
YITAHOME MAYIH0001203MA
YITAHOME 85 Quart Rolling Cooler Cart Instruction Manual
Model: MAYIH0001203MA
1. Introduction
Thank you for choosing the YITAHOME 85 Quart Rolling Cooler Cart. This manual provides essential information for the safe and efficient assembly, operation, and maintenance of your new cooler cart. Please read these instructions thoroughly before use and retain them for future reference.
This versatile cooler cart is designed for outdoor use, perfect for patios, decks, pool areas, and BBQ cookouts. It features an 85-quart (21-gallon) capacity, integrated bottle opener, drainage system, and lockable wheels for portability and stability.
2. Safety Information
Please observe the following safety precautions to prevent injury or damage to the product:
- Ensure all parts are present and undamaged before assembly. Do not attempt to assemble if any parts are missing or broken.
- Assemble the unit on a flat, stable surface to prevent tipping.
- Do not overload the cooler cart. Refer to specifications for maximum weight capacity.
- Always engage the wheel locks when the cart is stationary to prevent unintended movement.
- Keep children and pets away from the assembly area.
- Do not use abrasive cleaners or harsh chemicals on the resin material.
- Ensure the drain plug is securely closed when filling with ice and beverages to prevent leaks.
3. Parts List
Before beginning assembly, verify that all components listed below are included in your package. If any parts are missing or damaged, please contact YITAHOME customer service.
| Part | Description | Quantity |
|---|---|---|
| A | Side Panels | 2 |
| B | Front/Back Panels | 2 |
| C | Bottom Shelf Panels | 2 |
| D | Middle Shelf Panel | 1 |
| E | Top Frame | 1 |
| G | Screws (for bottle opener) | 4 |
| H | Lid Panels | 2 |
| I | Lid Hinges | 2 |
| J | Bottle Opener with Bin | 1 |
| K | Spice Rack | 1 |
| L | Handle Bracket (Left) | 1 |
| M | Hinge Screws (for lids) | 28 |
| N | Drain Plug Assembly | 1 |
| O | Handle Bar | 1 |
| P | Handle Bracket (Right) | 1 |
| Q | Casters (Lockable) | 2 |
| R | Casters (Non-Lockable) | 2 |
| S | Inner Cooler Liner | 1 |
| T | Small Screws (for hinges) | 8 |
| U | Drain Plug Cap | 1 |
4. Setup and Assembly
Follow these steps for proper assembly. A Phillips head screwdriver is required (not included).
- Assemble the Base Structure:
Connect the side panels (A) and front/back panels (B) by sliding them into place. Ensure the grooves align for a secure fit. The panels should click together. Repeat until the main rectangular frame is formed.

Image: The fully assembled YITAHOME 85 Quart Rolling Cooler Cart, showcasing its black resin construction and overall design.
- Install Shelves:
Insert the middle shelf panel (D) into the designated slots within the main frame. Then, install the two bottom shelf panels (C) into the lowest slots. Ensure they are firmly seated.
Video: A detailed assembly guide for the YITAHOME cooler cart, demonstrating the step-by-step process of connecting panels and installing shelves.
- Attach Top Frame and Casters:
Place the top frame (E) onto the assembled structure, ensuring it aligns with the top edges. Secure it by pressing down firmly. Turn the unit upside down and screw in the two lockable casters (Q) and two non-lockable casters (R) into the designated holes at the bottom corners.
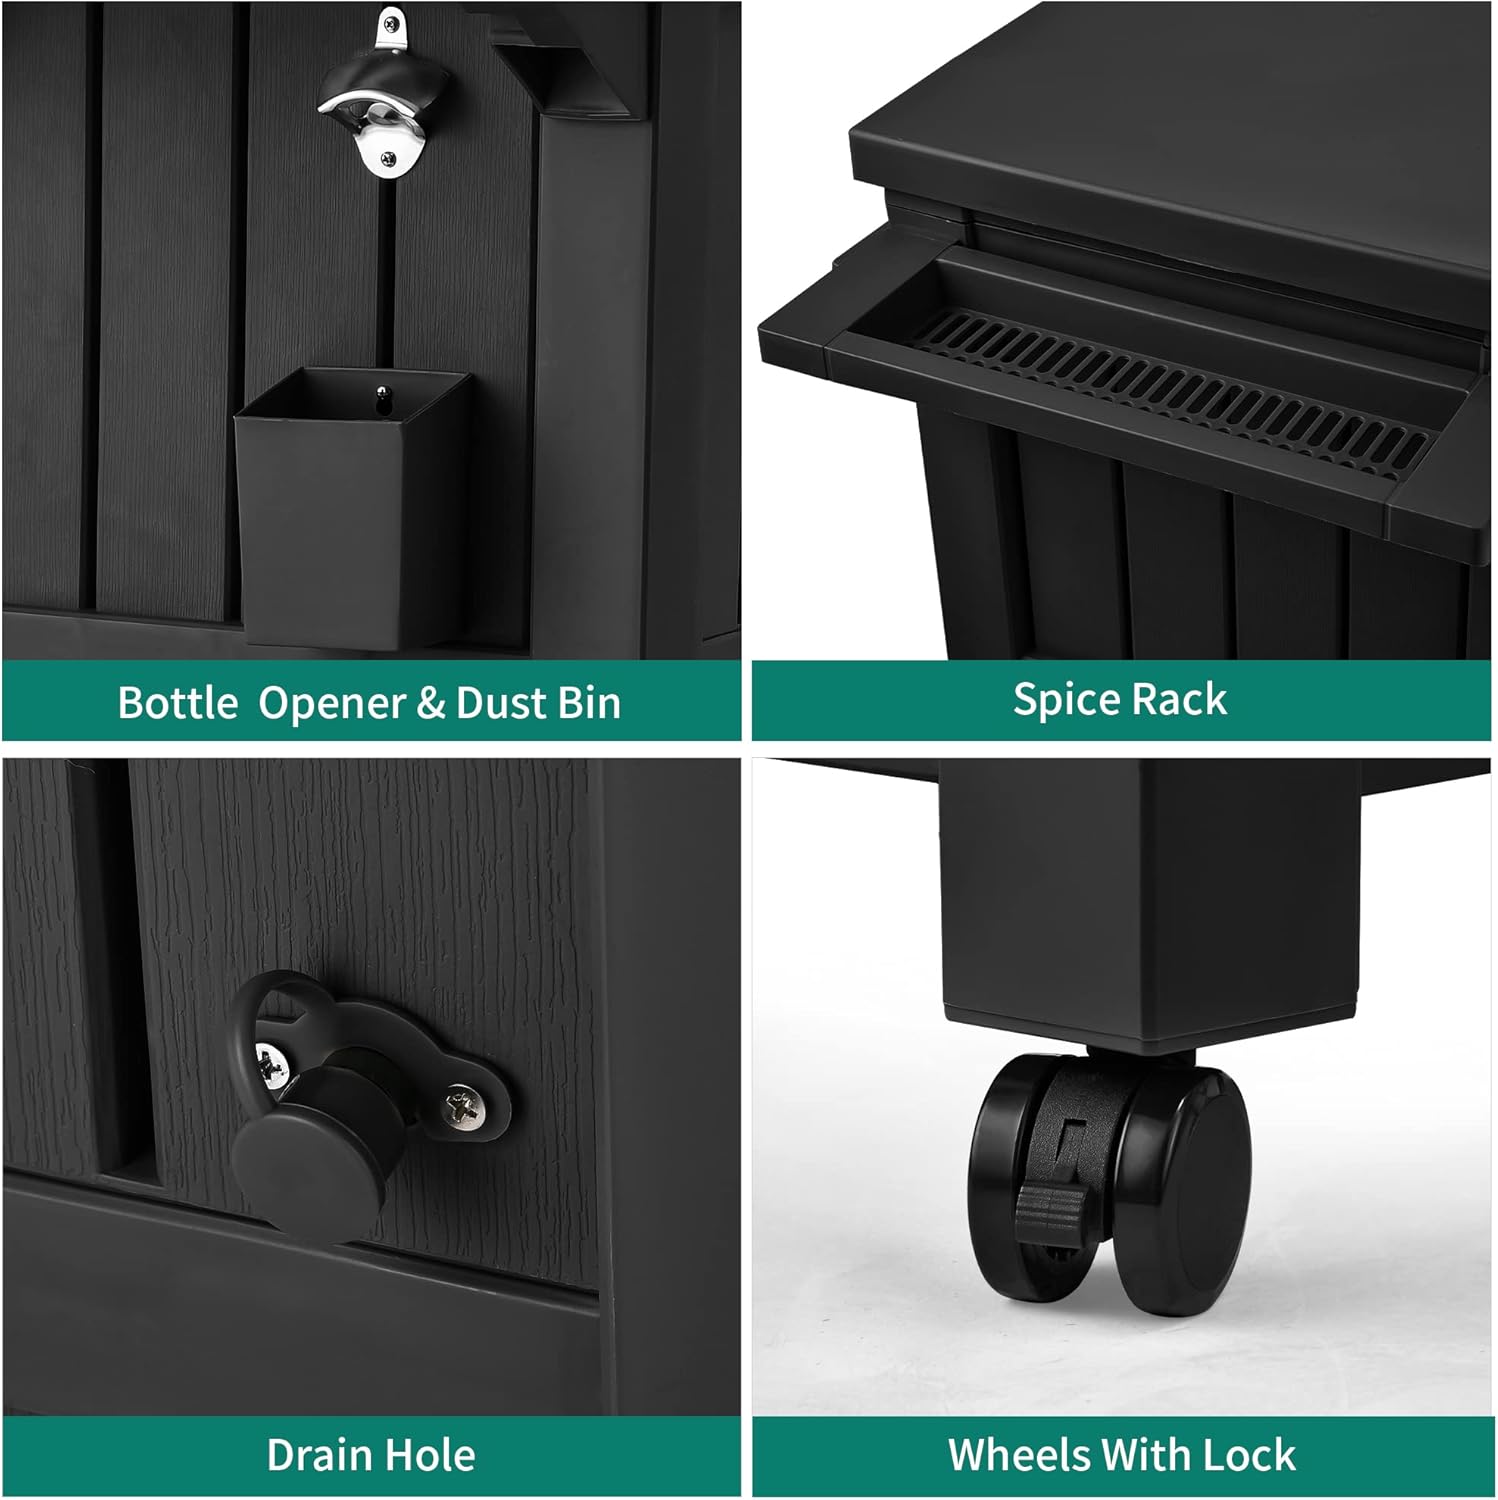
Image: Close-up view of the cooler cart's features, highlighting the integrated bottle opener, dust bin, drain hole, and the lockable wheels for stability.
- Install Accessories:
Attach the bottle opener with bin (J) to the side of the cart using screws (G). Install the spice rack (K) on the opposite side. Slide the handle bar (O) through the handle brackets (L and P) and secure them to the cart.
- Assemble and Install Lids:
Attach the lid hinges (I) to the lid panels (H) using the small screws (T). Then, attach the assembled lids to the top frame (E) using the hinge screws (M). Ensure the lids open and close smoothly.
- Insert Inner Cooler Liner:
Place the inner cooler liner (S) into the main compartment of the cart. Ensure it fits snugly and the drain hole in the liner aligns with the drain hole in the cart. Secure the drain plug cap (U) to the drain plug assembly (N) on the exterior of the cart.

Image: The YITAHOME cooler cart with its lids open, revealing the spacious interior with the cooler liner filled with ice and various beverages, ready for use.
5. Operating Instructions
- Filling the Cooler: Ensure the drain plug is securely closed. Place the inner cooler liner inside the main compartment. Fill with ice and your desired beverages or food items. The 85-quart capacity can hold up to 70 cans or 50 bottles.
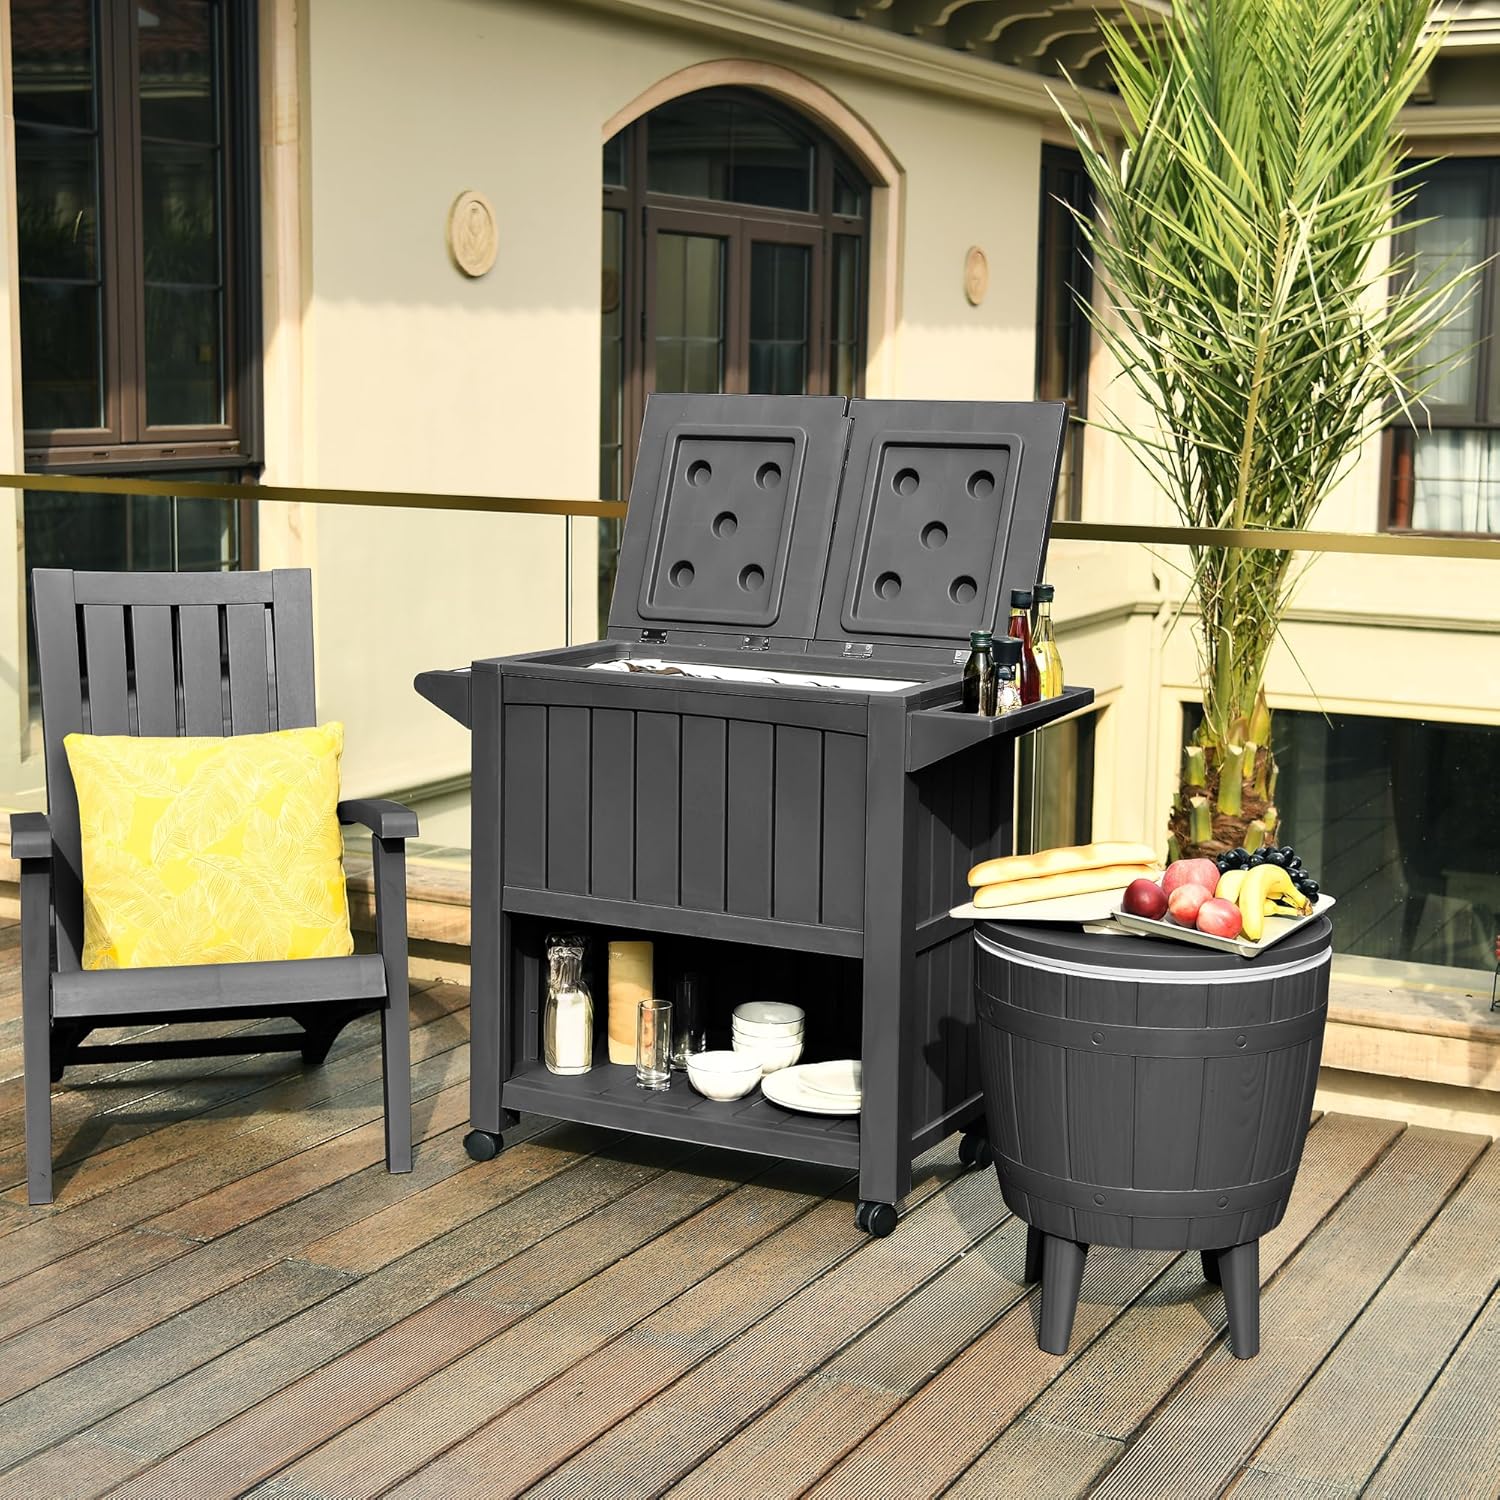
Image: A visual representation of the cooler cart's large capacity, indicating it can hold up to 70 cans or 50 bottles, with beverages chilling on ice.
- Mobility and Stability: To move the cart, disengage the wheel locks. Use the handle bar to push or pull the cart to your desired location. Once positioned, engage the wheel locks on the two lockable casters to ensure stability.
- Using the Bottle Opener: The integrated bottle opener allows for convenient opening of bottled beverages. The attached bin collects bottle caps for easy disposal.
- Using the Spice Rack: The side spice rack provides a convenient space for condiments, small utensils, or other accessories.
6. Maintenance
- Draining Water: After use, open the drain plug to release melted ice water. The PVC ice bag with drain holes allows for easy water replacement or drainage.
Video: A demonstration of the YITAHOME 85 Quart Rolling Cooler Cart in use, highlighting its features including the drainage system.
- Cleaning: Clean the cooler cart and inner liner with mild soap and water. Rinse thoroughly and allow to air dry completely before storage. Do not use abrasive brushes or harsh chemicals, as this may damage the resin material.
- Storage: Store the cooler cart in a cool, dry place when not in use, especially during off-seasons, to prolong its lifespan.
7. Troubleshooting
| Problem | Possible Cause | Solution |
|---|---|---|
| Water leaking from cooler. | Drain plug not securely closed or inner liner is damaged. | Ensure drain plug is tightly sealed. Inspect inner liner for tears or punctures; replace if necessary. |
| Wheels not locking. | Locking mechanism is not fully engaged or is obstructed. | Press down firmly on the locking lever until it clicks into place. Clear any debris from the wheel mechanism. |
| Lids do not close properly. | Hinges are misaligned or screws are loose. | Check hinge alignment and tighten all hinge screws. Ensure no items are obstructing the lid closure. |
| Cooler does not retain cold for long. | Lids are not fully closed, or ambient temperature is very high. | Ensure lids are completely closed. For prolonged cooling in high temperatures, pre-chill the cooler and use a higher ice-to-beverage ratio. |
8. Specifications
- Brand: YITAHOME
- Model: MAYIH0001203MA
- Capacity: 85 Quarts (approximately 21 Gallons)
- Dimensions (L x W x H): 31"D x 17"W x 33.8"H
- Material: Durable Resin
- Color: Black
- Item Weight: 33.1 Pounds
- Features: Rolling Casters (2 lockable), Built-in Bottle Opener, Drainage System, Bottom Storage Shelf, Spice Rack
9. Warranty and Support
YITAHOME products are designed for quality and durability. For warranty information, replacement parts, or technical support, please contact YITAHOME customer service directly. Please have your model number (MAYIH0001203MA) and purchase date available when contacting support.
For more information, visit the official YITAHOME Store: YITAHOME Store
Related documentsMAYIH0001203MA


Ask a question about this manual
Ask about setup, troubleshooting, compatibility, parts, safety, or missing instructions. Manuals+ will review the question and use this page’s manual context to help answer it.