Important Safety Instructions
When using electrical appliances, basic safety precautions should always be followed to reduce the risk of fire, electric shock, and/or injury, including the following:
- Read all instructions before using this appliance.
- Do not touch hot surfaces. Use handles or knobs.
- To protect against electrical shock, do not immerse cord, plugs, or appliance in water or other liquid.
- Close supervision is necessary when any appliance is used by or near children.
- Unplug from outlet when not in use and before cleaning. Allow to cool before putting on or taking off parts.
- Do not operate any appliance with a damaged cord or plug, or after the appliance malfunctions or has been damaged in any manner. Contact customer service for examination, repair, or adjustment.
- The use of accessory attachments not recommended by the appliance manufacturer may cause injuries.
- Do not use outdoors.
- Do not let cord hang over edge of table or counter, or touch hot surfaces.
- Do not place on or near a hot gas or electric burner, or in a heated oven.
- Extreme caution must be used when moving an appliance containing hot oil or other hot liquids.
- To disconnect, turn any control to 'off', then remove plug from wall outlet.
- Do not use appliance for other than intended use.
- Oversize foods or metal utensils must not be inserted in a toaster oven as they may create a fire or risk of electric shock.
- A fire may occur if the toaster oven is covered or touching flammable material, including curtains, draperies, walls, and the like, when in operation. Do not store any item on top of the appliance when in operation.
- Do not clean with metal scouring pads. Pieces can break off the pad and touch electrical parts, creating a risk of electric shock.
- Extreme caution should be exercised when using containers constructed of other than metal or glass.
- Do not store any materials, other than manufacturer's recommended accessories, in this oven when not in use.
- Do not place any of the following materials in the oven: paper, cardboard, plastic, or similar materials.
- Do not cover crumb tray or any part of the oven with metal foil. This will cause overheating of the oven.
- Always wear protective, insulated oven mitts when inserting or removing items from the hot oven.
Product Overview
The BLACK+DECKER Crisp 'N Bake Air Fryer Countertop Convection Toaster Oven is a versatile appliance designed for multiple cooking functions. Familiarize yourself with its components and controls before use.

Figure 1: Front view of the BLACK+DECKER Crisp 'N Bake Air Fryer Toaster Oven with the door slightly ajar, showing the air fry basket and bake pan inside.
Components:
- Oven Housing
- Glass Door
- Door Handle
- Control Panel
- Heating Elements (Top and Bottom)
- Removable Crumb Tray
Included Accessories:

Figure 2: The oven with its door open, displaying the included air fry basket, bake pan, and wire rack.
- Air Fry Basket: For air frying foods, allowing hot air to circulate evenly.
- Bake Pan: For baking, roasting, or collecting drips.
- Wire Rack: For toasting, baking, or broiling.
Control Panel:
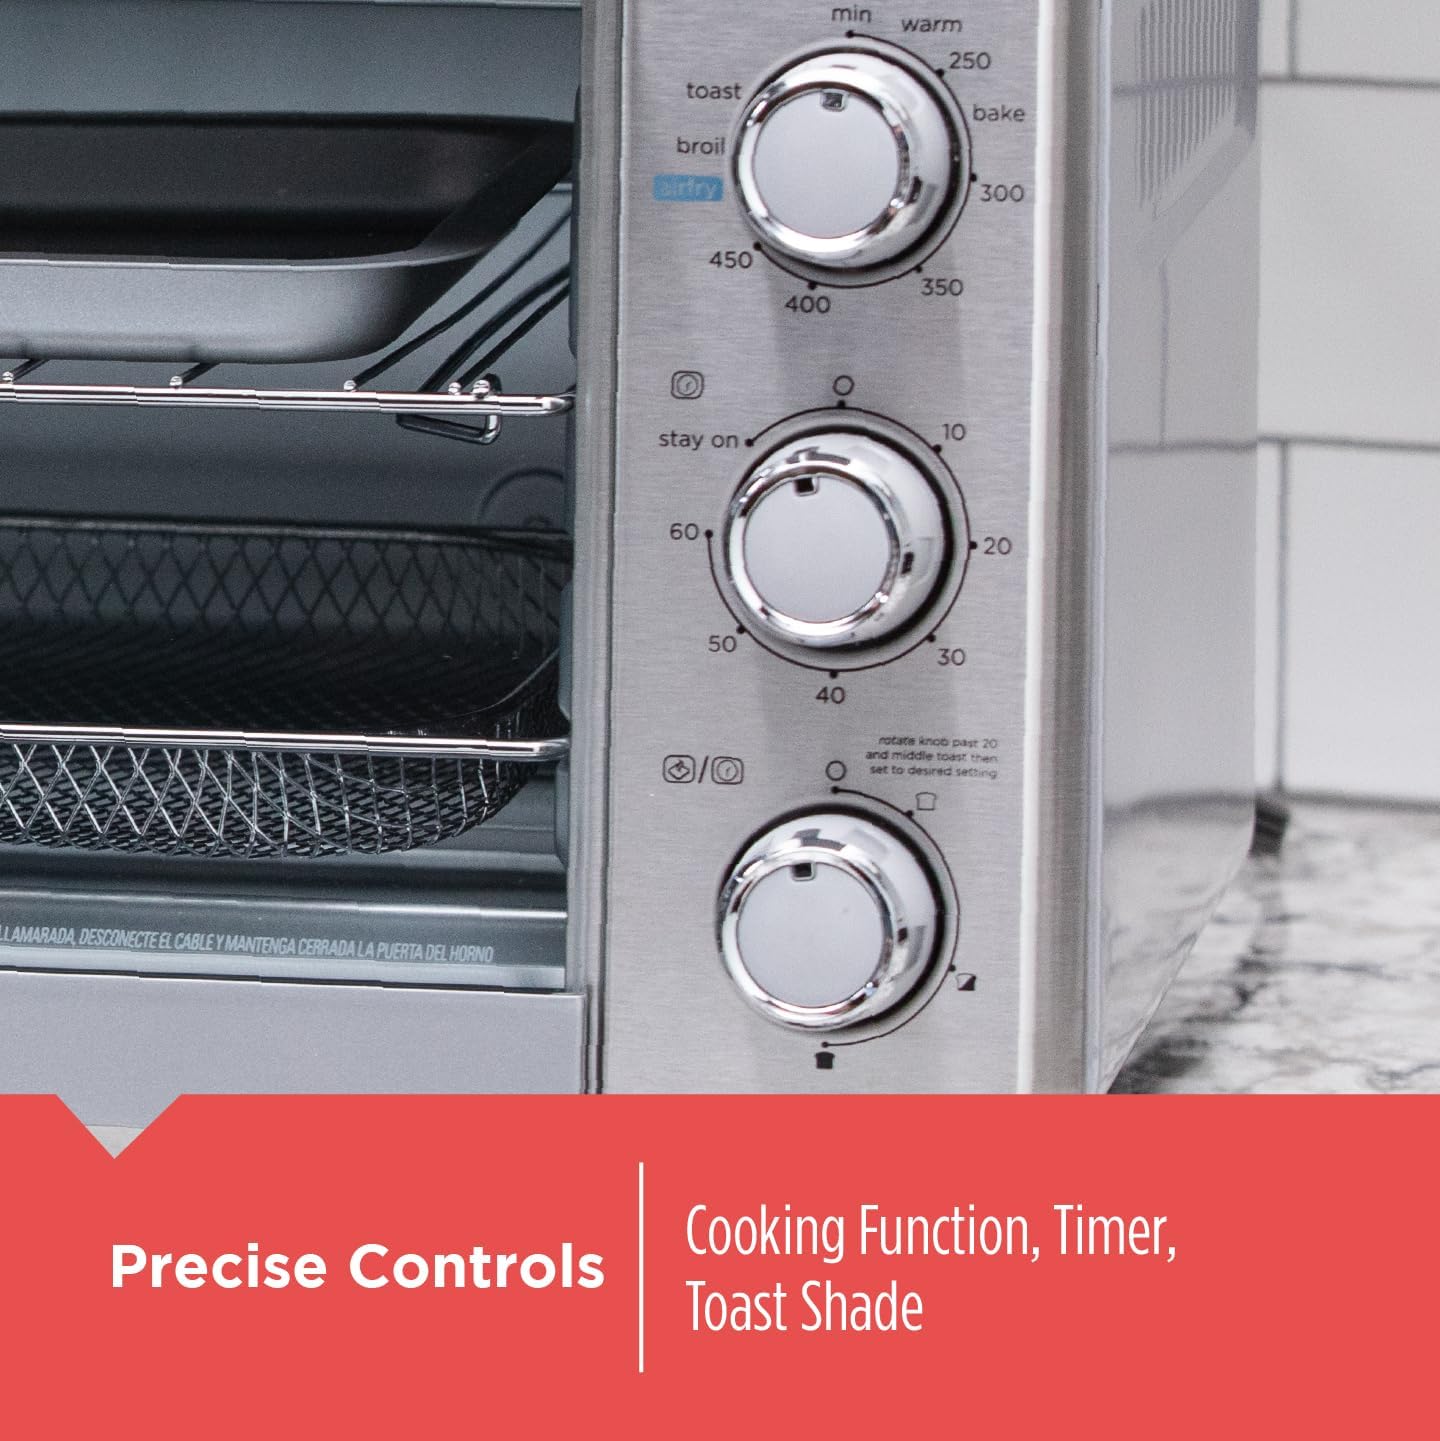
Figure 3: Close-up view of the three control knobs on the side of the oven, showing settings for cooking function, timer, and toast shade.
- Temperature/Function Knob: Selects cooking function (Air Fry, Bake, Broil, Toast, Keep Warm) and sets temperature (Warm to 450°F).

Figure 4: Detailed view of the temperature control knob, showing settings from Warm to 450°F (230°C).
- Timer Knob: Sets cooking time up to 60 minutes or selects 'Stay On' for continuous operation.

Figure 5: Detailed view of the timer control knob, with settings up to 60 minutes and a 'Stay On' option.
- Toast Shade Knob: Adjusts the desired darkness for toast.
Setup
- Unpacking: Remove all packaging materials, stickers, and any plastic bands from the oven.
- Initial Cleaning: Wash the air fry basket, bake pan, and wire rack in warm, soapy water. Rinse and dry thoroughly. Wipe the interior and exterior of the oven with a damp cloth.
- Placement: Place the oven on a stable, level, heat-resistant surface. Ensure there is at least 4 inches (10 cm) of space on all sides of the oven for proper ventilation. Do not place directly under cabinets.
- First Use Burn-Off: Before first use, operate the oven empty on the 'Bake' function at 400°F (200°C) for approximately 10-15 minutes. This will burn off any manufacturing residues and odors. A slight smoke or odor is normal during this process. Ensure the area is well-ventilated.
Operating Instructions
This appliance offers five primary cooking functions: Air Fry, Bake, Broil, Toast, and Keep Warm.
General Operation:
- Always preheat the oven for 5-10 minutes for optimal results, especially for baking and air frying.
- Use the appropriate rack position for your cooking needs.
- Always use oven mitts when handling hot accessories or food.
1. Air Fry Function:
Ideal for achieving crispy results with little to no oil.

Figure 6: The air fry basket filled with sliced sausage and bell peppers, being pulled out of the oven.
- Place food in the air fry basket, ensuring not to overcrowd. For best results, place the air fry basket on top of the bake pan to catch any drips.
- Insert the air fry basket and bake pan into the middle rack position.
- Turn the Temperature/Function knob to 'Air Fry' (450°F/230°C).
- Turn the Timer knob to the desired cooking time. The oven will begin to preheat and cook.
- Shake or flip food halfway through cooking for even crisping.
- When cooking is complete, the timer will ding. Carefully remove food.
2. Bake Function:
Suitable for cakes, cookies, casseroles, and other baked goods.

Figure 7: A 12-inch pepperoni pizza baking inside the oven, being removed with oven mitts.
- Place food in an oven-safe dish on the wire rack or directly on the bake pan.
- Insert the rack into the desired position (middle for most items, lower for taller items).
- Turn the Temperature/Function knob to 'Bake' and set the desired temperature.
- Turn the Timer knob to the desired cooking time. The oven will begin to preheat and cook.
- Monitor food for doneness. When cooking is complete, the timer will ding. Carefully remove food.
3. Broil Function:
For browning, melting, or cooking thin cuts of meat.
- Place food on the bake pan. For best results, use the wire rack on top of the bake pan to allow fat to drip.
- Insert the bake pan/rack into the top rack position for optimal browning.
- Turn the Temperature/Function knob to 'Broil'. The temperature is fixed for broiling.
- Turn the Timer knob to the desired cooking time. Broiling is typically a quick process, so monitor closely to prevent burning.
- When cooking is complete, the timer will ding. Carefully remove food.
4. Toast Function:
For toasting bread, bagels, and frozen waffles.
- Place items directly on the wire rack in the middle position.
- Turn the Temperature/Function knob to 'Toast'.
- Turn the Toast Shade knob to your desired darkness setting.
- Turn the Timer knob past 20 minutes, then back to the desired toast shade setting. The oven will begin to toast.
- The oven will automatically shut off and ding when toasting is complete.
5. Keep Warm Function:
Maintains food at a serving temperature without further cooking.
- Place cooked food in an oven-safe dish on the wire rack or bake pan.
- Insert the rack into the middle position.
- Turn the Temperature/Function knob to 'Warm'.
- Turn the Timer knob to the desired holding time, or to 'Stay On' for continuous warming.
- When warming is complete, turn the Timer knob to 'Off' if 'Stay On' was selected.
Maintenance and Cleaning
Regular cleaning ensures optimal performance and extends the life of your appliance.
Before Cleaning:
- Always unplug the oven from the electrical outlet and allow it to cool completely before cleaning.
Cleaning the Interior:
- Wipe the interior walls with a damp cloth and mild liquid soap solution. Do not use abrasive cleaners or metal scouring pads.
- For stubborn stains, a nylon scrubbing pad may be used.
- Clean the heating elements carefully with a damp cloth, ensuring they are completely cool. Do not scrub or immerse.
Cleaning the Exterior:
- Wipe the exterior surfaces with a damp cloth and dry thoroughly.
- Do not use abrasive cleaners or polishes that may scratch the stainless steel finish.
Cleaning Accessories:
- The air fry basket, bake pan, and wire rack can be washed in warm, soapy water. Rinse thoroughly and dry.
- The crumb tray should be removed and emptied regularly. Wash it in warm, soapy water, rinse, and dry before replacing.
Troubleshooting
Review these common issues and solutions before contacting customer service.
| Problem | Possible Cause | Solution |
|---|---|---|
| Oven does not turn on. | Not plugged in; power outage; timer not set. | Ensure oven is securely plugged into a working outlet. Check household circuit breaker. Ensure timer knob is set to a cooking time or 'Stay On'. |
| Food not cooking evenly. | Oven not preheated; food overcrowded; incorrect rack position. | Preheat oven before cooking. Do not overcrowd the basket/pan; cook in batches if necessary. Refer to recipe for recommended rack position. Rotate food halfway through cooking. |
| Excessive smoke during cooking. | Food with high fat content; food residue in oven; crumb tray not cleaned. | Use the bake pan under the air fry basket to catch drips. Clean the oven interior and crumb tray regularly. Ensure crumb tray is free of debris. |
| Toast is too light/dark. | Toast shade setting incorrect. | Adjust the Toast Shade knob to a lighter or darker setting for future use. |
Specifications

Figure 8: Front view of the oven on a countertop with dimensions indicated: 18 inches width and 11.2 inches height.
- Brand: BLACK+DECKER
- Model Name: Crisp 'N Bake Air Fryer Toaster Oven
- Model Number: AFTO2022
- Color: Stainless Steel
- Product Dimensions: 18"D x 16"W x 11.2"H
- Item Weight: 14.46 pounds
- Power Source: Electric
- Control Type: Knob Control
- Temperature Range: 200-450 Degrees Fahrenheit
- Timer: 60-Minute with Stay-On function
- Capacity: Fits 6 slices of toast or a 12-inch pizza
- Special Features: Adjustable Rack, Broiler Option, Large Capacity, Temperature Control, Timer
- Included Components: Air Fry Basket, Bake Pan, Wire Rack
Warranty and Support
For warranty information or product support, please refer to the warranty card included with your purchase or visit the official BLACK+DECKER website. You may also contact customer service directly for assistance with product operation, parts, or service inquiries.
Customer Service Contact: Please refer to your product packaging or the manufacturer's official website for the most current contact information.