1. Introduction and Overview
The ECO-WORTHY 12A Boost MPPT Solar Charge Controller is designed to efficiently charge various battery types, including 48V, 60V, and 72V Lead-Acid, LiFePO4, Gel, and Flooded batteries, using 12V or 24V solar panels. This controller is ideal for applications such as golf carts, electric vehicles, and solar system kits, eliminating the need for additional solar panels or complex wiring changes.
Key Features:
- Boost Charging: Boosts the voltage of 12V or 24V solar panels to charge 48V/60V/72V batteries.
- Multi-Battery Compatibility: Supports Lead-acid, Lithium, GEL, and Flooded batteries.
- High MPPT Efficiency: Achieves up to 95% charging efficiency and 93% conversion efficiency.
- Multiple Protection Functions: Includes protection against overcharge, reverse current, overheat, and reverse wiring.
- LED Digital Display: Provides visual display of charging current and voltage for easy monitoring.

Figure 1.1: The ECO-WORTHY 12A Boost MPPT Solar Charge Controller. This compact device efficiently manages solar power for various battery systems.
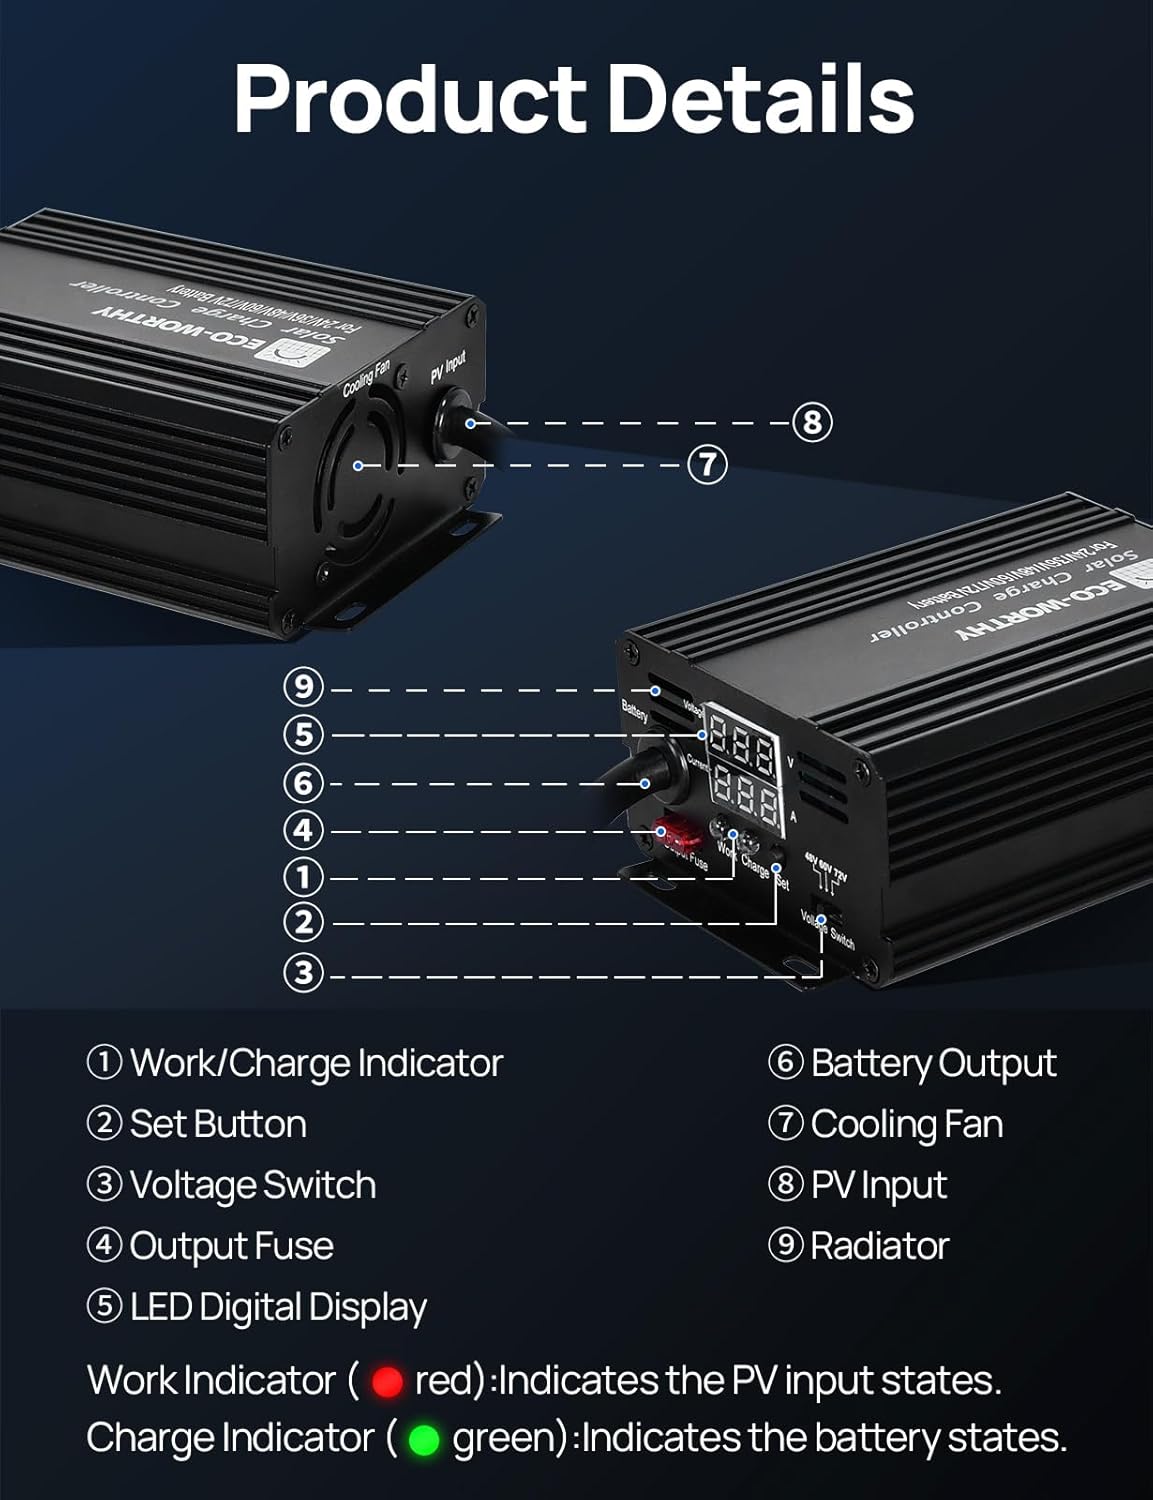
Figure 1.2: Detailed view of the controller's components, including the Work/Charge Indicator, Set Button, Voltage Switch, Output Fuse, LED Digital Display, Battery Output, Cooling Fan, PV Input, and Radiator.
2. Setup Instructions
Proper setup is crucial for the safe and efficient operation of your ECO-WORTHY solar charge controller. Please follow these steps carefully:
- Connect the Solar Panel First: Contrary to some traditional charge controllers, it is recommended to connect the solar panel to the controller's PV input first. This allows the controller to power on and display its settings. Ensure the solar panel's open circuit voltage (VOC) is within the controller's specified input range (DC 13-50V).
- Set Up the Controller:
- Use the Voltage Switch to select the appropriate voltage gear (48V, 60V, or 72V) that matches your battery system.
- To adjust the charging voltage for LiFePO4 batteries or fine-tune settings:
- Long press the "SET" button for 5 seconds to enter the battery voltage setting mode. The display will start flashing.
- Short press the "SET" button to add 0.1V each time. Long press "SET" to add 1.0V each time.
- Once setup is done, leave it for 5 seconds, and the number will be auto-saved.
- Connect the Battery: After configuring the controller, connect your battery to the controller's battery output terminals. Ensure correct polarity (positive to positive, negative to negative).
Recommended wiring gauge for solar panel input is 11AWG-8AWG, and for battery output is 11AWG.
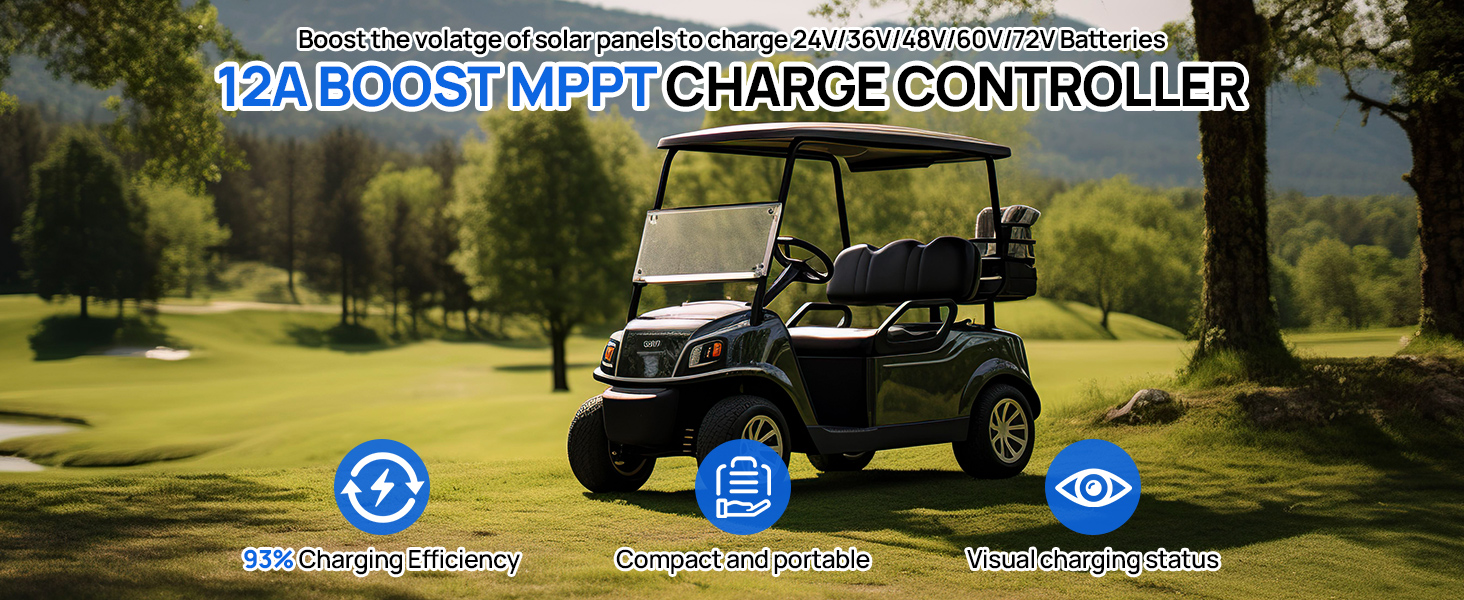
Figure 2.1: Visual guide for connecting the controller. Connect solar panel first, then set voltage, then connect the battery.
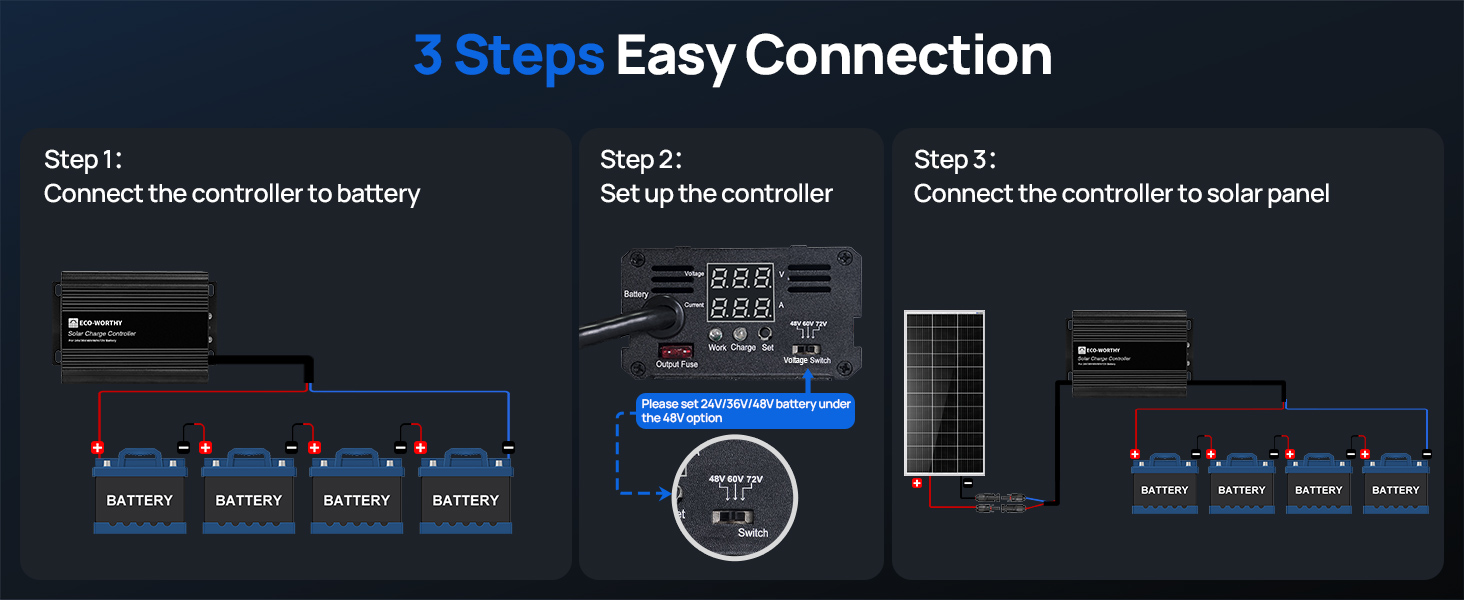
Figure 2.2: Table detailing recommended charging voltages for LiFePO4 batteries across different voltage gears.
3. Operating the Controller
Once properly installed, the ECO-WORTHY charge controller operates automatically. The LED digital display provides real-time information about your system's status.
LED Display Information:
- Main Display: Shows Battery Voltage and PV Input Current.
- Secondary Display: Shows PV Input Current and Controller Temperature (°C).
- To switch between main and secondary displays, short press the "SET" button. The display will auto-return to the main display after 3 seconds of inactivity.
Indicator Lights:
- Work Indicator (Red): Indicates the PV input states.
- Off: No Battery / PV Input Voltage < 16V
- On: PV Input Voltage > 16V
- Charge Indicator (Green): Indicates the battery states.
- Off: PV Input Voltage < 4V
- On: 4V < PV Input Voltage < 16V
- Flashing: PV Input Voltage > 16V / Fully Charged
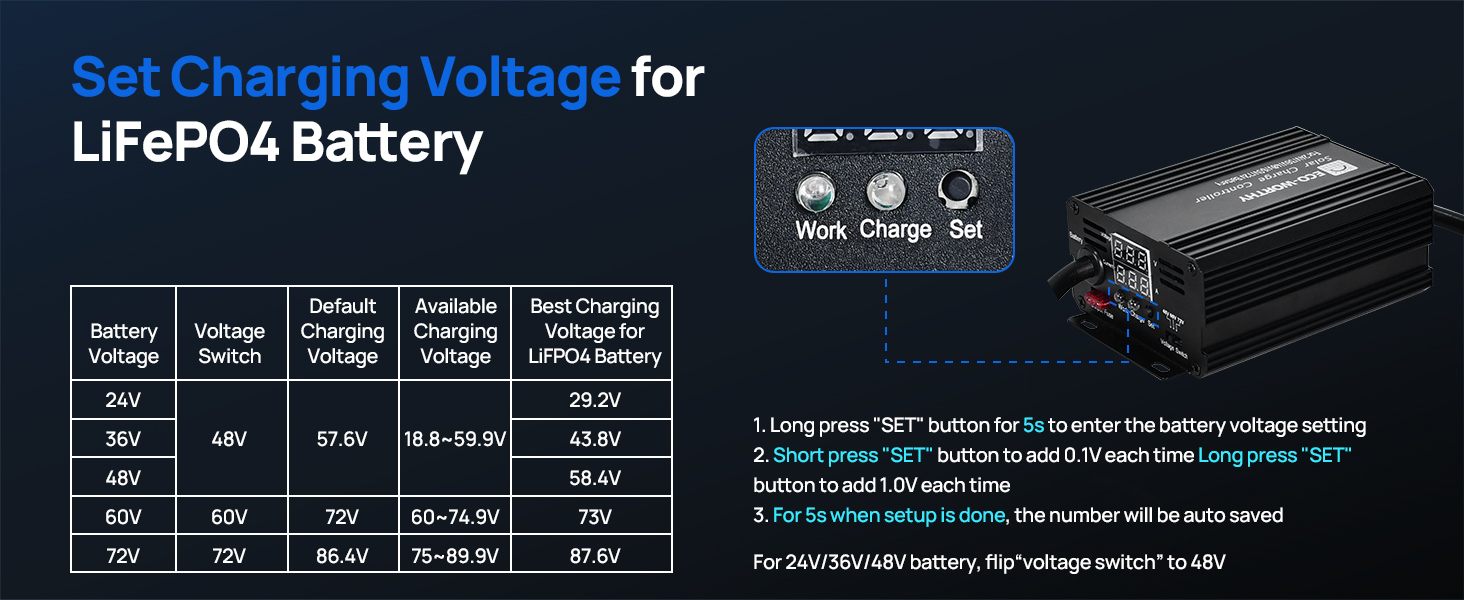
Figure 3.1: The clear LED display allows users to easily switch between viewing battery voltage, PV input current, and controller temperature.
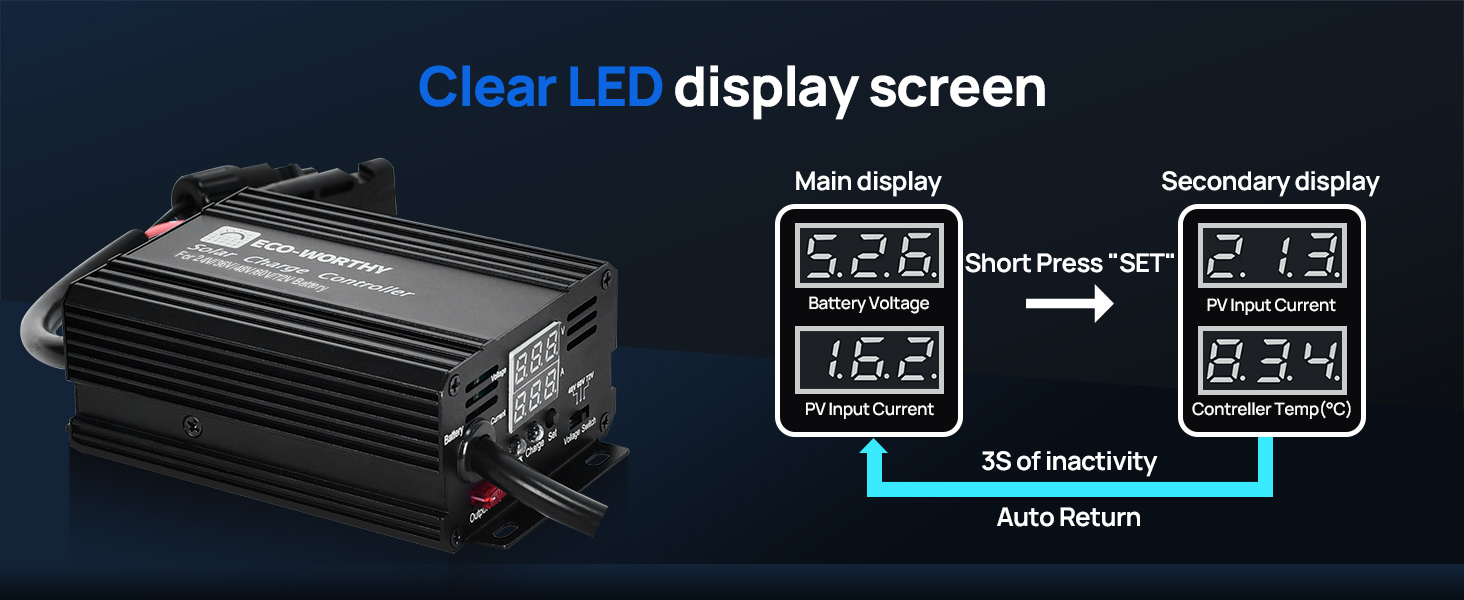
Figure 3.2: Understanding the red Work Indicator and green Charge Indicator helps in quickly assessing the controller's status and battery charge level.
4. Maintenance
The ECO-WORTHY 12A Boost MPPT Solar Charge Controller is designed for durability and minimal maintenance. However, regular checks can ensure optimal performance and longevity.
- Cleaning: Periodically clean the exterior of the controller with a dry, soft cloth to remove dust and debris. Ensure the cooling fins are free from obstructions to allow for proper heat dissipation.
- Connections: Routinely inspect all wiring connections to ensure they are secure and free from corrosion. Loose connections can lead to inefficient charging or potential hazards.
- Cooling Fan: The controller features a smart cooling fan that automatically activates when the internal temperature reaches 131°F (55°C) to prevent overheating. Ensure the fan's intake and exhaust vents are clear.
- Protection Features: The controller is equipped with multiple protection functions including overcharge, reverse current, overheating, and reverse wiring protection. These features operate automatically to safeguard your system.
- Power Source: The controller is designed to draw power directly from the solar panel, not from the battery, ensuring no battery power consumption when solar input is available.
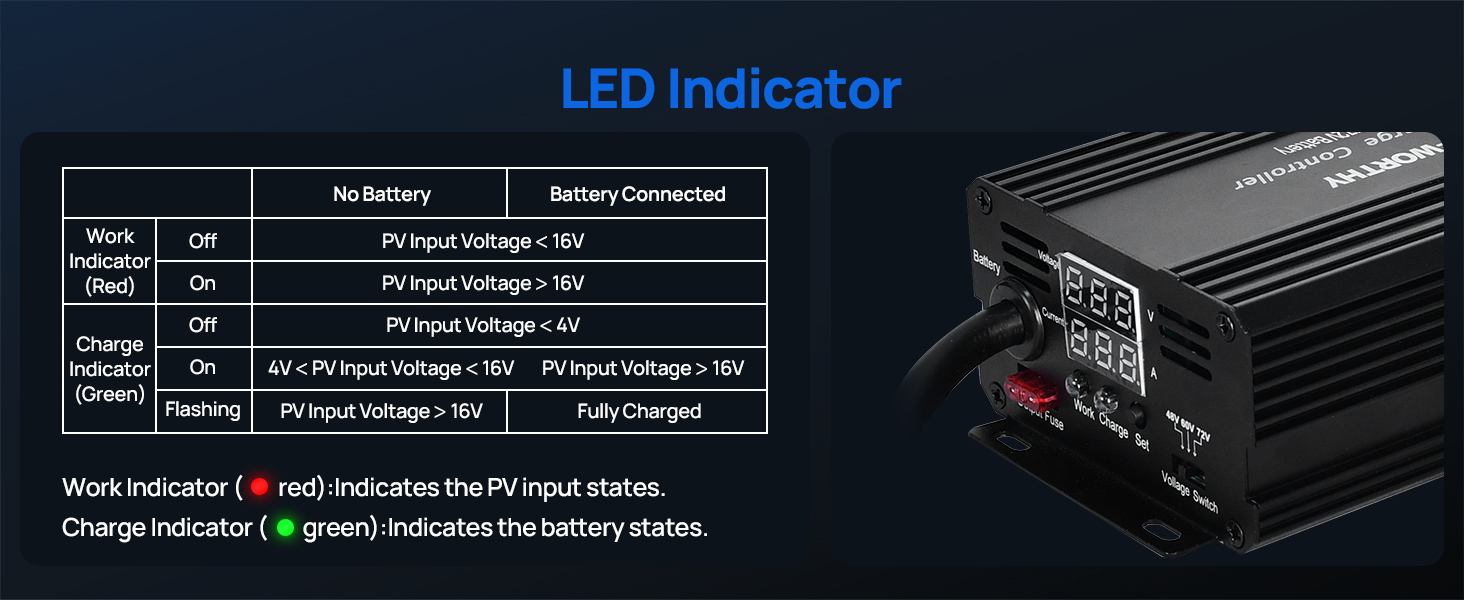
Figure 4.1: The robust design with a smart cooling fan and high-hardness pure aluminum shell ensures stable output and long-term reliability.
5. Troubleshooting
If you encounter issues with your ECO-WORTHY solar charge controller, refer to the following common troubleshooting tips:
- Controller Not Powering On / No Display:
- Ensure the solar panel is connected first and receiving sufficient sunlight. The controller draws power from the solar panel to operate its display.
- Check the PV input voltage to ensure it is above 13V.
- Verify all connections are secure and correct polarity is maintained.
- Battery Not Charging:
- Confirm the solar panel is producing power and connected correctly.
- Check the battery connections and ensure they are secure and have correct polarity.
- Verify that the selected voltage gear on the controller matches your battery's voltage.
- If charging a LiFePO4 battery, ensure the charging voltage is set correctly as per the manual's recommendations (refer to Figure 2.2).
- Check the output fuse on the controller. If blown, replace it with a fuse of the same rating.
- Overcharge Protection Activating:
- The controller has built-in overcharge protection. If the battery reaches its full charge voltage, the controller will stop charging. This is normal operation.
- Ensure your battery's recommended charging voltage is correctly set on the controller to prevent premature cut-off or overcharging.
- Overheat Protection:
- If the controller becomes excessively hot, the smart cooling fan will activate. If the temperature continues to rise, the controller may reduce output or shut down to prevent damage.
- Ensure adequate ventilation around the controller and that the cooling fan is not obstructed.
6. Specifications
| Feature | Specification |
|---|---|
| Brand | ECO-WORTHY |
| Model | 12A Boost MPPT Solar Charge Controller |
| Display Type | LED |
| Charging Port Type | MC4 |
| Max Capable Solar Panel Input Power | 216W/12V, 432W/24V |
| Supported Battery Voltages | 48V/60V/72V (Lead-Acid, LiFePO4, Gel, Flooded) |
| Charging Efficiency | Up to 95% (MPPT) |
| Conversion Efficiency | Up to 93% |
| Protection Functions | Overcharge, Reverse Current, Overheat, Reverse Wiring |
| Product Dimensions | 5.2 x 3.4 x 2 inches |
| Item Weight | 13.3 ounces |
| Color | Black |
7. Warranty and Support
ECO-WORTHY stands behind the quality of its products. For specific warranty details and terms, please refer to the official product documentation or contact ECO-WORTHY customer support directly.
If you require further assistance, technical support, or have questions not covered in this manual, please visit the official ECO-WORTHY website or contact their customer service team. You can also refer to the User Manual (PDF) for additional information.