1. Introduction
This manual provides detailed instructions for the proper setup, operation, and maintenance of your U.S. Solid Digital Analytical Balance, Model JFDBS00059. This high-precision lab scale is designed for accurate measurements up to 2kg with a readability of 0.01g, suitable for various industrial, laboratory, agricultural, and medical applications. Please read this manual thoroughly before using the device to ensure optimal performance and safety.
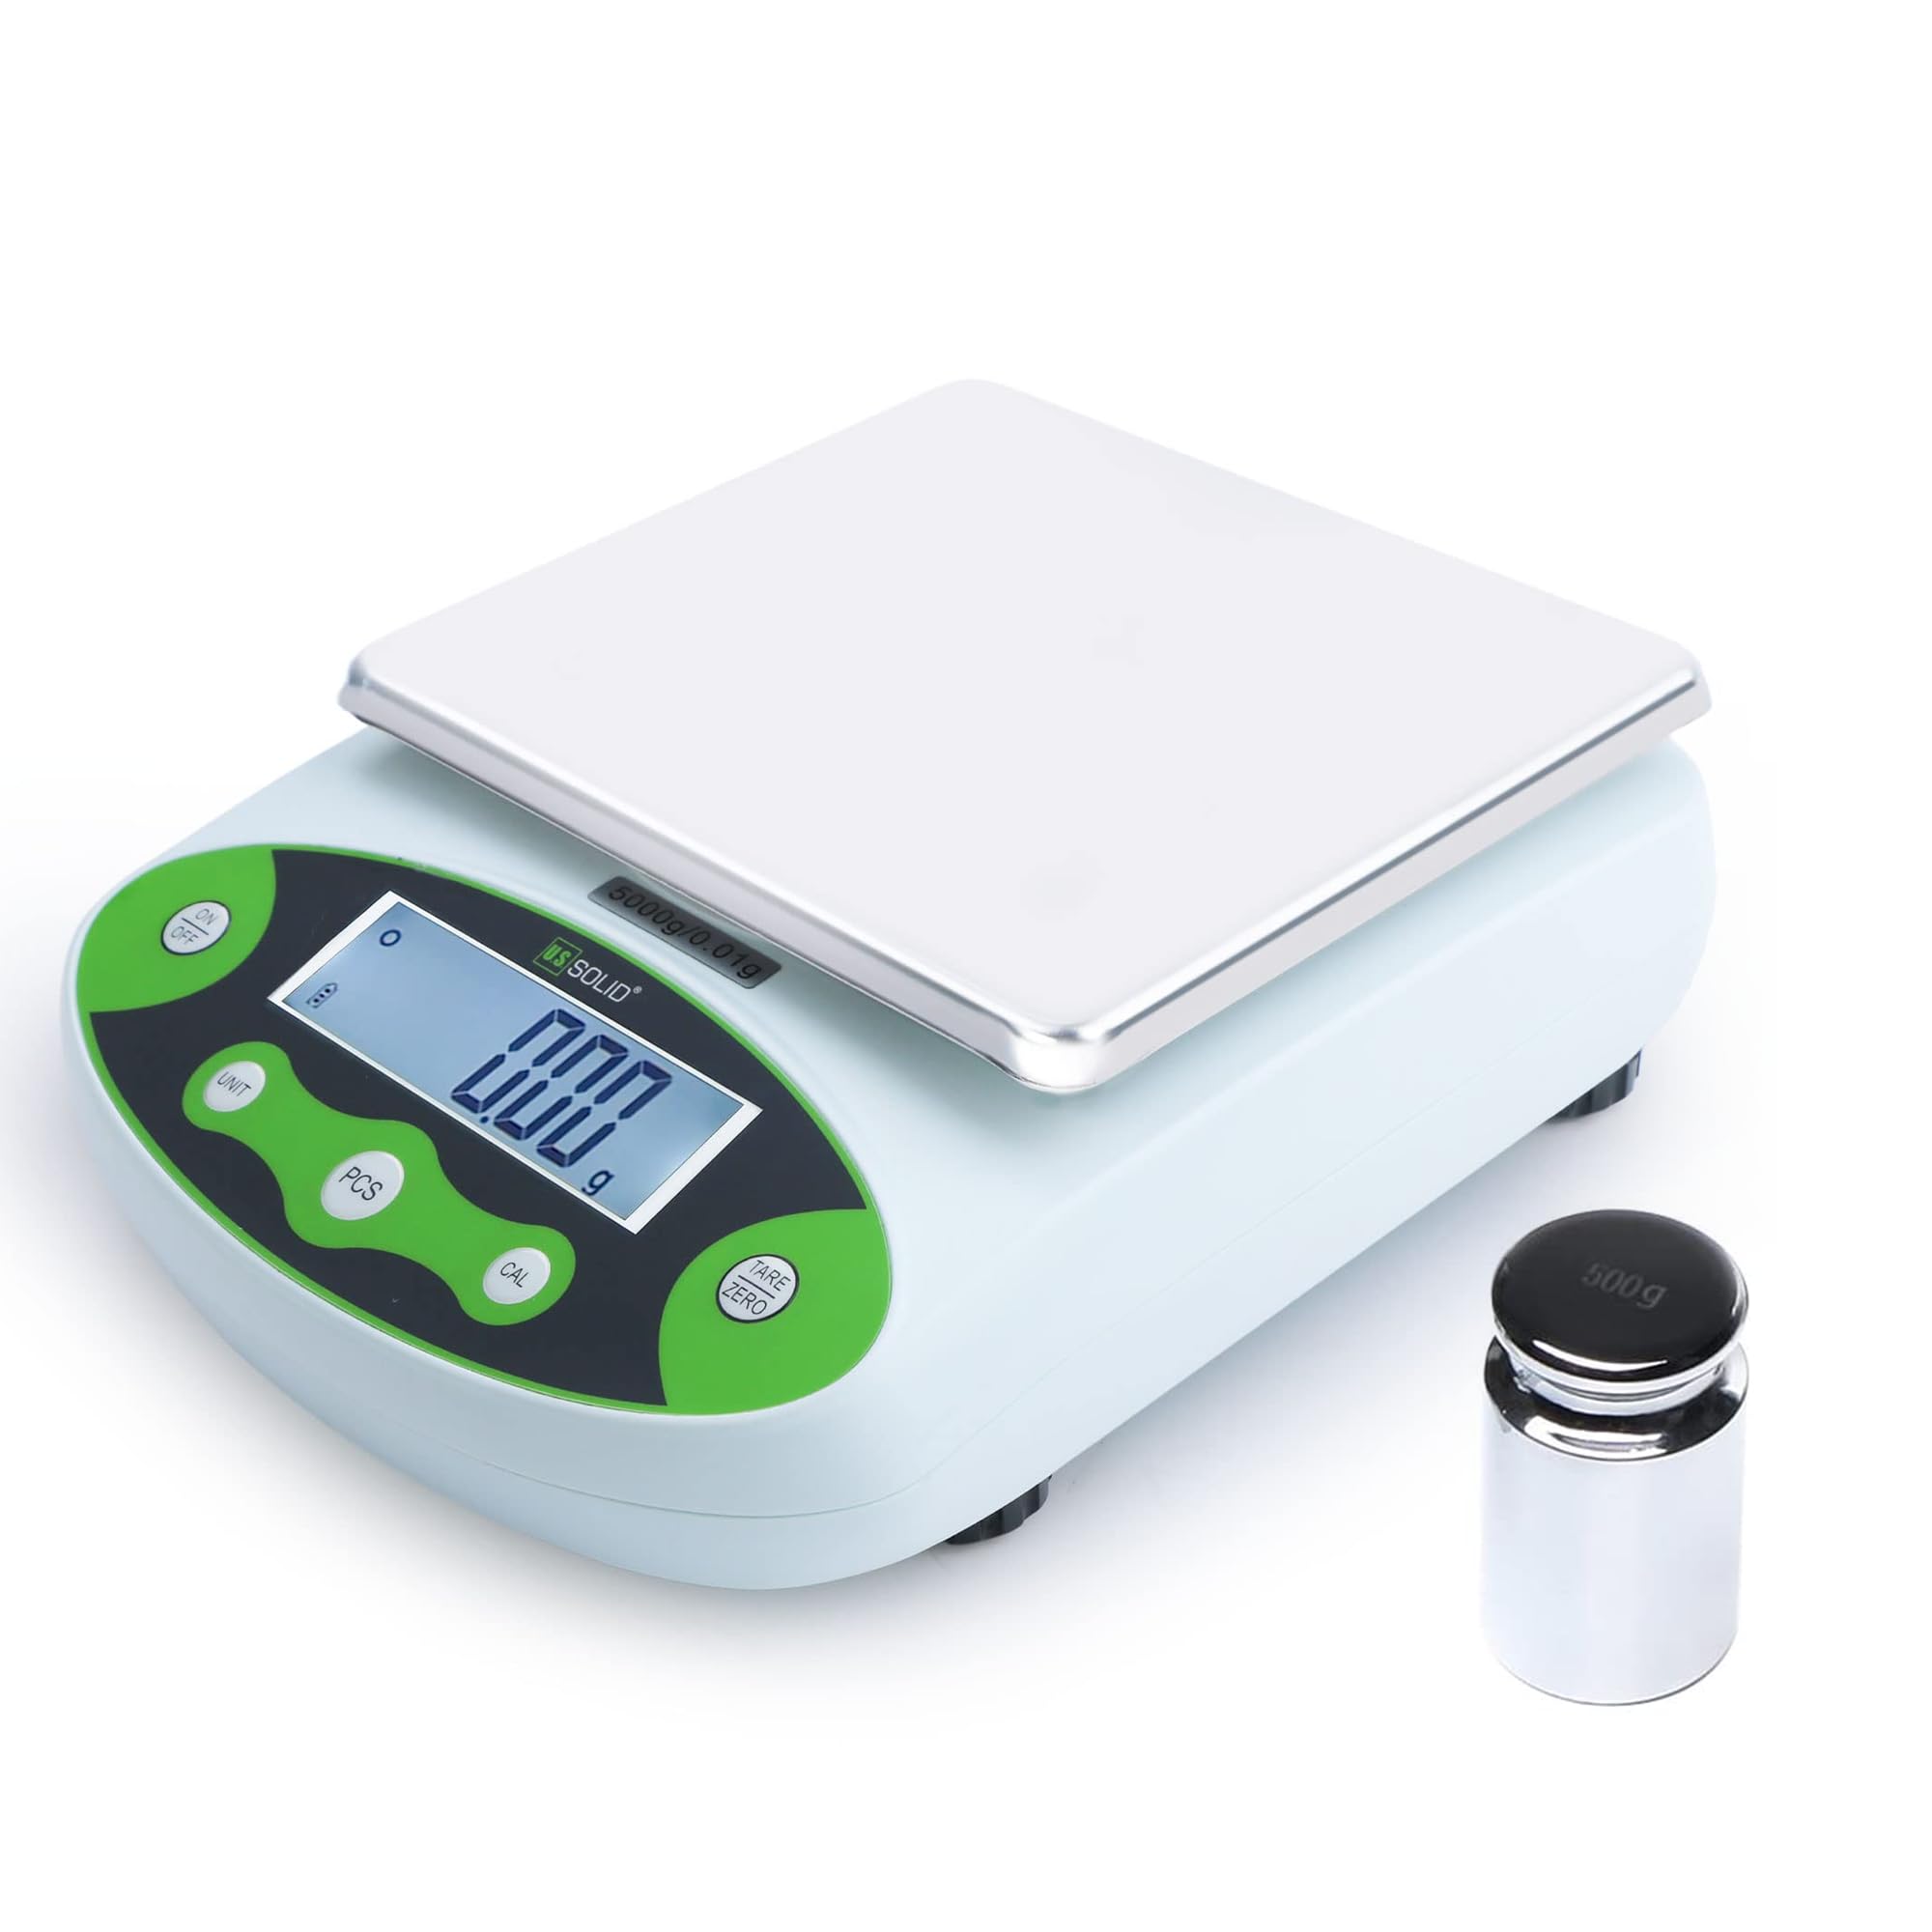
Figure 1: Front view of the U.S. Solid Digital Analytical Balance.
2. Safety Information
Observe the following safety precautions to prevent injury and ensure the longevity of your balance:
- Place the balance on a stable, level, and vibration-free surface.
- Avoid exposing the balance to direct sunlight, extreme temperatures, or drafts.
- Do not overload the balance beyond its maximum capacity of 2kg.
- Keep the balance away from strong electromagnetic fields.
- Use only the provided power adapter or a compatible 9V DC battery.
- Do not attempt to disassemble or repair the balance yourself. Contact qualified personnel for service.
- Keep liquids away from the balance to prevent electrical shock or damage.
3. Package Contents
Verify that all items are present and undamaged upon unpacking:
- U.S. Solid Digital Analytical Balance (Main Unit)
- Stainless Steel Weighing Pan
- Weighing Pan Support
- AC Power Adapter (100-240V)
- 500g Calibration Weight (for specific models, check your order)
- User Manual

Figure 2: Included components: balance, weighing pan, pan support, and power adapter.
4. Product Overview
4.1 Key Features
- Wide Measurement Range: Capacity up to 2kg with 0.01g accuracy.
- High Quality Material: Durable ABS housing and stainless steel rectangular pan.
- Dual Powering Modes: Operates with 100-240VAC power or 9VDC battery.
- Simplified 5-Button Operation: Intuitive control for various functions.
- Built-in Applications: Weighing, parts counting, percentage function, tare, units conversion, fault display, manual calibration.
- Display: LCD with backlight for clear readability.
- Leveling: Equipped with a level bubble and adjustable leveling feet.

Figure 3: Overview of key features including housing, pan, leveling, feet, display, units, functions, and power.
4.2 Control Panel and Display
The balance features a clear LCD with backlight and a user-friendly 5-button control panel:
- ON/OFF: Powers the device on or off.
- UNIT: Cycles through available weighing units.
- PCS (Piece Counting): Activates the piece counting function.
- CAL (Calibration): Initiates the calibration process.
- TARE/ZERO: Zeros the display or tares the current weight.

Figure 4: Control panel layout with button descriptions.
5. Setup
5.1 Installing the Weighing Pan
- Carefully remove the balance and all components from the packaging.
- Place the weighing pan support onto the central pillar of the balance. Ensure it is seated correctly and securely.
- Place the stainless steel weighing pan on top of the pan support.
Video 1: Demonstrates the installation of the weighing pan and support onto the balance.
5.2 Leveling the Balance
Accurate measurements require the balance to be perfectly level. Use the adjustable feet and the built-in level bubble:
- Locate the level bubble, typically found near the display or on the side of the balance.
- Adjust the four leveling feet at the bottom of the balance by turning them clockwise or counter-clockwise until the air bubble is centered within the circle.

Figure 5: Detail of the level bubble and adjustable feet for horizontal adjustment.
5.3 Power Connection
The balance can be powered by either an AC adapter or a 9V DC battery:
- AC Power: Connect the provided AC adapter to the power input port on the back of the balance and then plug it into a standard 100-240V AC outlet.
- Battery Power: For portable use, open the battery compartment on the underside of the balance and insert a 9V DC battery.
5.4 Warm-up Time
For optimal accuracy, allow the balance to warm up for at least 30 minutes after connecting power or if it has been off for an extended period. This stabilizes the internal components for precise measurements.

Figure 6: Important considerations for balance setup and accuracy.
6. Operating Instructions
6.1 Basic Weighing
- Press the ON/OFF button to turn on the balance.
- Ensure the display shows "0.00g" before placing any item on the pan. If not, press the TARE/ZERO button.
- Place the item to be weighed gently on the center of the weighing pan.
- Read the stable weight displayed on the LCD.
6.2 Unit Selection
The balance supports 10 different weighing units. To change the unit:
- Press the UNIT button repeatedly to cycle through the available units: g (grams), ct (carats), oz (ounces), ozt (troy ounces), lb (pounds), TOL (tola), dwt (pennyweights), MM (momme), kg (kilograms), and % (percentage).
- The selected unit will be displayed next to the weight value.

Figure 7: Available measuring units on the balance.
Video 2: Demonstrates how to select different weighing units on the balance.
6.3 Tare Function
The tare function allows you to subtract the weight of a container, so only the net weight of the contents is measured.
- Place the empty container on the weighing pan.
- Wait for the display to stabilize.
- Press the TARE/ZERO button. The display will return to "0.00g".
- Add the items to be weighed into the container. The display will show only the weight of the items.
6.4 Calibration
Calibration ensures the accuracy of your balance. It is recommended to calibrate the balance regularly or if it has been moved.
6.4.1 Standard Calibration
- Ensure the balance is on a stable surface and the pan is empty.
- Press and hold the CAL button until "CAL" appears on the display, then release.
- The display will show the required calibration weight (e.g., "2000.00g" for a 2kg balance).
- Carefully place the specified calibration weight (e.g., 2kg) onto the center of the weighing pan.
- Wait for the balance to stabilize and display "PASS" or return to normal weighing mode. Remove the weight.
Video 3: Demonstrates the standard calibration process using a single calibration weight.
6.4.2 Linear Calibration
Linear calibration uses multiple weights to ensure accuracy across the entire weighing range.
- Ensure the balance is on a stable surface and the pan is empty.
- Press and hold the CAL button for a longer duration than standard calibration until "CAL" appears, then release. The display may show a sequence of calibration points.
- Follow the on-screen prompts to place the specified calibration weights in sequence (e.g., 200g, 400g, 1000g, 2000g).
- Place each weight carefully and wait for the balance to stabilize before proceeding to the next step or removing the weight as instructed.
- Once all points are calibrated, the balance will return to normal weighing mode.
Video 4: Demonstrates the linear calibration process using multiple calibration weights.
6.5 Piece Counting Function
This function allows you to count a large number of identical items by weight.
- Place a sample quantity of items (e.g., 10, 20, 50, 100, 200, or 500 pieces) on the pan.
- Press and hold the PCS button until the display shows "PCS" and a number (e.g., "10 PCS").
- Use the UNIT button to select the sample quantity that matches the number of items you placed on the pan.
- Press the PCS button again to confirm. The balance is now in counting mode.
- Add more items to the pan, and the display will show the total count.

Figure 8: Piece counting function with selectable sample sizes.
Video 5: Demonstrates how to use the piece counting function.
6.6 Percentage Function
The percentage function allows you to measure the weight of an item as a percentage of a reference weight.
- Place the reference item (100% weight) on the pan.
- Press the UNIT button repeatedly until "%" is displayed. The current weight will be set as 100%.
- Remove the reference item. The display will show 0%.
- Place other items on the pan, and their weight will be displayed as a percentage of the reference weight.
Video 6: Demonstrates how to use the percentage weighing function.
7. Specifications
| Feature | Specification |
|---|---|
| Brand | U.S. Solid |
| Model | JFDBS00059 |
| Weight Capacity Maximum | 2000 Grams (2kg) |
| Readout Accuracy | 0.01 Grams |
| Display Type | LCD with Backlight |
| Power Supply | AC 100-240V or DC 9V Battery |
| Material Type | Stainless Steel (Pan), ABS (Housing) |
| Measurement Units | g, ct, oz, ozt, lb, TOL, dwt, MM, kg, % |
| Special Features | Backlit Display, Fault Display, Manual Calibration, Overload Protection, Percentage Function, Piece Counting Function, Unit Conversion |
| Item Weight | 500 Grams (approximate, unit only) |
| Dimensions (approximate) | 7.8" (W) x 10.2" (D) x 3.1" (H) |
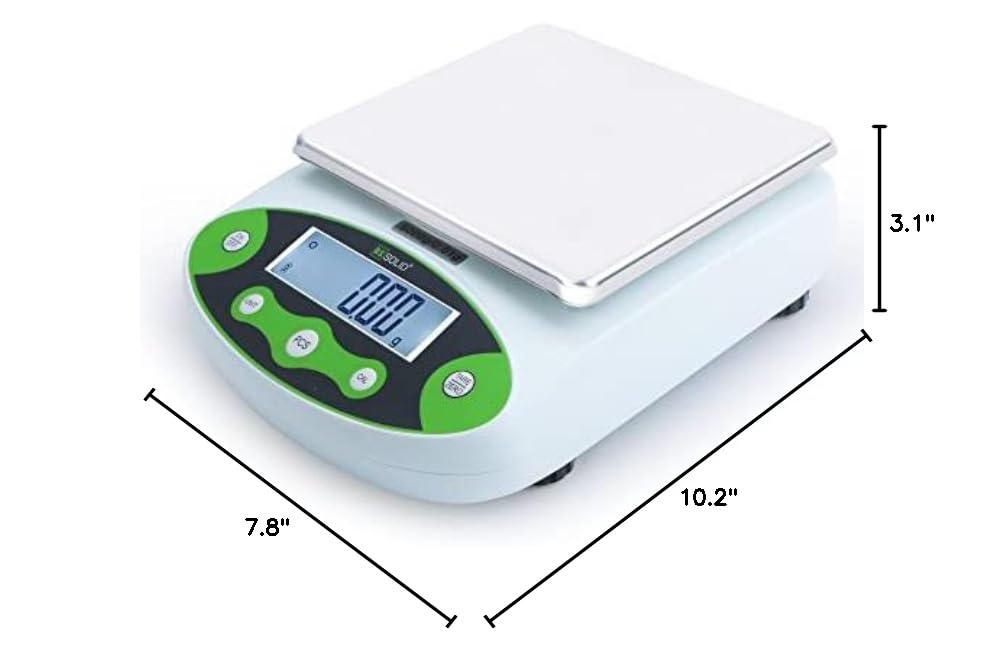
Figure 9: Approximate dimensions of the balance.
8. Maintenance
Proper maintenance ensures the longevity and accuracy of your balance:
- Cleaning: Wipe the balance and weighing pan with a soft, damp cloth. Do not use abrasive cleaners, solvents, or immerse the unit in water.
- Storage: When not in use for extended periods, store the balance in a dry, dust-free environment. Remove the battery if storing for a long time to prevent leakage.
- Calibration: Regular calibration is crucial. Refer to Section 6.4 for calibration procedures.
- Inspection: Periodically check for any signs of damage or wear.
9. Troubleshooting
If you encounter issues with your balance, refer to the following common problems and solutions:
| Problem | Possible Cause | Solution |
|---|---|---|
| Display shows "Err" or unstable readings | Overload, unstable surface, strong drafts, electromagnetic interference, or internal error. | Remove excess weight. Ensure balance is on a stable, level surface away from drafts and interference. Recalibrate the balance. If the problem persists, contact support. |
| Balance does not turn on | No power, dead battery, or faulty power adapter. | Check AC adapter connection and power outlet. Replace the 9V battery if using battery power. |
| Inaccurate readings | Not calibrated, not leveled, warm-up time insufficient, or environmental factors. | Perform calibration (Section 6.4). Ensure the balance is level (Section 5.2). Allow sufficient warm-up time (Section 5.4). Avoid drafts and temperature changes. |
| Piece counting is incorrect | Incorrect sample quantity set, or items are not uniform in weight. | Ensure the sample quantity selected matches the number of items placed on the pan. Use identical items for counting. |
10. Warranty and Support
For technical assistance, warranty claims, or further inquiries regarding your U.S. Solid Digital Analytical Balance, please contact the seller or U.S. Solid customer support.
Seller: The highest quality shop
Protection Plans: Additional protection plans may be available for purchase, offering extended coverage beyond the standard warranty. Please refer to your purchase documentation for details on available 2-Year or 3-Year protection plans, or monthly Complete Protect options.
Always refer to your original purchase receipt and product packaging for specific warranty terms and contact information.