GOLDEN BLUE M108
M108 Mini Digital Multimeter User Manual
Model: M108 | Brand: GOLDEN BLUE
1. Introduction
The GOLDEN BLUE M108 Mini Digital Multimeter is a compact, portable, and versatile tool designed for electrical testing. It features 4000 counts display, non-contact AC/DC current and voltage testing, resistance, capacitance, frequency, diode, and continuity measurements. Its intelligent recognition function simplifies operation, making it suitable for both professionals and DIY enthusiasts. The device is equipped with a backlit LCD screen, flashlight, and a durable silicone protective casing.
2. Safety Information
Always observe basic safety precautions when using this multimeter to avoid personal injury or damage to the meter or equipment under test. Read and understand all instructions before use.
- Do not exceed the maximum input value specified for each range.
- Exercise extreme caution when working with voltages above 36V DC or 25V AC RMS. These voltages pose a shock hazard.
- Disconnect power to the circuit and discharge all high-voltage capacitors before testing resistance, continuity, diodes, or capacitance.
- Always use the correct terminals, function, and range for your measurement.
- Do not use the meter if it appears damaged or if the test leads are damaged.
- Ensure the battery cover is securely closed before operation.
- Do not operate the meter in explosive gas, vapor, or dust environments.
3. Product Overview
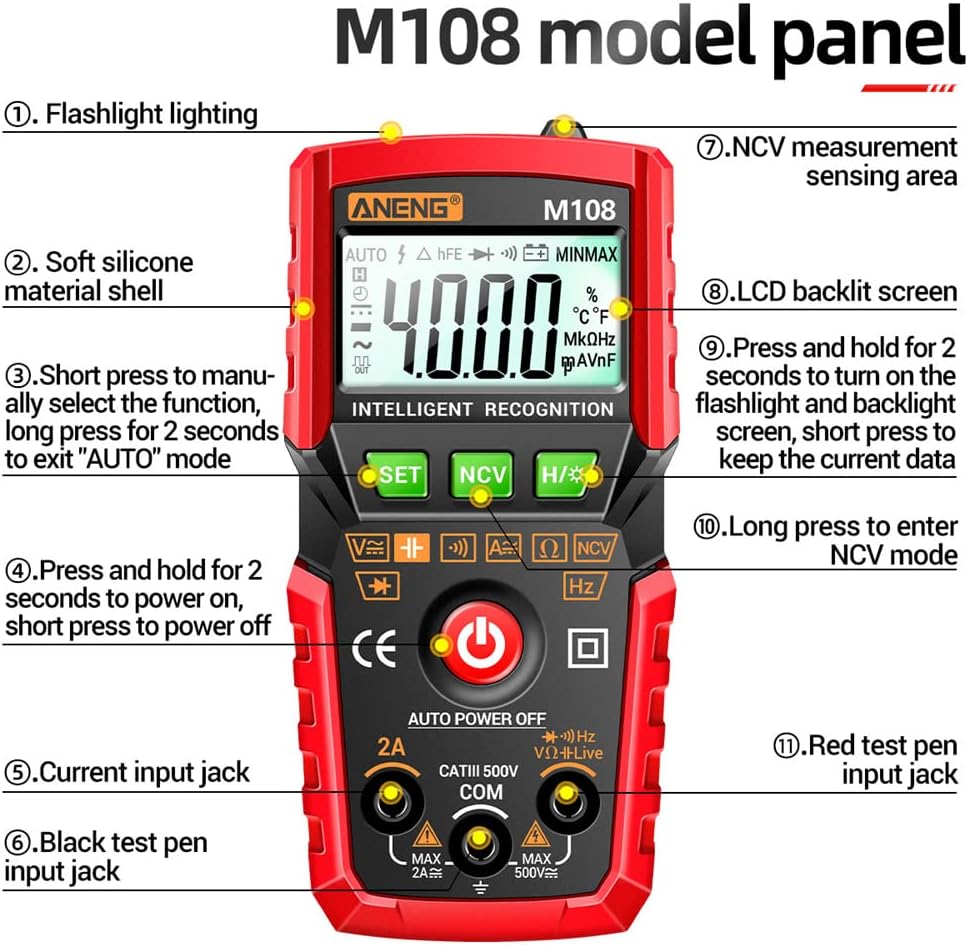
A detailed diagram of the M108 Multimeter's front panel, labeling its various buttons, display areas, and input jacks for easy identification.
- Flashlight lighting
- Soft silicone material shell
- SET button: Short press to manually select function, long press for 2 seconds to exit "AUTO" mode.
- Power button: Press and hold for 2 seconds to power on, short press to power off.
- Current input jack (2A MAX)
- Black test pen input jack (COM)
- NCV measurement sensing area
- LCD backlit screen
- H/* button: Press and hold for 2 seconds to turn on the flashlight and backlight screen, short press to keep the current data (Data Hold).
- NCV button: Long press to enter NCV mode.
- Red test pen input jack (MAX 500V)

Front view of the M108 Mini Digital Multimeter, showcasing its LCD display, function buttons, and input jacks.

Close-up of the M108 Multimeter's durable anti-drop silicone shell, designed to protect the device from impacts.
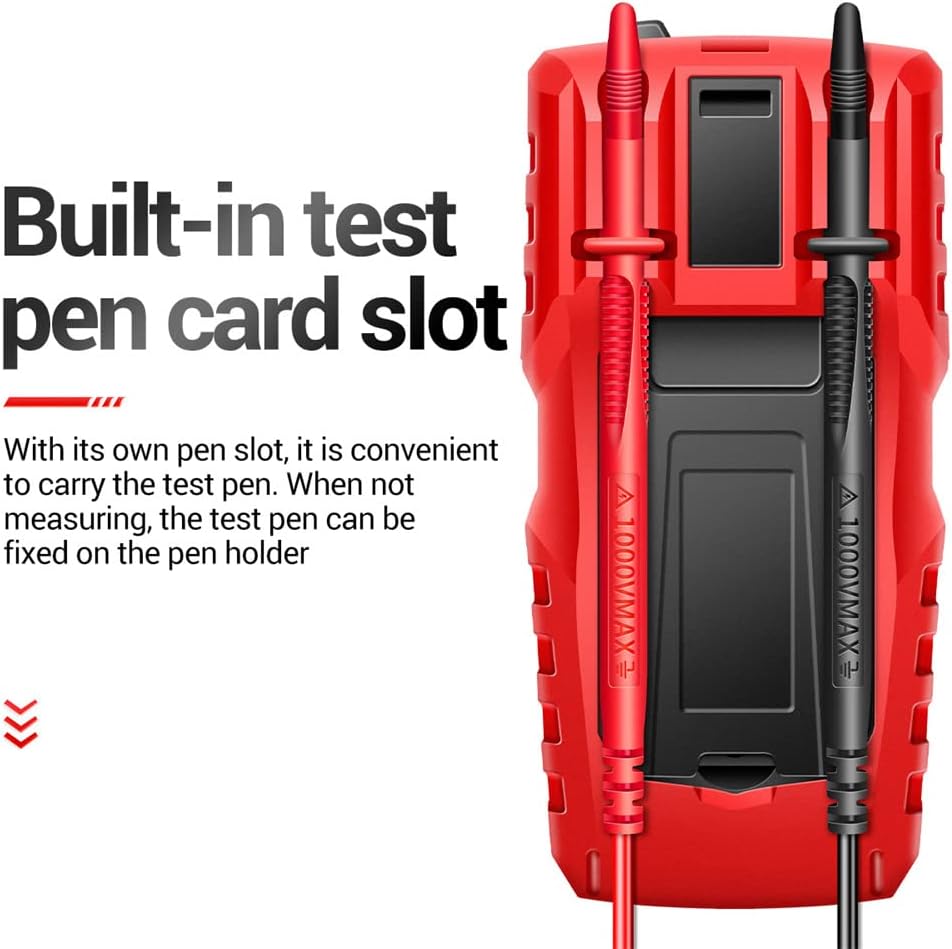
The back of the M108 Multimeter, illustrating the convenient built-in slot for storing test leads when not in use.
4. Setup
4.1 Battery Installation
The M108 Multimeter requires 2 X AAA batteries (not included) for operation.
- Ensure the multimeter is powered off.
- Locate the battery compartment on the back of the device.
- Use a screwdriver to open the battery compartment cover.
- Insert 2 AAA batteries, observing the correct polarity (+ and -) as indicated inside the compartment.
- Replace the battery compartment cover and secure it with the screw.
4.2 Connecting Test Leads
Insert the black test lead into the 'COM' (common) input jack. Insert the red test lead into the 'VΩHz' input jack for voltage, resistance, frequency, capacitance, diode, and continuity measurements. For current measurements up to 2A, insert the red test lead into the '2A' input jack.
5. Operating Instructions
5.1 Power On/Off
To power on the multimeter, press and hold the red power button for 2 seconds. To power off, short press the red power button.
5.2 Function Selection
The M108 features intelligent recognition (AUTO mode) which automatically identifies the measurement type (AC/DC voltage, resistance, continuity). To manually select a function, short press the 'SET' button. Long press 'SET' for 2 seconds to return to AUTO mode.
5.3 AC/DC Voltage Measurement
- Connect the black test lead to the 'COM' jack and the red test lead to the 'VΩHz' jack.
- Select Voltage mode (or let AUTO mode detect).
- Connect the test leads in parallel to the circuit or component to be measured.
- Read the voltage value on the display.
5.4 AC/DC Current Measurement
Caution: Never connect the multimeter in parallel to a voltage source when measuring current, as this can damage the meter and circuit.
- Connect the black test lead to the 'COM' jack and the red test lead to the '2A' jack.
- Select Current mode.
- Disconnect power to the circuit. Open the circuit where you want to measure current.
- Connect the multimeter in series with the circuit.
- Apply power to the circuit and read the current value.
5.5 Resistance Measurement
- Connect the black test lead to 'COM' and the red test lead to 'VΩHz'.
- Select Resistance mode (or let AUTO mode detect).
- Ensure the circuit is de-energized and all capacitors are discharged.
- Connect the test leads across the component to be measured.
- Read the resistance value.
5.6 Capacitance Measurement (M108 Specific)
- Connect the black test lead to 'COM' and the red test lead to 'VΩHz'.
- Select Capacitance mode.
- Ensure the capacitor is fully discharged before connecting the test leads.
- Connect the test leads across the capacitor.
- Read the capacitance value.
5.7 Frequency Measurement (M108 Specific)
- Connect the black test lead to 'COM' and the red test lead to 'VΩHz'.
- Select Frequency mode.
- Connect the test leads to the signal source.
- Read the frequency value.
5.8 Diode Test (M108 Specific)
- Connect the black test lead to 'COM' and the red test lead to 'VΩHz'.
- Select Diode mode.
- Connect the red test lead to the anode and the black test lead to the cathode of the diode.
- Read the forward voltage drop. Reverse the leads to check for open circuit (OL).
5.9 Continuity Test
- Connect the black test lead to 'COM' and the red test lead to 'VΩHz'.
- Select Continuity mode.
- Ensure the circuit is de-energized.
- Connect the test leads across the circuit or component. A continuous beep indicates continuity (low resistance).
5.10 NCV (Non-Contact Voltage) Measurement

The M108 Multimeter detecting non-contact induced voltage, highlighting its NCV capability for safety.
The NCV function allows for non-contact detection of AC voltage, useful for identifying live wires without direct contact.
- Long press the 'NCV' button to enter NCV mode.
- Move the front end of the multimeter (NCV sensing area) close to the object being tested (e.g., a wire, outlet).
- If AC voltage is detected, the meter will emit an alarm buzzer and the NCV indicator will light up.
5.11 Data Retention (Data Hold)
During any measurement, short press the 'H/*' button to hold the current reading on the display. Press it again to release the data hold function.
5.12 Flashlight and Backlight

The M108 Multimeter with its screen backlight illuminated and the built-in flashlight active, useful for low-light conditions.
Long press the 'H/*' button for 2 seconds to turn on both the flashlight and the screen backlight. This is useful for working in dimly lit environments. Long press again to turn them off.
5.13 Automatic Shutdown
The multimeter will automatically shut down after approximately 15 minutes of inactivity to conserve battery life. To reactivate, press the power button.
6. Maintenance
6.1 Cleaning
Wipe the case with a damp cloth and mild detergent. Do not use abrasives or solvents. Keep the terminals free of dirt and moisture.
6.2 Battery Replacement
When the battery indicator appears on the display, replace the batteries promptly to ensure accurate readings. Refer to section 4.1 for battery installation instructions.
6.3 Storage
If the meter is not to be used for a long period, remove the batteries to prevent leakage and damage to the device. Store the multimeter in a cool, dry place away from direct sunlight.
7. Troubleshooting
- No Display / Meter Does Not Turn On: Check battery installation and ensure batteries are not depleted. Replace if necessary.
- "OL" (Overload) Displayed: The measured value exceeds the selected range. Switch to a higher range or ensure the input is within the meter's maximum capabilities.
- Inaccurate Readings: Check battery level. Ensure test leads are properly connected and not damaged. Verify the correct function and range are selected. Clean test lead tips and input jacks.
- No Continuity Beep: Ensure the circuit is de-energized. Check if the resistance is too high for continuity detection.
- NCV Not Detecting: Ensure the NCV button is long-pressed to activate the mode. The sensing area must be close to the AC voltage source.
8. Specifications

A comprehensive table outlining the technical specifications and measurement capabilities of the M108 Multimeter, including ranges, resolutions, and accuracies for various functions.

Technical drawing showing the precise dimensions of the M108 Multimeter in millimeters and inches.
| Parameter | Value |
|---|---|
| Material | ABS + Silicone |
| Dimensions | 120.3 x 57.3 x 37.4 mm (4.73 x 2.25 x 1.47 inches) |
| Power Supply | 2 x AAA batteries (not included) |
| Maximum Display | 4000 counts |
| Screen Display | LCD backlit screen |
| Automatic Shutdown | After 15 minutes of inactivity |
| AC Voltage Range | 0-500V |
| DC Voltage Range | 0-500V |
| AC Current Range | 0mA-2A |
| DC Current Range | 0mA-2A |
| Resistance Range | 0-20.00MΩ |
| Capacitance Range | 0nF-40mF |
| Hz Frequency Range | 0-4MHz |
| Diode Test | Yes |
| Continuity Detection | Yes |
| Data Retention | Yes |
| NCV | Yes |
| Torch Lighting | Yes |
9. Warranty and Support
This GOLDEN BLUE M108 Mini Digital Multimeter is covered by a standard manufacturer's warranty against defects in materials and workmanship. For specific warranty terms and conditions, please refer to the product packaging or contact your point of purchase.
For technical support, troubleshooting assistance, or warranty claims, please contact GOLDEN BLUE customer service through the retailer where you purchased the product or visit the official GOLDEN BLUE website for contact information.
Ask a question about this manual
Ask about setup, troubleshooting, compatibility, parts, safety, or missing instructions. Manuals+ will review the question and use this page’s manual context to help answer it.