MIEBELY MBL302US02
MIEBELY MBL302US02 3D Wooden Marble Run Model Kit Instruction Manual
Model: MBL302US02 | Brand: MIEBELY
Introduction
This manual provides detailed instructions for the assembly, operation, and maintenance of your MIEBELY MBL302US02 3D Wooden Marble Run Model Kit. This kit features 235 precision-cut wooden pieces designed to create a functional marble run with both electric and manual operation modes. Please read these instructions carefully before beginning assembly to ensure a smooth and enjoyable building experience.

Figure 1: Fully assembled MIEBELY 3D Wooden Marble Run Model Kit, showcasing its intricate wooden structure and marble tracks.
Safety Information
- This product contains small parts and is recommended for ages 8 years and up.
- Adult supervision is recommended during assembly and operation, especially for younger users.
- Keep small parts away from children under 3 years old to prevent choking hazards.
- Handle wooden pieces carefully to avoid splinters.
- Do not force pieces together; excessive force may cause breakage.
Package Contents
Verify that all components are present before starting assembly.
- Wooden Puzzle Boards (7 boards, 266 pieces total)
- House Module (1 unit)
- Wax (1 piece)
- Stop Rings (6 pieces)
- Iron Beads / Marbles (10 pieces)
- Iron Rods (3 pieces)
- Frosting Bar (1 piece)
- Small Hammer (1 piece)
- Detailed Instruction Manual (1 booklet)
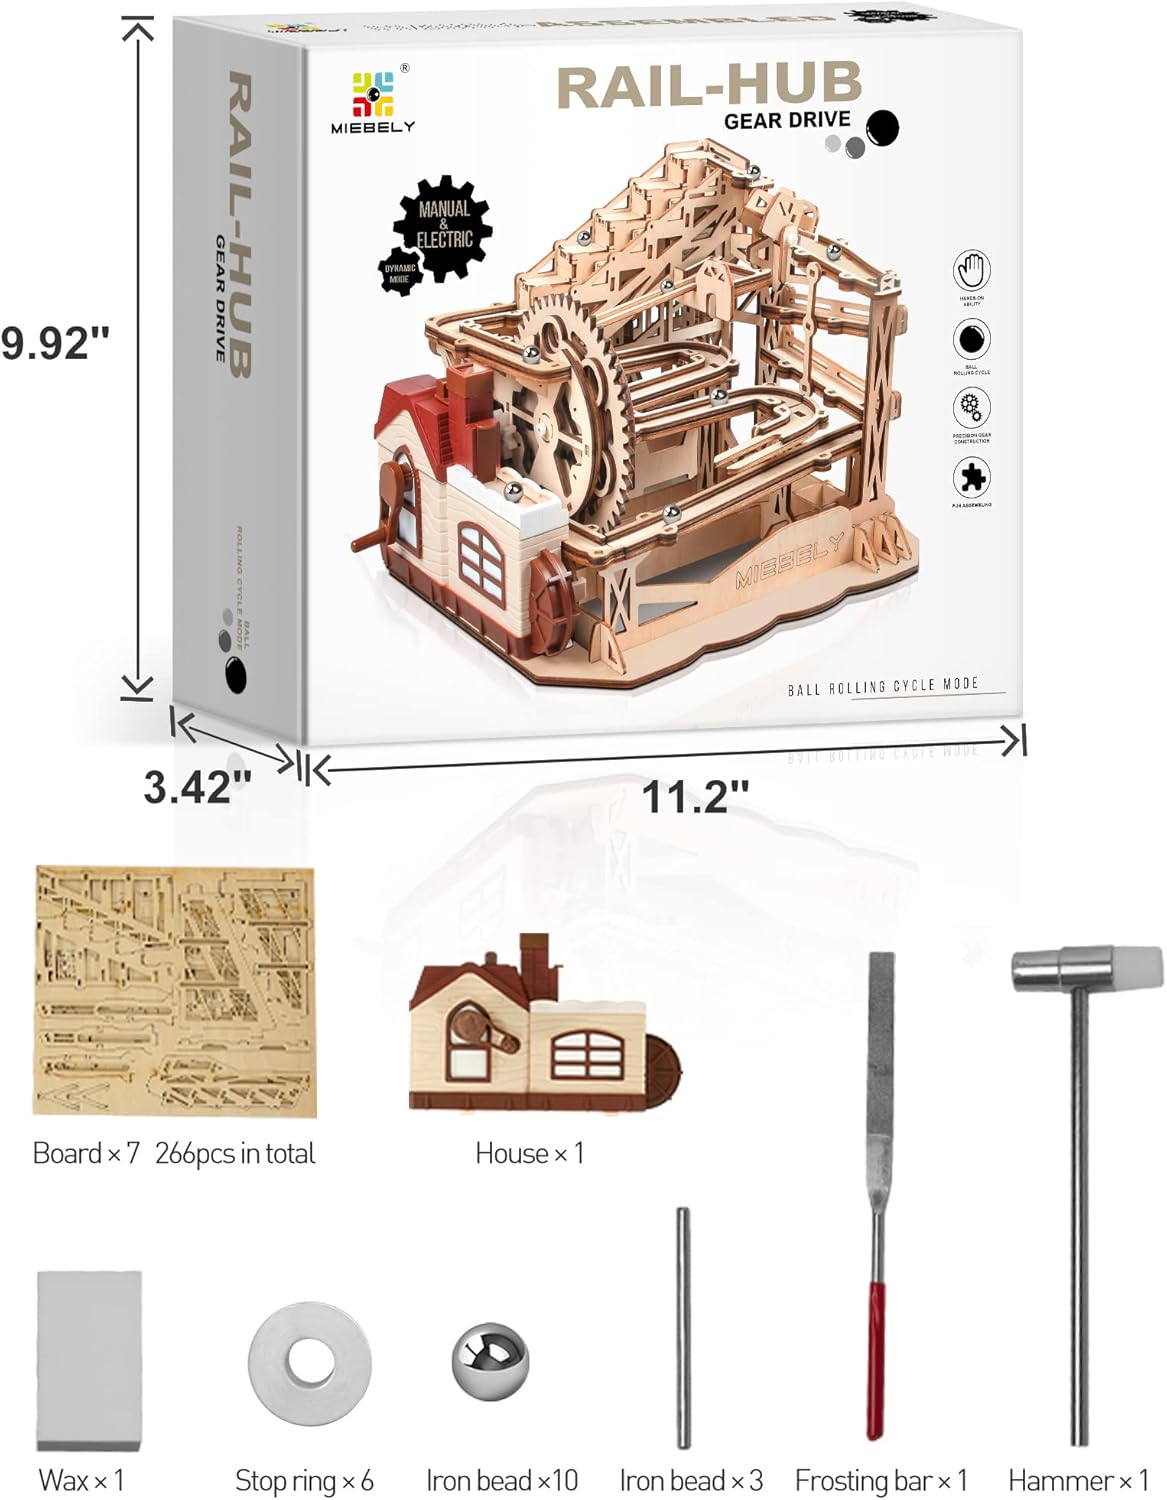
Figure 2: Overview of the kit contents, including wooden sheets, house module, marbles, and assembly tools.
Assembly Instructions
The MIEBELY 3D Wooden Marble Run Model Kit is designed for glue-free assembly using a tenon and mortise structure. Each piece is laser-cut for precision. Follow the included detailed instruction manual step-by-step.
1. Preparing Pieces
Carefully remove each wooden piece from its board. Identify the connection points and gently press down to loosen, then lift in the opposite direction. Shake gently to fully detach. Each piece is numbered for easy identification with the manual.

Figure 3: Demonstrates the process of assembling wooden pieces, highlighting the precise fit.

Figure 4: Close-up of hands carefully detaching and fitting wooden components, illustrating the tenon and mortise connection.
2. Interlocking Components
Align the tenons with the corresponding mortises. Apply gentle, even pressure to fit the pieces together. Use the provided small hammer with caution for snug fits, ensuring not to damage the wood. If a piece is too tight, use the frosting bar to gently sand the edges for a better fit.

Figure 5: Illustration of using the small hammer for secure, gentle assembly of wooden parts.
3. Applying Wax
For moving parts, such as gears and tracks, apply a small amount of the provided wax to reduce friction and ensure smooth operation. Refer to the manual for specific areas requiring wax application.

Figure 6: Detail of the gear mechanism, where wax should be applied for optimal performance.
4. Building the Marble Tracks
Construct the various marble tracks and ramps according to the manual. Pay close attention to the alignment to ensure marbles can flow freely without obstruction. The design incorporates multiple layers of tracks for an engaging experience.

Figure 7: Illustrates the intricate design of the marble tracks and the gear drive system.

Figure 8: A marble traversing a section of the wooden track, demonstrating the path of the marble.
5. Integrating the House Module
The house module contains the mechanism for switching between electric and manual operation. Attach it securely as indicated in the manual.

Figure 9: Details the electric and manual switch positions on the house module for operating the marble run.
Operating Instructions
1. Electric Mode
To activate the electric mode, ensure batteries (not included) are installed in the house module. Turn the electric switch to the "ON" position. The internal motor will power the gear mechanism, lifting the marbles automatically.

Figure 10: A hand placing a marble into the starting point of the marble run.
2. Manual Mode
For manual operation, ensure the electric switch is "OFF". Use the hand crank located on the side of the house module to manually power the gear mechanism and lift the marbles.

Figure 11: A hand operating the manual crank to engage the marble lifting mechanism.
3. Dropping Marbles
Place the provided iron beads (marbles) into the designated drop-off point at the top of the marble run. The mechanism will then transport them through the various tracks.
Maintenance
- Cleaning: Dust the model regularly with a soft, dry cloth. Avoid using water or cleaning solutions, as they may damage the wood.
- Lubrication: Reapply wax to moving parts (gears, lifts) periodically if you notice increased friction or noise during operation.
- Storage: Store the model in a dry environment away from direct sunlight and extreme temperature changes to prevent warping or damage to the wood.
- Battery Replacement: If using electric mode, replace batteries when the motor performance diminishes.
Troubleshooting
| Problem | Possible Cause | Solution |
|---|---|---|
| Marbles stop or slow down on tracks. |
|
|
| Gear mechanism binds or is stiff. |
|
|
| Electric motor not working. |
|
|
| Wooden pieces break during assembly. |
|
|
Specifications
- Model Number: MBL302US02
- Brand: MIEBELY
- Number of Pieces: 235
- Material: High-quality Basswood (3mm to 4mm thick)
- Product Dimensions (Assembled): Approximately 11.42 x 7.08 x 9.05 inches
- Item Weight: 2.71 pounds
- Recommended Age: 8 years and up
- Operation Modes: Electric (requires batteries, not included) and Manual
Customer Support
For any questions, missing parts, or assistance with assembly, please contact MIEBELY customer support. Refer to the packaging or the official MIEBELY website for contact information.
We are committed to ensuring your satisfaction with our products.