1. Introduction
The XYGStudy RGB-Matrix-P4-64x32 is a full-color LED matrix panel designed for displaying text, colorful images, and animations. It features 2048 individual RGB LEDs arranged in a 64x32 pixel grid with a 4mm pitch. This panel offers adjustable brightness and is compatible with various microcontrollers, including Raspberry Pi and Arduino platforms.


2. Package Contents
Please verify that all items listed below are included in your package:
- RGB-Matrix-P4-64x32 LED matrix panel and accessories (x1)
- Power supply terminal adapter (x1) - Note: A 5V 4A power supply is recommended (not included).
- 16P wire, approximately 30cm in length (x1)
- Pico Accessories (x1)
3. Specifications
| Feature | Specification |
|---|---|
| Part Number | RGB-Matrix-P4-64x32 |
| Dimensions | 256mm × 128mm |
| Pixels | 64 × 32 (2048 dots) |
| Pitch | 4mm |
| Pixel Form | 1R1G1B |
| Viewing Angle | ≥160° |
| Control Type | Synchronization |
| Driving | 1/16 scan |
| Header | HUB75 |
| Power Supply | 5V / 4A (VH4 header input) |
| Power Consumption | ≤20W |
| Connectivity Technology | HUB75, 16-pin parallel interface |
| Operating System Compatibility | Linux |


4. Setup
4.1 Power Connection
The LED matrix panel requires a 5V DC power supply. Connect the provided power supply terminal adapter to the panel's power input. A 5V 4A power supply is recommended for optimal performance. Ensure correct polarity when connecting the power supply.
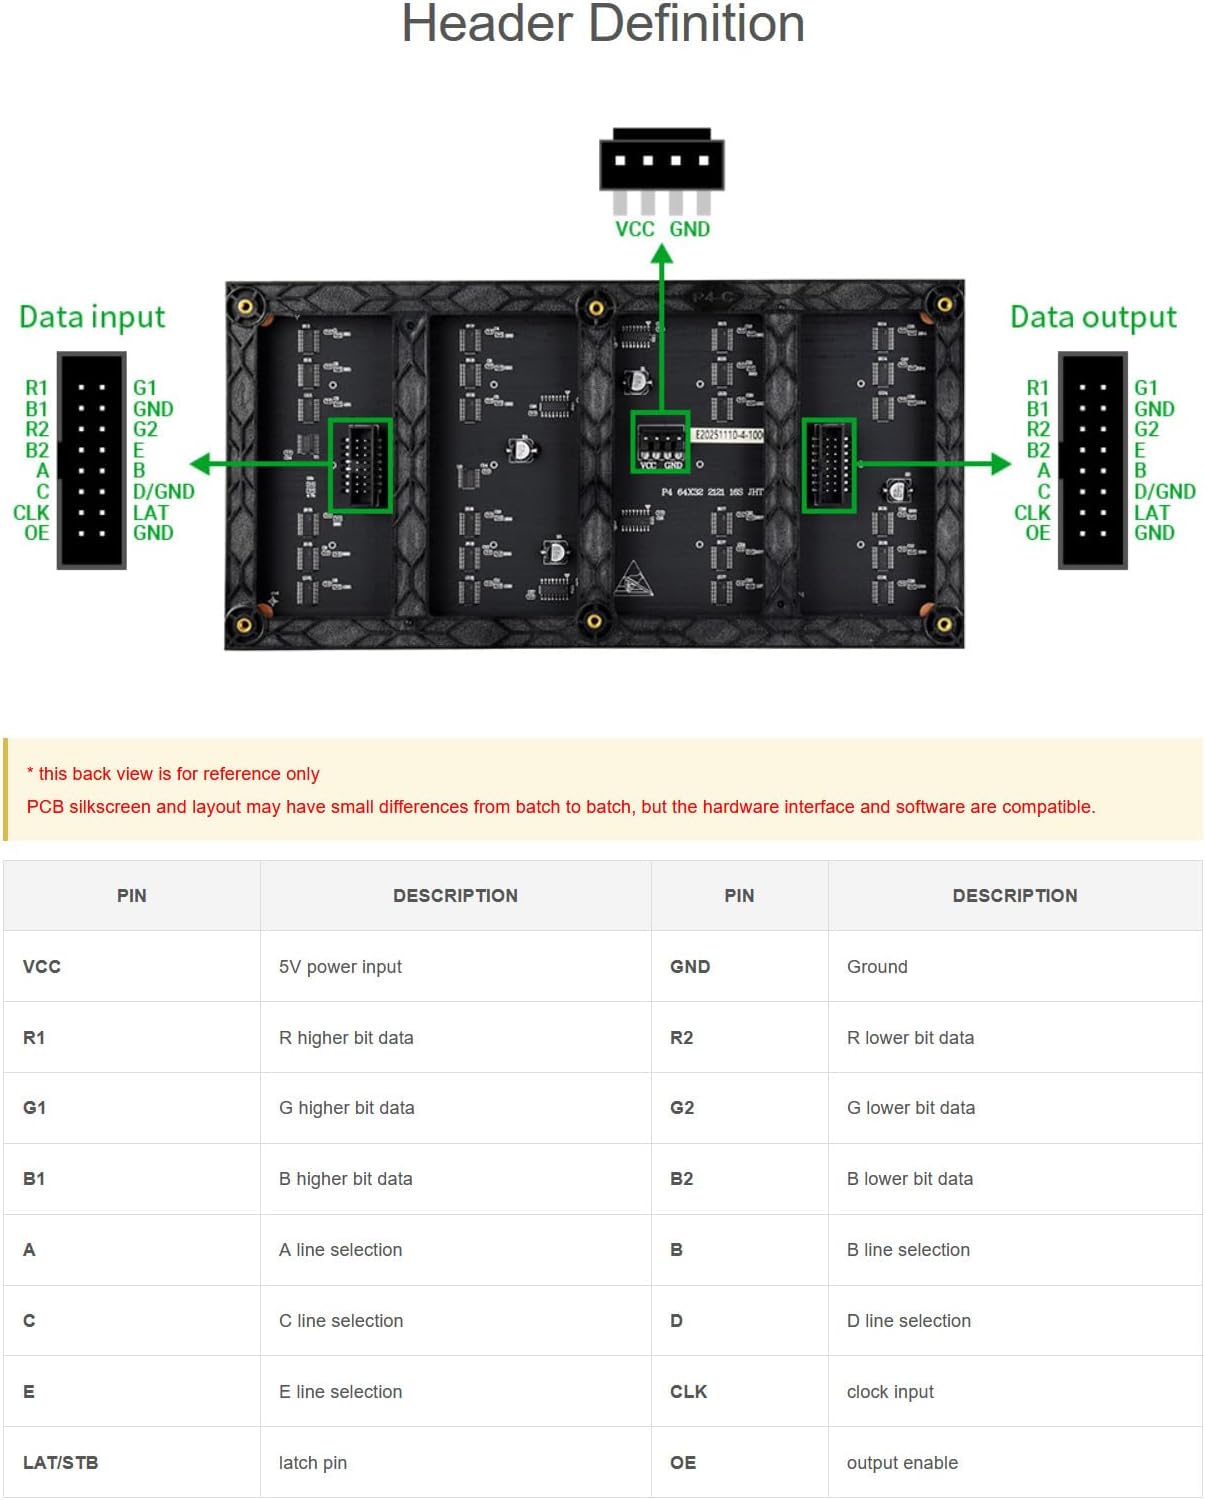
4.2 Data Connection (HUB75 Interface)
The panel uses a HUB75 interface for data input. Use the included 16P wire to connect the panel to your control board (e.g., Raspberry Pi, Arduino with appropriate adapter). Refer to the 'Header Definition' diagram for correct pin assignments.

4.3 Chainable Design
Multiple LED matrix panels can be chained together to create a larger display. This is achieved via the HUB75 input/output headers. When chaining panels, each RGB LED matrix panel requires a standalone 5V/4A or above power supply to ensure stable operation and display quality.

5. Operating
Once properly connected to a compatible microcontroller (e.g., Raspberry Pi, Arduino), the LED matrix panel can be programmed to display various content. Software libraries and example code are typically available from the manufacturer or community resources for controlling HUB75 panels.
- Brightness Adjustment: The panel supports adjustable brightness, which can typically be controlled through software commands from your microcontroller.
- Content Display: Display text, static images, or dynamic animations by sending appropriate data to the panel via the HUB75 interface.
5.1 Usage Scenarios
The RGB LED matrix panel is versatile and can be used in various applications:
- DIY desktop or wall-mount displays
- Digital signboards
- Environmental monitors
- Art installations

6. Maintenance
To ensure the longevity and optimal performance of your LED matrix panel, follow these maintenance guidelines:
- Cleaning: Gently wipe the surface of the LED panel with a soft, dry, lint-free cloth. Avoid using liquid cleaners or abrasive materials.
- Environment: Operate the panel in a dry environment, away from excessive moisture, dust, and extreme temperatures.
- Handling: Handle the panel by its edges to avoid touching the LED surface directly. Avoid applying excessive pressure or bending the panel.
- Power: Always disconnect the power supply before performing any maintenance or making connections.
7. Troubleshooting
If you encounter issues with your LED matrix panel, consider the following troubleshooting steps:
- No Display/Partial Display:
- Check all power connections to ensure they are secure and the power supply meets the 5V 4A requirement.
- Verify that the data cable (16P wire) is correctly connected to both the panel and the microcontroller, following the pinout diagram.
- Ensure your microcontroller is running the correct code and sending data to the panel.
- If chaining panels, confirm each panel has adequate power.
- Incorrect Colors/Flickering:
- Review your software code for correct color mapping and refresh rates.
- Check for loose data connections.
- Ensure your power supply is stable and providing sufficient current.
- Panel Not Responding:
- Restart your microcontroller and the LED panel.
- Confirm that the correct libraries and drivers are installed and configured for your microcontroller.
If these steps do not resolve the issue, please refer to the support section for further assistance.
8. Warranty and Support
For further assistance, detailed user guides, or to inquire about warranty information, please contact XYGStudy customer support directly via Amazon. Provide your product model number (RGB-Matrix-P4-64x32) and a clear description of your issue for efficient support.