
1. Important Safety Information
Please read this manual carefully before installing, operating, or performing maintenance on your washing machine. Keep this manual for future reference.
- Ensure the washing machine is properly grounded before use.
- Do not allow children to play with or operate the appliance.
- Always unplug the appliance before cleaning or performing maintenance.
- Do not install the appliance in areas where the temperature may drop below freezing.
- Do not overload the washing machine. Refer to the maximum load capacity for each program.
- Use only detergents and additives suitable for automatic washing machines.
- The appliance is equipped with an overflow protection system.
2. Product Overview
The TELEFUNKEN W-01-52-W is a freestanding washing machine designed for efficient and convenient laundry care. It features a 5 kg capacity and a maximum spin speed of 1000 RPM.
2.1 Front View

Figure 2.1: Front view of the TELEFUNKEN W-01-52-W Washing Machine, showing the control panel, detergent drawer, and door.
2.2 Angled View

Figure 2.2: Angled view of the washing machine, highlighting its compact design.
2.3 Open Door View

Figure 2.3: The washing machine with its door open, revealing the drum interior.
2.4 Control Panel
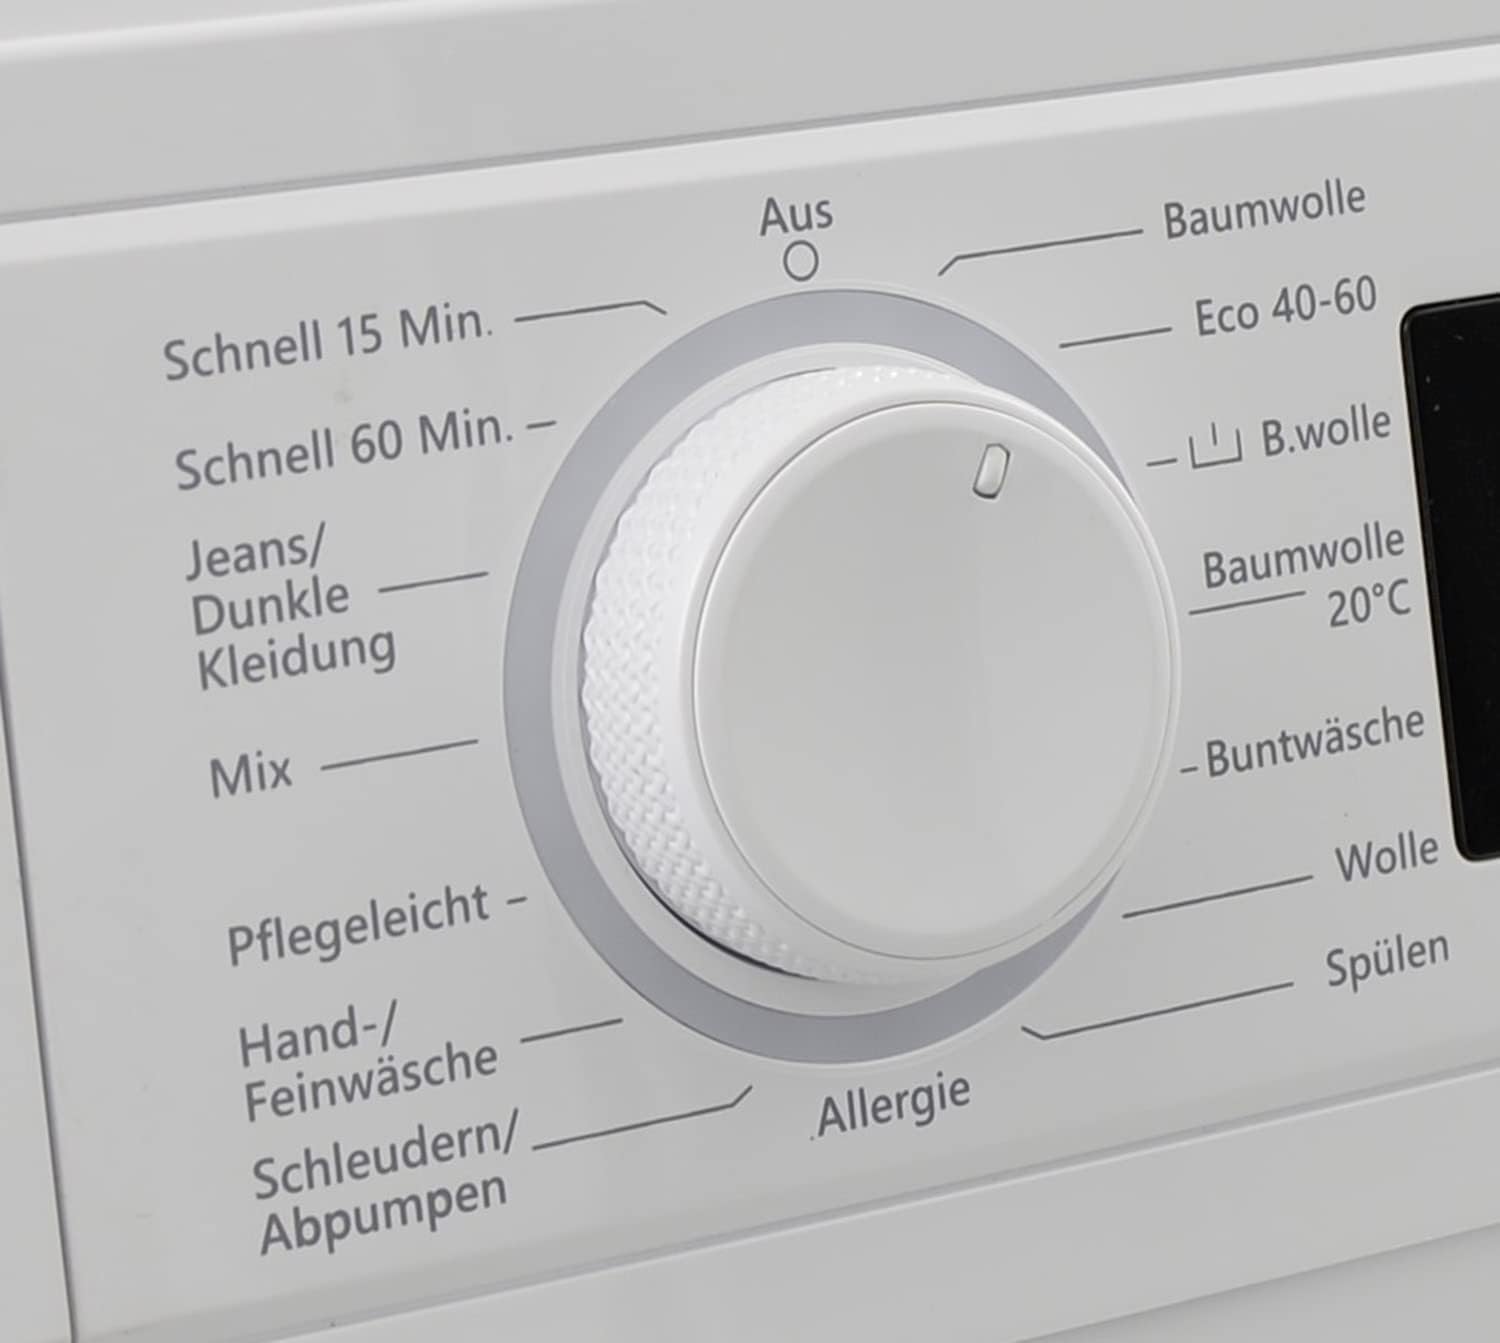
Figure 2.4: Detailed view of the control panel, featuring the program selector dial and digital display.
2.5 Detergent Drawer
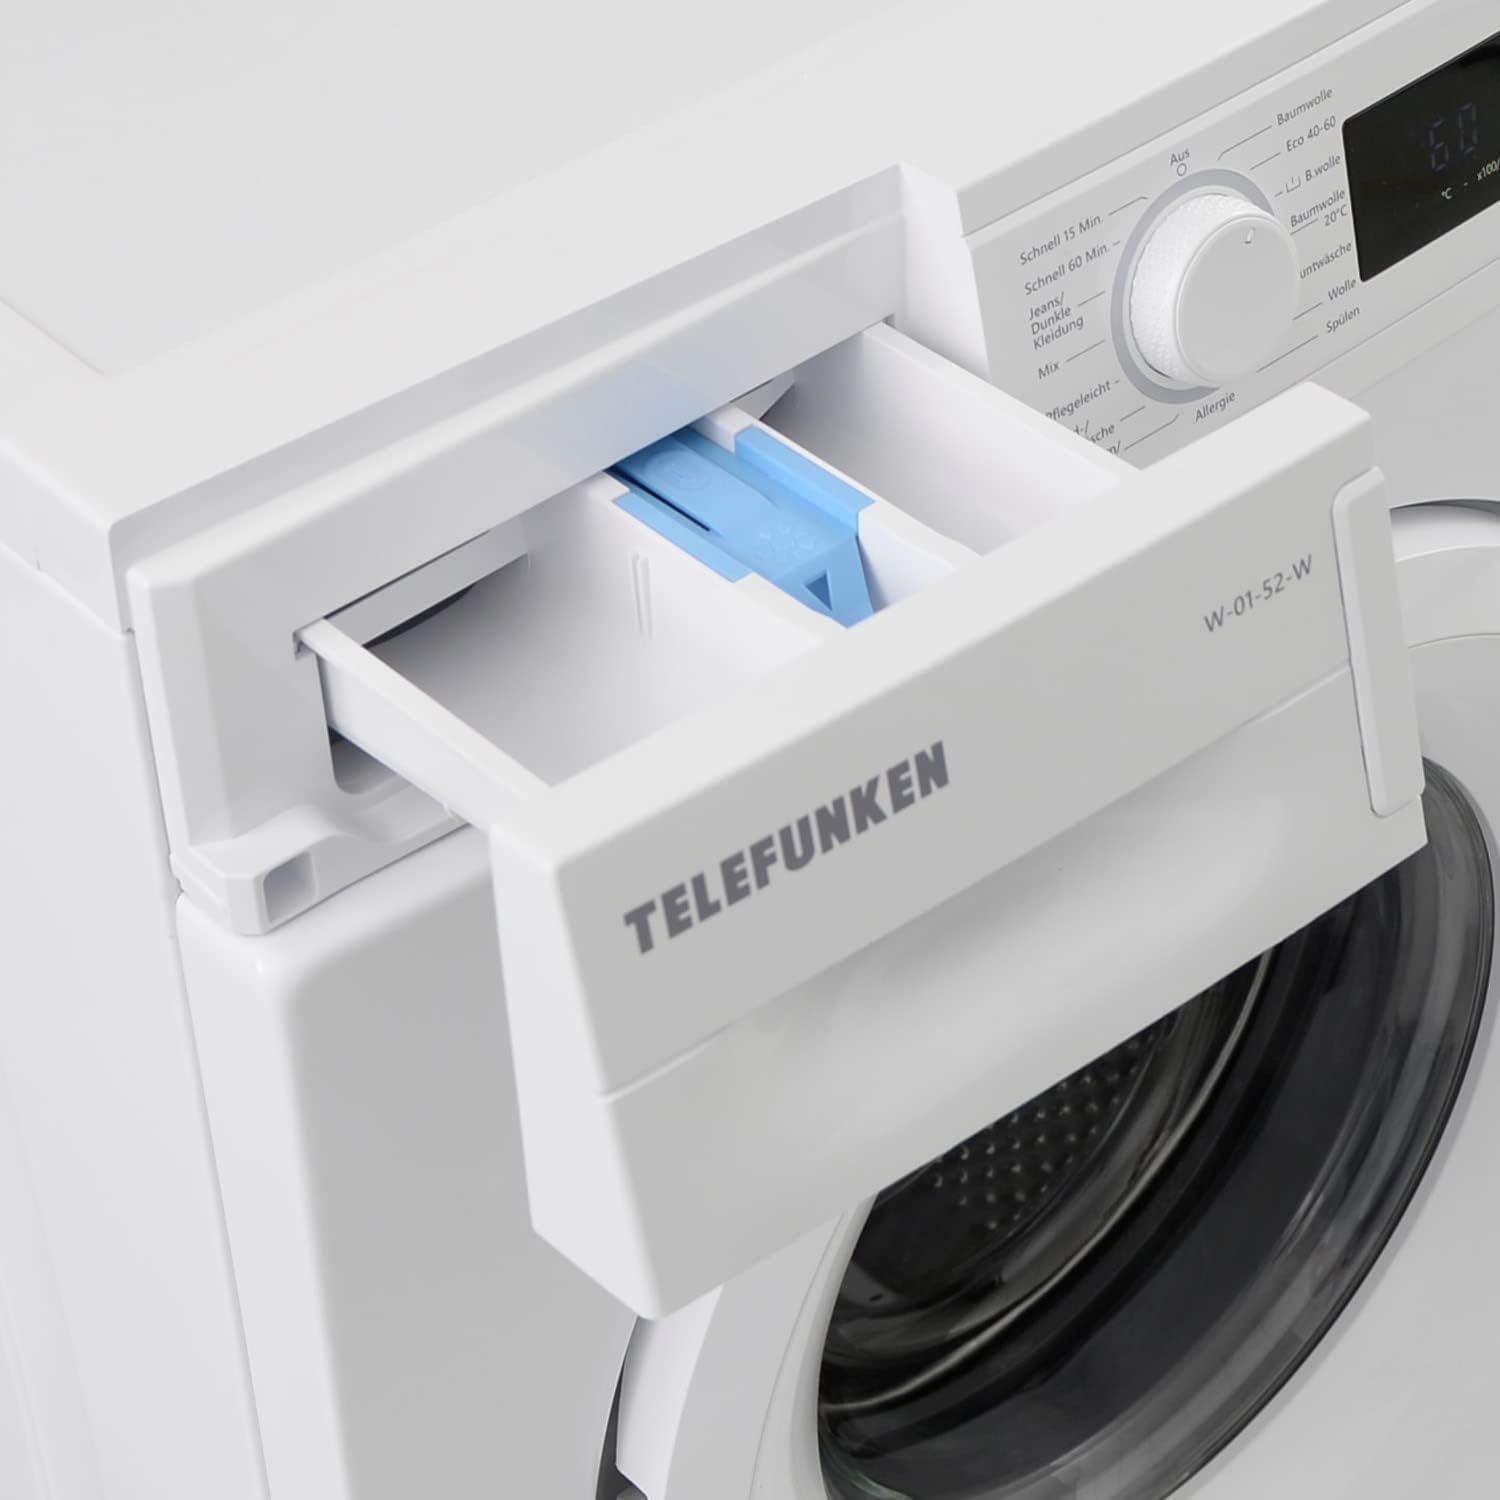
Figure 2.5: The detergent drawer, showing compartments for pre-wash, main wash, and fabric softener.
2.6 Drum Interior

Figure 2.6: Close-up of the stainless steel drum, designed for effective and gentle washing.
3. Setup and Installation
Proper installation is crucial for the safe and efficient operation of your washing machine.
3.1 Unpacking and Transport Bolt Removal
Before operating the machine, remove all transport bolts located at the rear of the appliance. These bolts secure the drum during transit and must be removed to prevent damage and excessive vibration during operation. Store them for future transport if needed.
3.2 Positioning and Leveling
Place the washing machine on a firm, level floor. Adjust the leveling feet at the bottom of the machine until it is perfectly stable and does not wobble. Use a spirit level to ensure proper alignment. This prevents excessive noise and vibration during the spin cycle.

Figure 3.2: Ensure the machine is level and stable to prevent movement during operation.
3.3 Water and Drain Connections
Connect the water inlet hose to a cold water tap with a 3/4-inch thread. Ensure the connection is tight to prevent leaks. Position the drain hose into a standpipe or over the edge of a sink, ensuring it is securely fastened to prevent dislodgement during drainage.
4. Operating Instructions
Follow these steps for optimal washing results.
4.1 Loading Laundry
Sort your laundry by fabric type, color, and degree of soiling. Open the washing machine door and load the laundry loosely into the drum, ensuring not to exceed the maximum load capacity of 5 kg. The machine features automatic load sensing to adjust water usage.

Figure 4.1: Load laundry evenly into the drum, respecting the maximum capacity.
4.2 Adding Detergent and Additives
Pull out the detergent drawer (Figure 2.5). Add the appropriate amount of detergent to the main wash compartment. If using pre-wash, add detergent to the pre-wash compartment. Fabric softener can be added to its designated compartment. Close the drawer gently.
4.3 Program Selection
Turn the program selector dial (Figure 2.4) to choose one of the 15 available programs. Common programs include:
- Cotton: For durable cotton items.
- Eco 40-60: Energy-efficient program for normally soiled cotton items.
- Synthetics: For synthetic or mixed fabrics.
- Delicates/Hand Wash: For delicate items requiring gentle care.
- Wool: Specific program for wool garments.
- Quick 15 Min / Quick 60 Min: For lightly soiled items needing a fast wash.
- Jeans/Dark Clothes: Optimized for denim and dark fabrics.
- Mix: For mixed loads of different fabric types.
- Allergy: For enhanced rinsing, suitable for sensitive skin.
- Spin/Drain: For draining water or additional spinning.
4.4 Adjusting Settings
After selecting a program, you can adjust settings such as temperature and spin speed using the corresponding buttons on the control panel. The display will show the selected settings. You can also use the Delay Start function to postpone the start of the wash cycle.
4.5 Starting the Wash Cycle
Press the Start/Pause button to begin the selected wash cycle. The machine will automatically proceed through the wash, rinse, and spin phases. The display will show the remaining time.
5. Maintenance and Cleaning
Regular maintenance ensures the longevity and optimal performance of your washing machine.
5.1 Cleaning the Detergent Drawer
Periodically remove the detergent drawer and rinse it under running water to remove any detergent residue or mold buildup. Clean the housing of the drawer with a brush.
5.2 Cleaning the Drum
To prevent odors and maintain hygiene, run a maintenance wash (e.g., a hot cycle with no laundry and a descaling agent or washing machine cleaner) regularly. Ensure the drum is clean and free of debris.

Figure 5.2: A clean drum interior is essential for effective washing and preventing odors.
5.3 Cleaning the Filter
Locate the drain pump filter, usually at the bottom front of the machine. Open the cover and carefully unscrew the filter. Remove any lint, coins, or other foreign objects. Clean the filter under running water and reinsert it securely. This should be done periodically to prevent drainage issues.
5.4 Exterior Cleaning
Wipe the exterior surfaces of the washing machine with a soft, damp cloth. Do not use abrasive cleaners or solvents that could damage the finish.

Figure 5.4: Regular cleaning contributes to fresh-smelling laundry and a well-maintained appliance.
6. Troubleshooting
Before contacting service, try these solutions for common issues.
6.1 Machine Not Starting
- Check if the power cord is securely plugged in.
- Ensure the door is fully closed and latched.
- Verify that the water supply tap is open.
- Check if a program has been selected and the Start/Pause button pressed.
6.2 Excessive Noise or Vibration
- Ensure all transport bolts have been removed (refer to Section 3.1).
- Check if the machine is level and stable on the floor (refer to Section 3.2).
- Make sure the laundry load is balanced inside the drum. Uneven loads can cause vibration.
- Verify that the machine is not touching other objects or walls.

Figure 6.2: Inspect the drum and load for balance if excessive noise occurs.
6.3 Water Not Draining
- Check if the drain hose is kinked or blocked.
- Clean the drain pump filter (refer to Section 5.3).
- Ensure the drain hose is not too high, preventing proper drainage.

Figure 6.3: Issues like overflowing can indicate drainage problems or incorrect detergent use.
6.4 Poor Washing Results
- Check if the correct amount and type of detergent were used.
- Ensure the machine is not overloaded.
- Select an appropriate program for the fabric type and soil level.
- Verify that the water temperature is suitable for the laundry.
7. Technical Specifications
Detailed specifications for the TELEFUNKEN W-01-52-W Washing Machine.
| Feature | Specification |
|---|---|
| Model Number | W-01-52-W |
| Brand | TELEFUNKEN |
| Capacity | 5 Kilograms |
| Maximum Spin Speed | 1000 Revolutions per Minute |
| Annual Energy Consumption | 147 Kilowatt-hours |
| Energy Efficiency Class | D |
| Product Dimensions (WxDxH) | 59.7 x 49.7 x 84.5 cm |
| Weight | 54.4 Kilograms |
| Installation Type | Freestanding |
| Number of Programs | 15 |
| Control Type | Touch |
| Noise Level (Spin) | 76 dB |
| Material | Stainless Steel (Drum) |

Figure 7.1: Key dimensions of the TELEFUNKEN W-01-52-W Washing Machine.

Figure 7.2: EU Energy Label for the TELEFUNKEN W-01-52-W, showing energy efficiency class D.
For more detailed product information, please refer to the EPREL database.
8. Warranty and Support
Your TELEFUNKEN W-01-52-W Washing Machine comes with a 24-month manufacturer's guarantee from the date of purchase. This warranty covers defects in materials and workmanship under normal use.
For warranty claims, technical support, or spare parts, please contact your retailer or the authorized TELEFUNKEN service center. Keep your proof of purchase for all warranty-related inquiries.

Figure 8.1: For complex issues, professional assistance is recommended.