1. Introduction
Thank you for choosing the DEWENWILS Digital Timer Outlet. This device is designed to automate the power supply to your electronic appliances, helping you save energy and enhance home security. It features up to 16 programmable on/off settings, a countdown function, and a random mode for various applications. Please read this manual carefully before use to ensure proper operation and safety.

Image 1.1: Front view of the DEWENWILS Digital Timer Outlet.
2. Safety Instructions
- For indoor use only. Do not expose to rain or moisture.
- Do not exceed the maximum load capacity of 3840W (16A).
- Ensure the timer is securely plugged into a grounded outlet.
- Do not disassemble or attempt to repair the device. Contact customer support if issues arise.
- Keep out of reach of children.
- Unplug the timer from the wall outlet before cleaning.
3. Product Overview
The DEWENWILS Digital Timer Outlet features an easy-to-read LCD display and seven control buttons for programming. Its unique 180° rotatable display allows for flexible viewing angles, making it convenient to read and operate in various outlet orientations.

Image 3.1: The 180° rotatable LCD screen for easy viewing.
Components:
- LCD Display: Shows current time, day, program status, and mode.
- Buttons:
- WEEK: Sets the day of the week.
- HOUR: Sets the hour.
- MINUTE: Sets the minute.
- RESET: Clears all settings and resets the device.
- MODE: Cycles through AUTO, ON, OFF, RANDOM, COUNTDOWN modes.
- EIN/AUS (ON/OFF): Manual override for programs.
- EINGABE (ENTER): Confirms settings.
- Power Outlet: For connecting your appliance.
4. Setup
4.1 Initial Activation and Reset
Before first use, or after a prolonged period of disuse, press the RESET button to activate the unit and clear any previous settings. This ensures the internal battery is charged and the device is ready for programming.
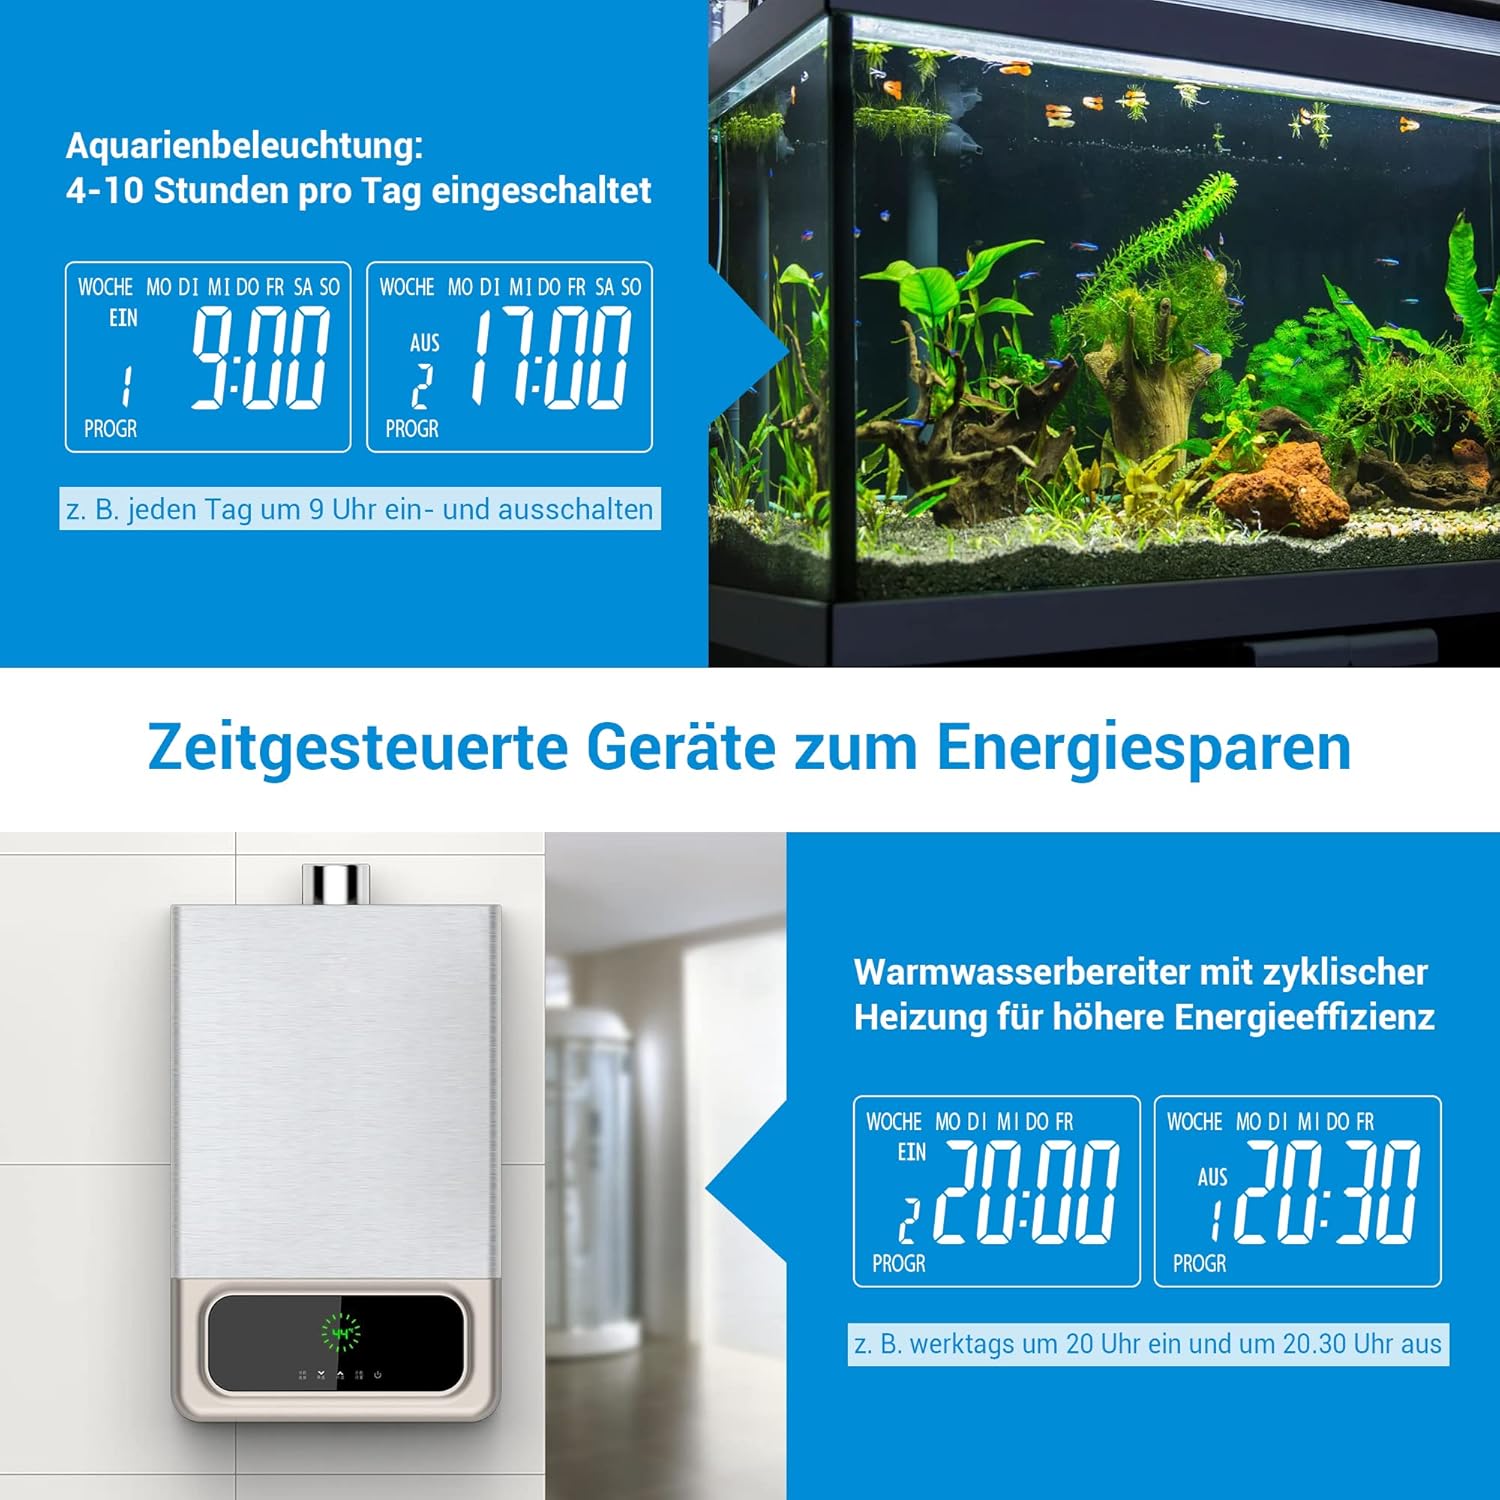
Image 4.1: Location of the RESET button and indication of built-in battery for memory retention.
4.2 Setting Current Time
- Plug the timer into a wall outlet.
- Press the WEEK button repeatedly to select the current day of the week.
- Press the HOUR button to set the current hour.
- Press the MINUTE button to set the current minute.
- The time is now set. The built-in battery will retain these settings for approximately 30 days during a power outage.
5. Operating Instructions
5.1 Programming On/Off Times (16 Programs)
The timer allows for up to 16 distinct ON/OFF programs per day or week. Each program consists of an ON time and an OFF time.
- Press the EINGABE (ENTER) button once to enter program setting mode. The display will show '1 ON'.
- Use WEEK, HOUR, and MINUTE buttons to set the desired ON time for the first program.
- Press EINGABE (ENTER) again. The display will show '1 OFF'.
- Use WEEK, HOUR, and MINUTE buttons to set the desired OFF time for the first program.
- Repeat steps 1-4 for up to 16 programs. Press EINGABE (ENTER) to cycle through programs (1 ON, 1 OFF, 2 ON, 2 OFF, etc.).
- After setting all desired programs, press the MODE button to return to the current time display. Ensure the mode is set to AUTO for programs to execute automatically.

Image 5.1: Display indicating multiple program settings.
5.2 Countdown Function
The countdown function allows you to set a specific duration after which the connected appliance will turn ON or OFF.
- Press the MODE button repeatedly until 'COUNTDOWN' appears on the display.
- Use HOUR and MINUTE buttons to set the desired countdown duration.
- Press EINGABE (ENTER) to start the countdown. The display will show the remaining time.
- Once the countdown finishes, the connected appliance will switch its state (from ON to OFF, or OFF to ON).
5.3 Random Mode (Anti-Theft)
The random mode is designed to simulate occupancy when you are away, enhancing home security. It randomly turns the connected appliance ON and OFF between 7:00 PM and 6:00 AM.
- Press the MODE button repeatedly until 'RANDOM' appears on the display.
- The timer will now randomly switch the connected appliance ON and OFF during the specified night hours.
- To exit random mode, press the MODE button again to select another mode (e.g., AUTO, ON, OFF).

Image 5.2: Random mode for simulating occupancy and deterring intruders.
5.4 Manual Override
You can manually switch the connected appliance ON or OFF at any time, overriding the current program or mode.
- Press the EIN/AUS (ON/OFF) button to toggle the power state of the connected appliance.
- The display will show 'ON' or 'OFF' accordingly.
- To return to automatic operation, press the MODE button until 'AUTO' is displayed.
5.5 Application Examples
The DEWENWILS Digital Timer Outlet can be used for various applications to save energy and automate your home:
- Aquarium Lighting: Program specific ON/OFF times to maintain a healthy environment for aquatic life.
- Water Heaters: Schedule heating cycles to reduce energy consumption during off-peak hours.
- Christmas Decorations/Lights: Automate festive lighting schedules.
- Coffee Makers: Have your coffee ready when you wake up.
- Phone Charging: Prevent overcharging by setting a timer for your phone or other devices.

Image 5.3: Examples of energy-saving applications for the timer, such as aquarium lighting and water heaters.

Image 5.4: Further examples of automation, including smart phone charging and coffee preparation.
6. Maintenance
- Cleaning: Wipe the timer with a dry, soft cloth. Do not use abrasive cleaners or immerse in water.
- Storage: Store the timer in a cool, dry place when not in use.
- Battery: The internal battery is not user-replaceable. It maintains settings for approximately 30 days during power interruptions.
7. Troubleshooting
| Problem | Possible Cause | Solution |
|---|---|---|
| Timer does not turn ON/OFF as programmed. | Incorrect program settings; Timer not in AUTO mode; Power outage. | Verify program settings. Ensure the timer is set to AUTO mode. Check power supply. |
| Display is blank or unresponsive. | No power; Internal battery depleted. | Ensure the timer is plugged into a live outlet. Press the RESET button to reactivate and charge the internal battery. |
| Appliance connected to timer does not work. | Appliance is faulty; Timer is OFF or in an incorrect mode. | Test the appliance directly in a wall outlet. Check the timer's mode (ON or AUTO with active program). |
| Settings are lost after unplugging. | Internal battery needs charging. | Keep the timer plugged in for at least 4 hours to fully charge the internal battery. |
8. Specifications
| Feature | Detail |
|---|---|
| Model | DHDTI03B1 |
| Brand | DEWENWILS |
| Color | White |
| Material | Acrylonitrile Butadiene Styrene (ABS) |
| Product Dimensions (D x W x H) | 15D x 6B x 12H centimeters |
| Number of Programs | 16 |
| Max Load Capacity | 3840 W, 16 A |
| Display | 180° Rotatable LCD |
| Memory Retention | Approx. 30 days (built-in battery) |

Image 8.1: Product dimensions of the timer outlet.
9. Warranty and Support
DEWENWILS products are designed for reliability and performance. For warranty information, technical support, or any questions regarding your product, please contact DEWENWILS customer service through the retailer's platform or the official DEWENWILS website. Please have your model number (DHDTI03B1) and purchase details ready when contacting support.