GIWOX F100
GIWOX 3D Hologram LED Fan
Instruction Manual - Model F100
1. Introduction
The GIWOX 3D Hologram LED Fan provides a unique and immersive visual experience, projecting high-definition 3D holographic images that appear to float in the air. This device is ideal for exhibitions, advertising, and creating captivating displays without the need for special viewing equipment. Its advanced design features 1184 LED beads and 1440P resolution for bright, vivid content.
Safety Warning: This device contains rapidly rotating blades. Always ensure the fan is securely mounted and powered off before handling. Keep hands, hair, and loose clothing clear of the fan during operation. Do not operate if any part is damaged or loose. Ensure the safety buckles are fully locked during installation to prevent the light strips from being thrown out.
2. Package Contents
Please verify that all items listed below are included in your package. If any components are missing or damaged, please contact GIWOX customer support.
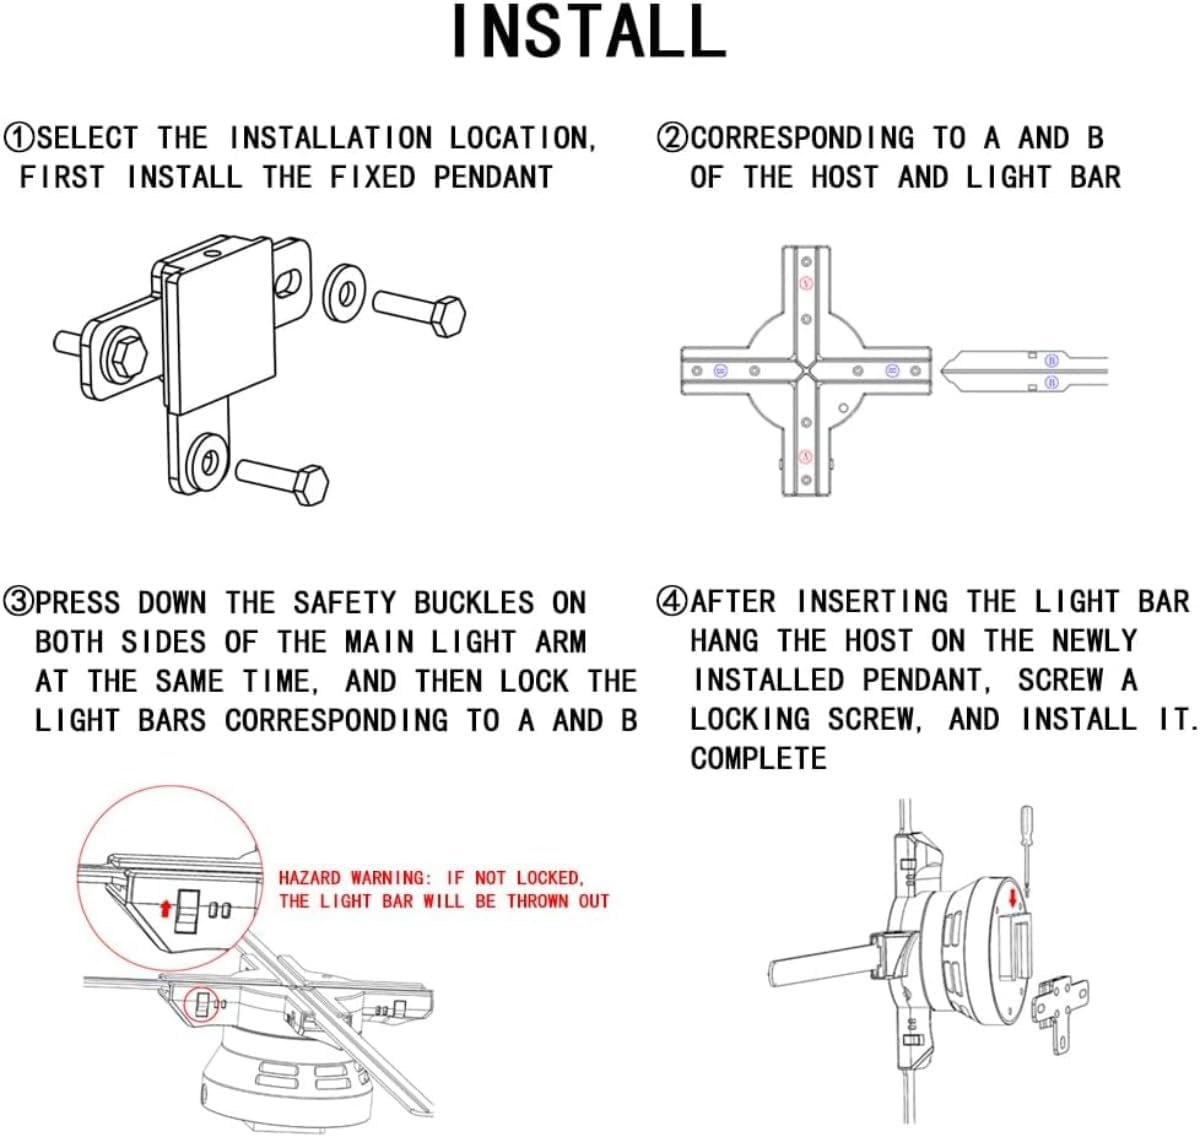
Image: Overview of the GIWOX 3D Hologram LED Fan package contents.
- Hologram Fan Host Unit
- Product Fan Blades (4 pieces)
- Power Adapter
- Remote Control
- Mounting Bracket (Snap)
- Mounting Screws
- Instruction Manual
3. Setup and Installation
Follow these steps carefully to set up your GIWOX 3D Hologram LED Fan. Ensure the device is unplugged during installation.
- Select Installation Location: Choose a suitable location for mounting the fan. Consider factors such as visibility, power access, and safety clearance from people or objects.
- Install Fixed Pendant/Mounting Bracket: Securely attach the mounting bracket to your chosen surface (wall, ceiling, or stand) using the provided screws. Ensure it is firmly fixed to support the fan's weight and rotational forces.
- Prepare Fan Blades: Each LED light strap (blade) has a specific orientation. The side with the LED lights should face upwards, while the side with circuits and chips faces downwards.
- Insert Blades: Insert blade 'A' into slot 'A' and blade 'B' into slot 'B' on the fan host. Repeat for all four blades, ensuring they are fully seated.
- Secure Safety Buckles: Press down the safety buckles on both sides of the main light arm simultaneously. Ensure the safety buckle is completely locked and spring-locked. Failure to lock the safety buckles fully may result in the light strips being ejected during operation, posing a safety hazard.
- Mount the Host: After inserting and securing all light bars, hang the fan host unit onto the newly installed mounting bracket. Screw in the locking screw to secure the host.
- Connect Power: Plug the power adapter into the fan host and then into a suitable power outlet. The fan will typically start spinning immediately upon receiving power.

Image: Detailed installation diagram for the fan host and blades.

Image: Correct orientation and insertion of fan blades.
The GIWOX 3D Hologram LED Fan supports various installation methods, including hoisting, wall mounting, desktop placement, and floor stands. Accessories for these methods may need to be purchased separately.

Image: Examples of different installation methods.
4. Operating Instructions
The GIWOX 3D Hologram LED Fan can be controlled via a remote control, a dedicated mobile application (Android and iOS), or PC software (Windows 7/8/10).
4.1. Content Management
The fan comes preloaded with some content. You can customize the display content by uploading your own 3D images and videos. The device supports high transfer speeds (2MB/1s) for efficient content updates.
4.2. Using the Mobile App
Download the official GIWOX mobile application (available for Android and iOS devices). The app allows for wireless connection to the fan, enabling quick video replacement, content upload, and adjustment of brightness and display angle with a single click.

Image: Wireless connection and app interface for content management.
4.3. Using PC Software
Install the GIWOX PC software on a Windows 7/8/10 computer. This software provides advanced features for content creation, management, and synchronization, especially useful for splicing multiple fans for larger displays.
4.4. Remote Control Operation
Use the provided remote control for basic functions such as turning the fan on/off (if supported by model), adjusting brightness, and cycling through preloaded content.
5. Maintenance
Proper maintenance ensures the longevity and optimal performance of your 3D Hologram LED Fan.
- Cleaning: Gently wipe the fan blades and host unit with a soft, dry cloth. Do not use liquid cleaners or abrasive materials, as they may damage the LEDs or electronic components.
- Storage: When not in use for extended periods, store the fan in a cool, dry place, away from direct sunlight and extreme temperatures. It is recommended to disassemble the blades for safer storage.
- Handling: Always handle the fan with care. Avoid dropping or subjecting it to strong impacts.
6. Troubleshooting
This section addresses common issues you might encounter with your GIWOX 3D Hologram LED Fan.
| Problem | Possible Cause | Solution |
|---|---|---|
| Fan does not spin or power on. | No power, loose connection, faulty power adapter. | Check power outlet. Ensure power adapter is securely connected to both the fan and the power source. Try a different outlet. |
| Blades are ejected during operation. | Safety buckles not fully locked. | Immediately power off the device. Re-insert blades and ensure all safety buckles are fully spring-locked before powering on again. |
| No 3D effect or image appears distorted. | Incorrect content format, low resolution content, environmental factors. | Ensure content is in the correct 3D holographic format and high resolution (1440P recommended). Optimize viewing distance and ambient lighting. |
| Mobile app/PC software connection issues. | Incorrect Wi-Fi settings, software bug. | Ensure your device is connected to the fan's Wi-Fi network. Restart the app/software and the fan. Refer to the software's specific instructions for connection. |
| Fan is excessively loud. | Loose components, motor issue. | Power off and inspect for any loose blades or components. If the noise persists, contact customer support. |
7. Specifications
| Feature | Detail |
|---|---|
| Brand | GIWOX |
| Model Number | F100 |
| Display Size | 39.4 inches |
| LED Beads | 1184 pcs |
| Resolution | 1440P (1600 x 1200) |
| Brightness | 2400cd/㎡ |
| Connectivity | Bluetooth, Wi-Fi, USB |
| Supported Software | Phone APP (Android and iOS), PC Software (Win7/8/10) |
| Item Weight | 4.19 pounds |
| Product Dimensions | 3 x 39.4 x 39.4 inches |
| Recommended Use | Business, Exhibition |
8. Warranty and Support
For warranty information, technical support, or replacement parts, please contact the seller, Giwox USA, directly through your purchase platform. Keep your purchase receipt or order number handy for faster service.
While this product does not come with an explicit manufacturer's warranty period detailed here, third-party protection plans may be available for purchase separately to extend coverage.
Ask a question about this manual
Ask about setup, troubleshooting, compatibility, parts, safety, or missing instructions. Manuals+ will review the question and use this page’s manual context to help answer it.