1. Introduction
Thank you for choosing the ATOMSTACK S10 PRO Laser Engraver. This manual provides essential information for the safe and efficient operation of your device. Please read it thoroughly before assembly and use to ensure optimal performance and to prevent damage or injury. Keep this manual for future reference.
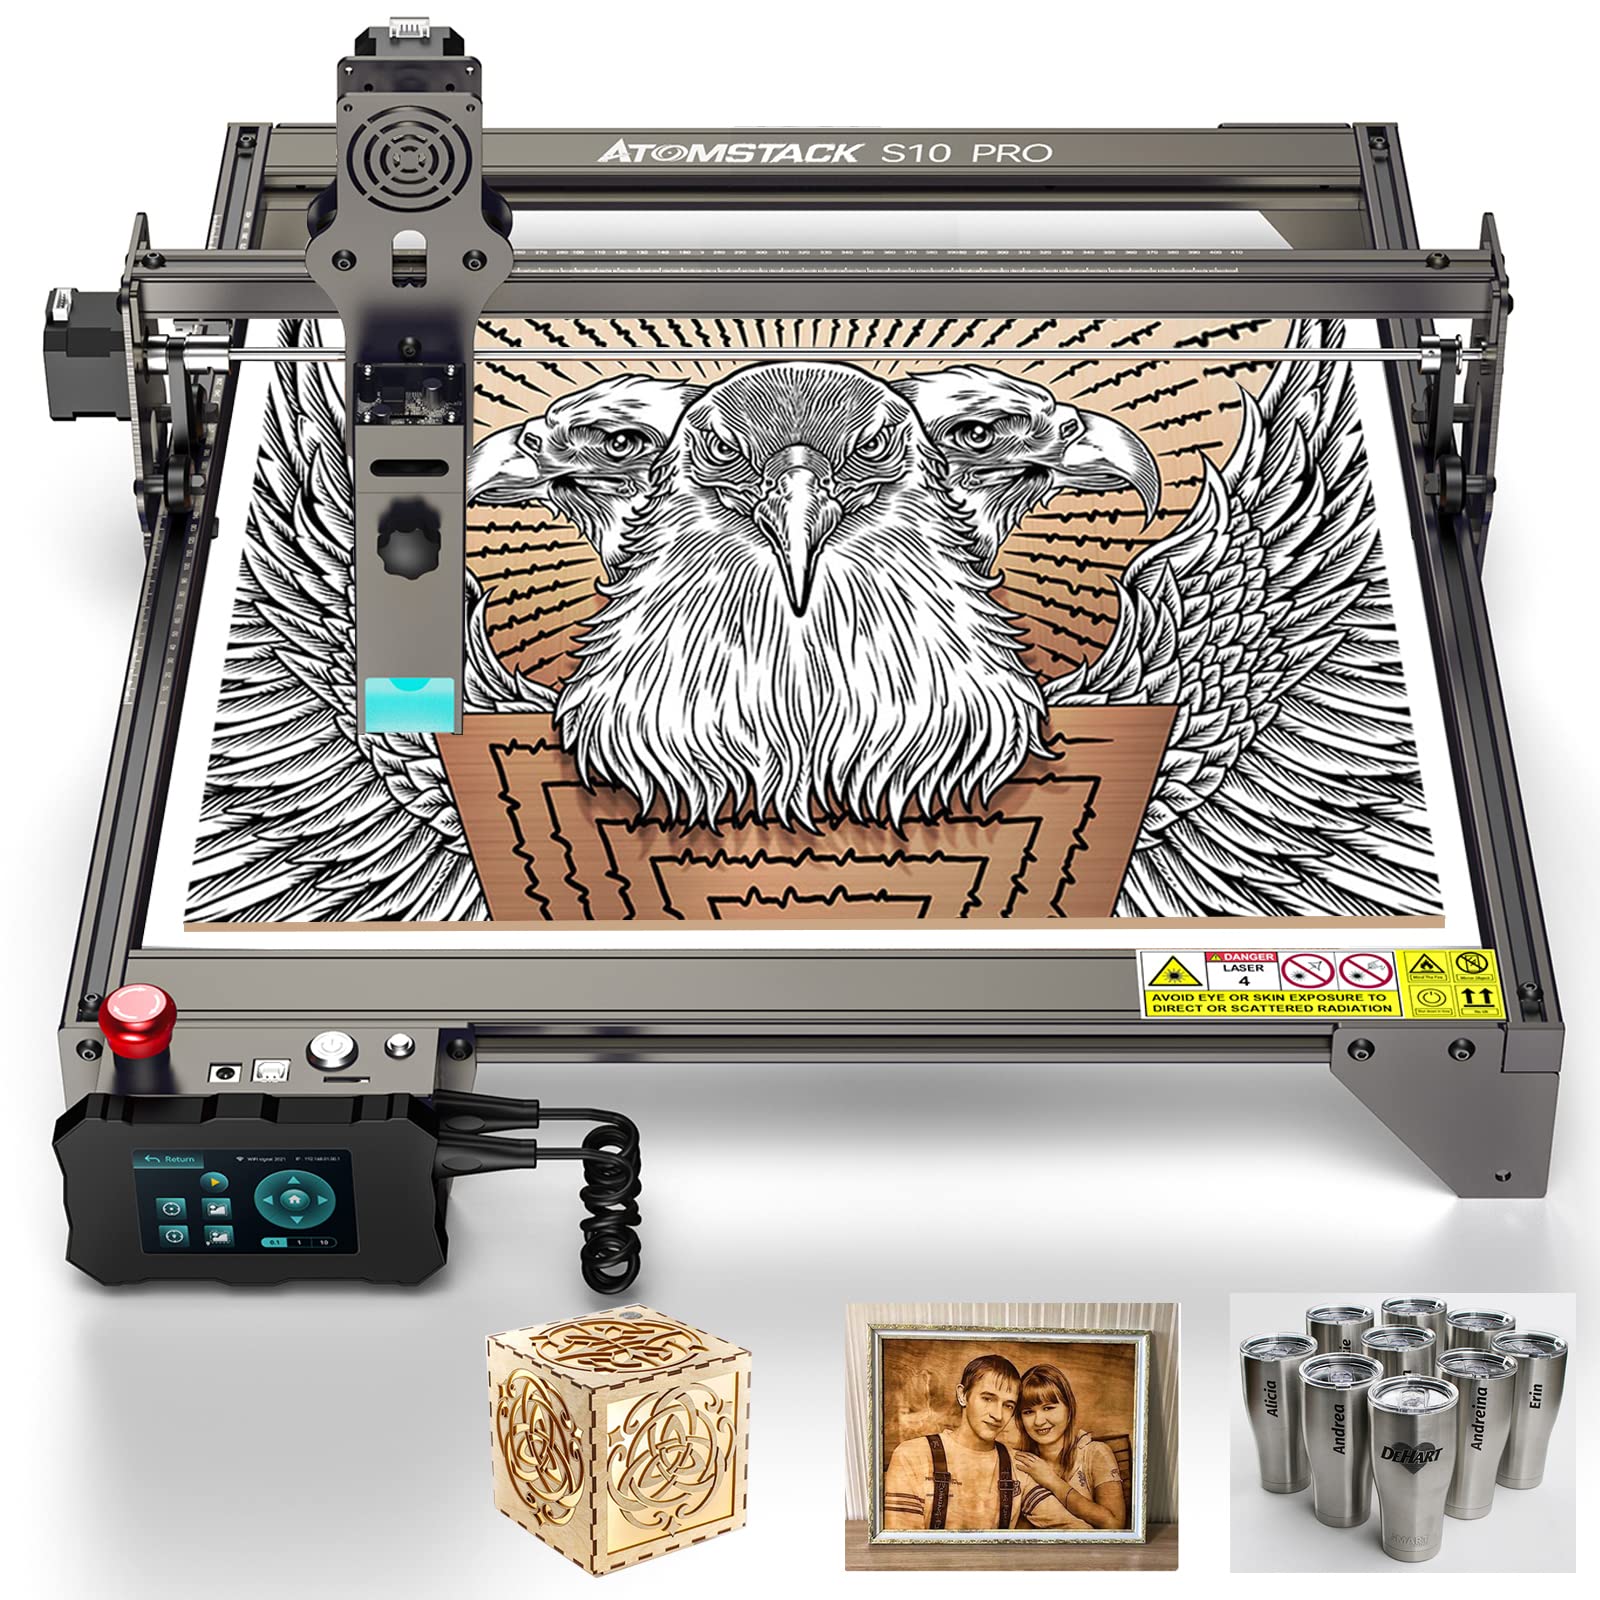
Figure 1.1: The ATOMSTACK S10 PRO Laser Engraver, showcasing its robust frame and laser module.
2. Safety Information
Operating a laser engraver involves inherent risks. Adhere strictly to the following safety guidelines:
- Eye Protection: Always wear certified laser safety goggles when the laser is active. Never look directly at the laser beam or its reflection.
- Ventilation: Operate the machine in a well-ventilated area to dissipate fumes and smoke produced during engraving and cutting. Consider an exhaust system.
- Fire Hazard: Laser processing can ignite flammable materials. Keep a fire extinguisher nearby and never leave the machine unattended during operation.
- Material Compatibility: Only engrave or cut materials approved for laser processing. Avoid PVC, vinyl, or other materials that produce toxic fumes when burned.
- Children and Pets: Keep children and pets away from the operating area.
- Emergency Stop: Familiarize yourself with the location and function of the emergency stop button.
- Power Off: Disconnect power before performing any maintenance or adjustments.
3. Product Overview and Features
The ATOMSTACK S10 PRO is a high-precision laser engraver designed for detailed engraving and cutting tasks. It features a powerful 10W laser output with a fine 0.08mm laser focus, enabling intricate designs and clean cuts.
Key Features:
- High-Power Laser: 10W optical output power for efficient engraving and cutting.
- Fine Laser Spot: 0.08mm compressed laser spot for enhanced precision and detail.
- Large Engraving Area: Standard 410 x 400 mm, expandable to 410 x 850 mm.
- Offline Operation: Equipped with a 32-bit motherboard and a 3.5-inch sliding touch screen for standalone control without a computer connection.
- Enhanced Metal Engraving: Capable of producing clearer and faster engraving marks on metal surfaces.
- Cutting Capability: Efficiently cuts materials such as 20mm thick wood and 15mm thick acrylic.
4. Setup
4.1 Assembly
The ATOMSTACK S10 PRO requires assembly. Refer to the separate assembly guide provided with your product for detailed step-by-step instructions. Ensure all components are securely fastened before proceeding.
4.2 Software Installation
The ATOMSTACK S10 PRO is compatible with popular laser control software such as LightBurn and LaserGRBL. Install the appropriate software on your computer and ensure the necessary drivers are installed for communication with the engraver.
4.3 Focusing the Laser
Accurate laser focusing is crucial for optimal engraving and cutting results. Follow the instructions in your assembly guide or software manual to properly set the laser focus distance for your material.
5. Operating Instructions
5.1 Basic Controls

Figure 5.1: Location of the Emergency Stop, On/Off, and Reset buttons.
- Emergency Stop Button: Press this red button to immediately stop all machine operations. To restart, turn the button in the direction indicated to unlock it.
- On/Off Switch: Use this switch to terminate the operation and cut off all power to the machine.
- Reset Button: Press to stop the current operation, close the control terminal, and restart the system.
5.2 Offline Operation
The ATOMSTACK S10 PRO features an offline control terminal, allowing you to operate the machine without a continuous computer connection. The 32-bit motherboard supports this functionality, enhancing user experience and efficiency.

Figure 5.2: The 3.5-inch sliding touch screen for offline control, displaying the start menu and operational parameters.

Figure 5.3: The 32-bit motherboard, enabling offline operation and improved processing capabilities.
To use offline operation, transfer your engraving files to the machine's storage (e.g., via SD card or Wi-Fi if supported). Use the 3.5-inch touch screen to select files, adjust parameters, and initiate engraving or cutting tasks directly.
5.3 Engraving
The S10 PRO excels in fine engraving due to its double-compressed spot technology, which reduces the laser spot size to 0.08mm, allowing for highly detailed and precise image engraving.

Figure 5.4: An example of fine engraving, demonstrating the detail achievable with the 0.08mm laser spot. Engraving parameters are typically set in your software (e.g., LightBurn).
The S10 PRO also offers enhanced metal engraving capabilities, producing clearer and faster marks compared to previous models.

Figure 5.5: Illustration of the ATOMSTACK S10 PRO's enhanced metal engraving capability, resulting in clearer marks and faster processing.
5.4 Cutting
The powerful 10W laser allows for effective cutting of various materials. Always ensure proper ventilation and fire safety precautions when cutting.
5.4.1 Wood Cutting
The S10 PRO can cut wood up to 20mm thick, producing smooth edges. Adjust laser power and speed settings in your software according to the wood type and thickness.

Figure 5.6: The ATOMSTACK S10 PRO cutting 20mm thick wood, demonstrating a clean cut and smooth edge.
5.4.2 Acrylic Cutting
The machine is capable of cutting acrylic up to 15mm thick. Optimal settings will vary based on acrylic color and composition.

Figure 5.7: The ATOMSTACK S10 PRO cutting 15mm thick acrylic, illustrating a precise cut and smooth finish.
5.5 Expanding Engraving Area
The modular design of the ATOMSTACK S10 PRO allows for an expanded engraving area. By purchasing and installing an extended accessory kit, you can increase the working area from 410 x 400 mm to a super large 410 x 850 mm.

Figure 5.8: The ATOMSTACK S10 PRO configured with the extended accessory package, providing a larger 410 x 850 mm engraving area.
The extended accessory package, which includes longer frame components, must be purchased separately. Refer to the instructions provided with the expansion kit for proper installation.
6. Maintenance
Regular maintenance ensures the longevity and optimal performance of your ATOMSTACK S10 PRO.
- Cleaning: Regularly clean the machine frame and rails to prevent dust and debris buildup, which can affect movement accuracy.
- Laser Lens: Periodically inspect and clean the laser lens using a specialized lens cleaning solution and cloth. A dirty lens can reduce laser power and engraving quality.
- Belt Tension: Check the tension of the timing belts. They should be taut but not overly tight. Adjust if necessary to prevent skipping or inaccurate movement.
- Firmware Updates: Check the ATOMSTACK official website for any available firmware updates to ensure your machine has the latest features and bug fixes.
7. Troubleshooting
If you encounter issues with your ATOMSTACK S10 PRO, refer to the following common problems and solutions:
| Problem | Possible Cause | Solution |
|---|---|---|
| No laser output | Power not connected, laser module fault, software settings, emergency stop engaged. | Check power connections. Ensure laser module is properly seated. Verify laser power settings in software. Disengage emergency stop button. |
| Poor engraving/cutting quality | Incorrect focus, dirty lens, wrong power/speed settings, material issues. | Re-focus the laser. Clean the laser lens. Adjust power and speed settings for the specific material. Ensure material is flat and suitable. |
| Machine not connecting to computer | USB cable issue, driver not installed, incorrect port selection. | Try a different USB cable/port. Install necessary drivers. Select the correct COM port in your software. |
| Inaccurate movement/skipped steps | Loose belts, debris on rails, motor issues. | Check and adjust belt tension. Clean rails and wheels. Contact support if motor issues persist. |
For issues not covered here, please refer to the ATOMSTACK support resources or contact customer service.
8. Specifications
Technical specifications for the ATOMSTACK S10 PRO Laser Engraver:
- Manufacturer: ATOMSTACK
- Model: S10 PRO
- Laser Output Power: 10W
- Machine Power: 50W (effect)
- Laser Spot Size: 0.08mm (double-compressed)
- Standard Engraving Area: 410 x 400 mm
- Expandable Engraving Area: Up to 410 x 850 mm (with optional kit)
- Motherboard: 32-bit, supports offline operation
- Control Terminal: 3.5-inch sliding touch screen
- Connectivity: USB, Wi-Fi (for offline file transfer, if supported by firmware)
- Machine Weight: 5.5 kg
- Package Dimensions: 59 x 35 x 13 cm
- Batteries Required: No
- First Available Date: August 17, 2022
9. Warranty and Support
For warranty information, please refer to the documentation included with your purchase or visit the official ATOMSTACK website. If you require technical assistance or have questions regarding your ATOMSTACK S10 PRO, please contact ATOMSTACK customer support through their official channels.