UYIKOO HUT10
UYIKOO Keyless Hidden Camera User Manual
Model: HUT10
Product Overview
The UYIKOO Keyless Hidden Camera is an ultra-compact device designed to resemble a standard car remote key, offering discreet recording capabilities. Its realistic appearance ensures it blends seamlessly into any environment, making it ideal for various surveillance and evidence collection needs without drawing attention.
Key features include 1080P Full HD video recording, high-resolution still image capture, invisible night vision, and advanced motion detection. It supports up to 128GB Micro SD cards with loop recording, ensuring continuous operation without memory concerns. The device also features a timestamp function for accurate record-keeping and can operate for extended periods with external power.

Image: The UYIKOO Keyless Hidden Camera, designed to look like a car remote key, shown with its integrated camera lens and infrared light.
Package Contents
Please check that all items are present and in good condition upon opening the package:
- Camera Body (Keyless Hidden Camera)
- USB Cable
- Japanese Instruction Manual (English translation provided in this document)
Product Diagram and Controls
Familiarize yourself with the camera's components and control buttons:
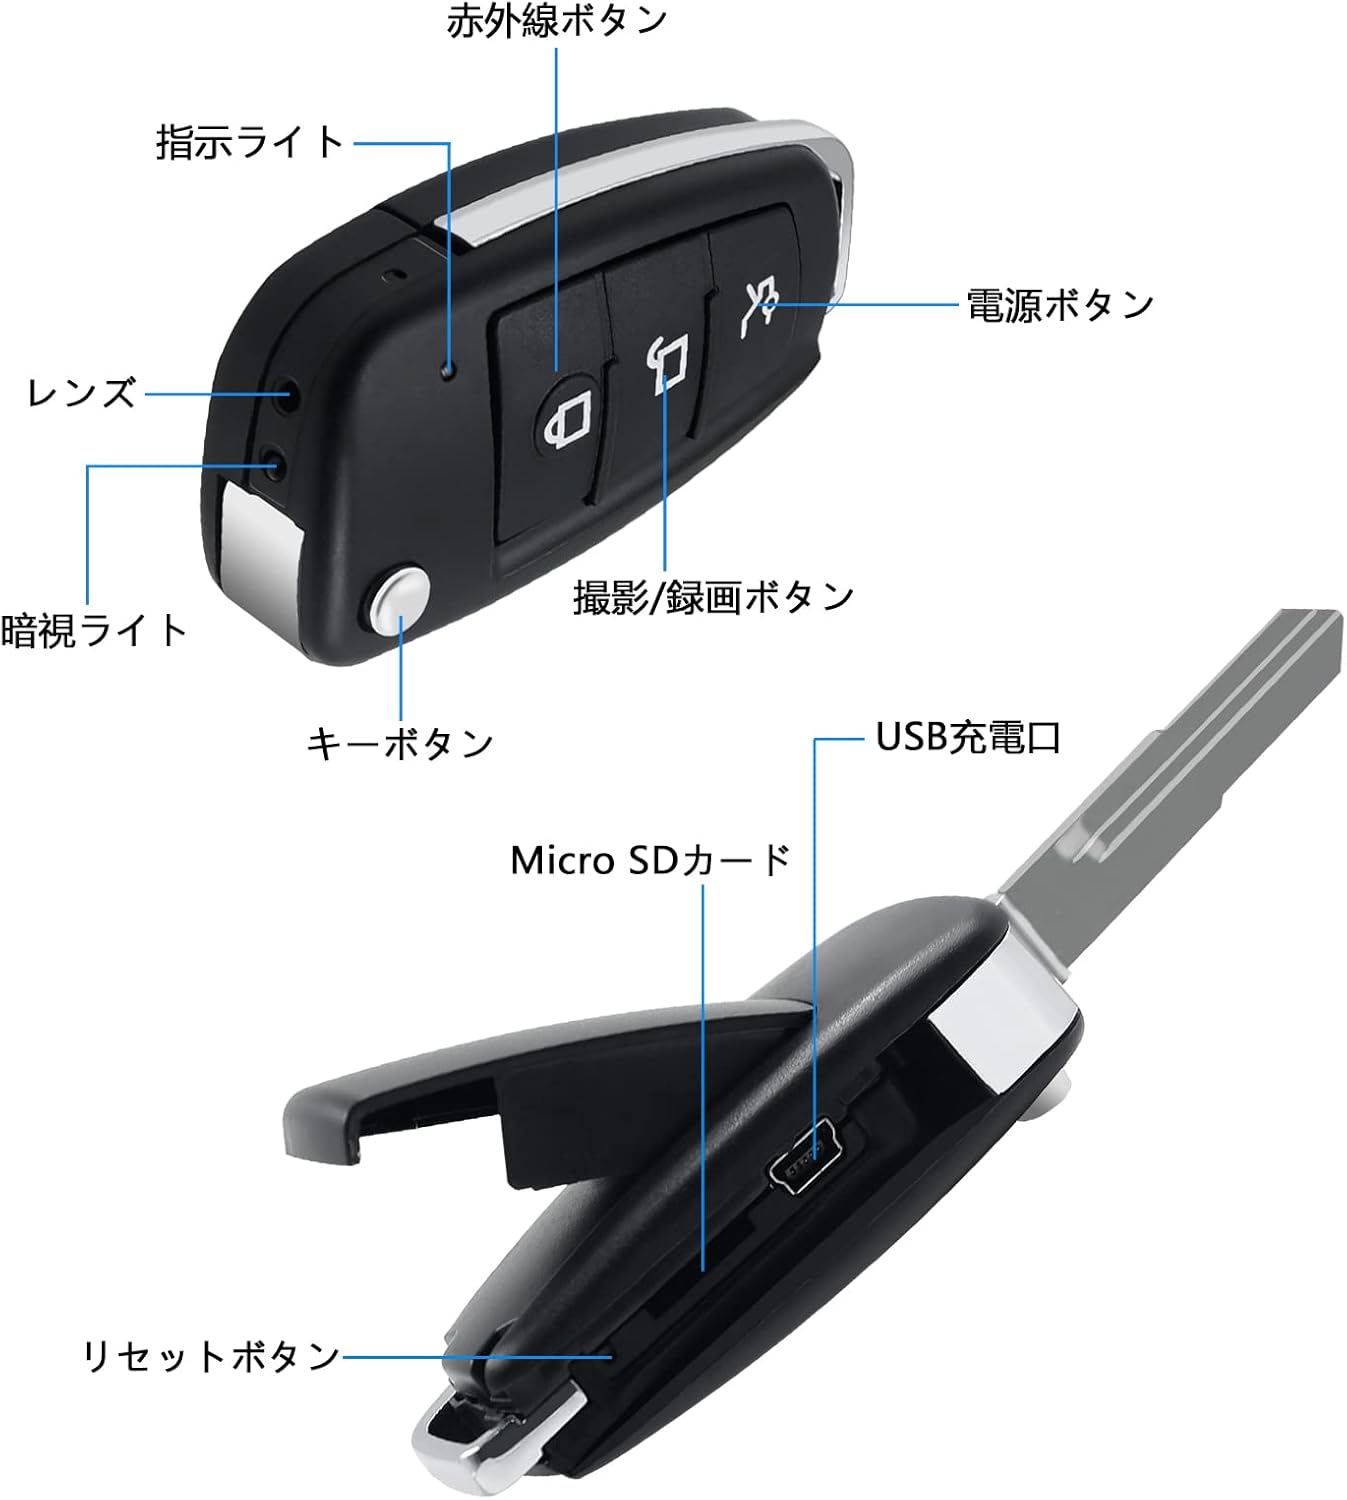
Image: Detailed diagram of the keyless hidden camera, highlighting key components such as the power button, recording button, infrared button, indicator light, lens, night vision light, key button, Micro SD card slot, USB charging port, and reset button.
- Power Button: Used to turn the device on and off.
- Recording/Photo Button: Initiates video recording or takes still photos.
- Infrared Button: Activates or deactivates the invisible night vision lights.
- Indicator Light: Provides status feedback (e.g., power on, recording, charging).
- Lens: The camera's optical component for capturing images and videos.
- Night Vision Light: Invisible infrared LEDs for low-light recording.
- Key Button: A decorative button resembling a car key release.
- Micro SD Card Slot: For inserting the memory card (supports 8-128GB, Class 10 or higher recommended).
- USB Charging Port: For charging the device and connecting to a computer.
- Reset Button: Used to reset the device if it becomes unresponsive.
Setup
1. Charging the Device
Before first use, fully charge the camera. Connect the camera to a USB power adapter (not included) or a computer's USB port using the provided USB cable. The indicator light will show charging status and turn off or change color when fully charged. A full charge takes approximately 1.5 to 2 hours and provides 130-150 minutes of continuous operation.

Image: The keyless hidden camera being charged via a USB cable connected to a wall adapter.
2. Inserting and Formatting the Micro SD Card
The camera supports Micro SD cards from 8GB to 128GB. A Class 10 or higher card is recommended for optimal performance. Before first use, it is crucial to format the Micro SD card on a computer to ensure compatibility and proper function.
- Open the Micro SD card slot cover on the camera.
- Insert the Micro SD card into the slot until it clicks into place.
- Connect the camera to your computer via the USB cable.
- Access the camera's storage drive on your computer.
- Right-click on the Micro SD card drive and select "Format." Choose the appropriate file system (e.g., FAT32) and start the formatting process.
- Once formatted, safely eject the camera from your computer.
The camera supports loop recording, meaning when the memory card is full, it will automatically overwrite the oldest files to continue recording.

Image: The keyless hidden camera illustrating its support for up to 128GB Micro SD cards and its loop recording capability, which overwrites older files when memory is full.
3. Setting Date and Time (Timestamp)
The camera can embed a timestamp (date and time) on your recordings. To set or disable this feature:
- Connect the camera to your computer via the USB cable.
- Open the camera's storage drive.
- Create a new text file (e.g., time.txt) in the root directory of the Micro SD card.
- Edit the text file to reflect the current date and time in the format YYYY-MM-DD HH:MM:SS (e.g., 2024-07-26 14:30:00). To disable the timestamp, you might need to set it to YYYY-MM-DD HH:MM:SS N or refer to the specific instructions in the included manual.
- Save the file and safely eject the camera. The camera will update its internal clock upon the next power cycle.

Image: A visual representation of the timestamp feature on recorded video, displaying the date and time for evidence collection.
Operating Instructions
1. Power On/Off
- Power On: Press and hold the Power Button for a few seconds until the indicator light illuminates.
- Power Off: Press and hold the Power Button again until the indicator light turns off.
2. Video Recording (1080P)
The camera records video in 1920x1080 Full HD resolution at 30 frames per second.
- Ensure the camera is powered on and a formatted Micro SD card is inserted.
- Press the Recording/Photo Button once to start video recording. The indicator light may flash or turn off to indicate recording is in progress discreetly.
- Press the Recording/Photo Button again to stop recording. The video file will be saved to the Micro SD card.

Image: The keyless hidden camera capturing a scene, demonstrating its 1080P Full HD video recording capability.
3. Photo Taking
The camera can capture high-quality still images at 2592x1944 pixels.
- Ensure the camera is powered on.
- Press the Recording/Photo Button briefly (or as specified in the detailed manual for photo mode) to take a photo. The indicator light may flash briefly.
- The image file will be saved to the Micro SD card.
4. Night Vision Mode
The camera is equipped with invisible infrared lights, allowing for recording in low-light or completely dark conditions without visible illumination.
- To activate night vision, press the Infrared Button. The indicator light may change to confirm activation.
- To deactivate night vision, press the Infrared Button again.
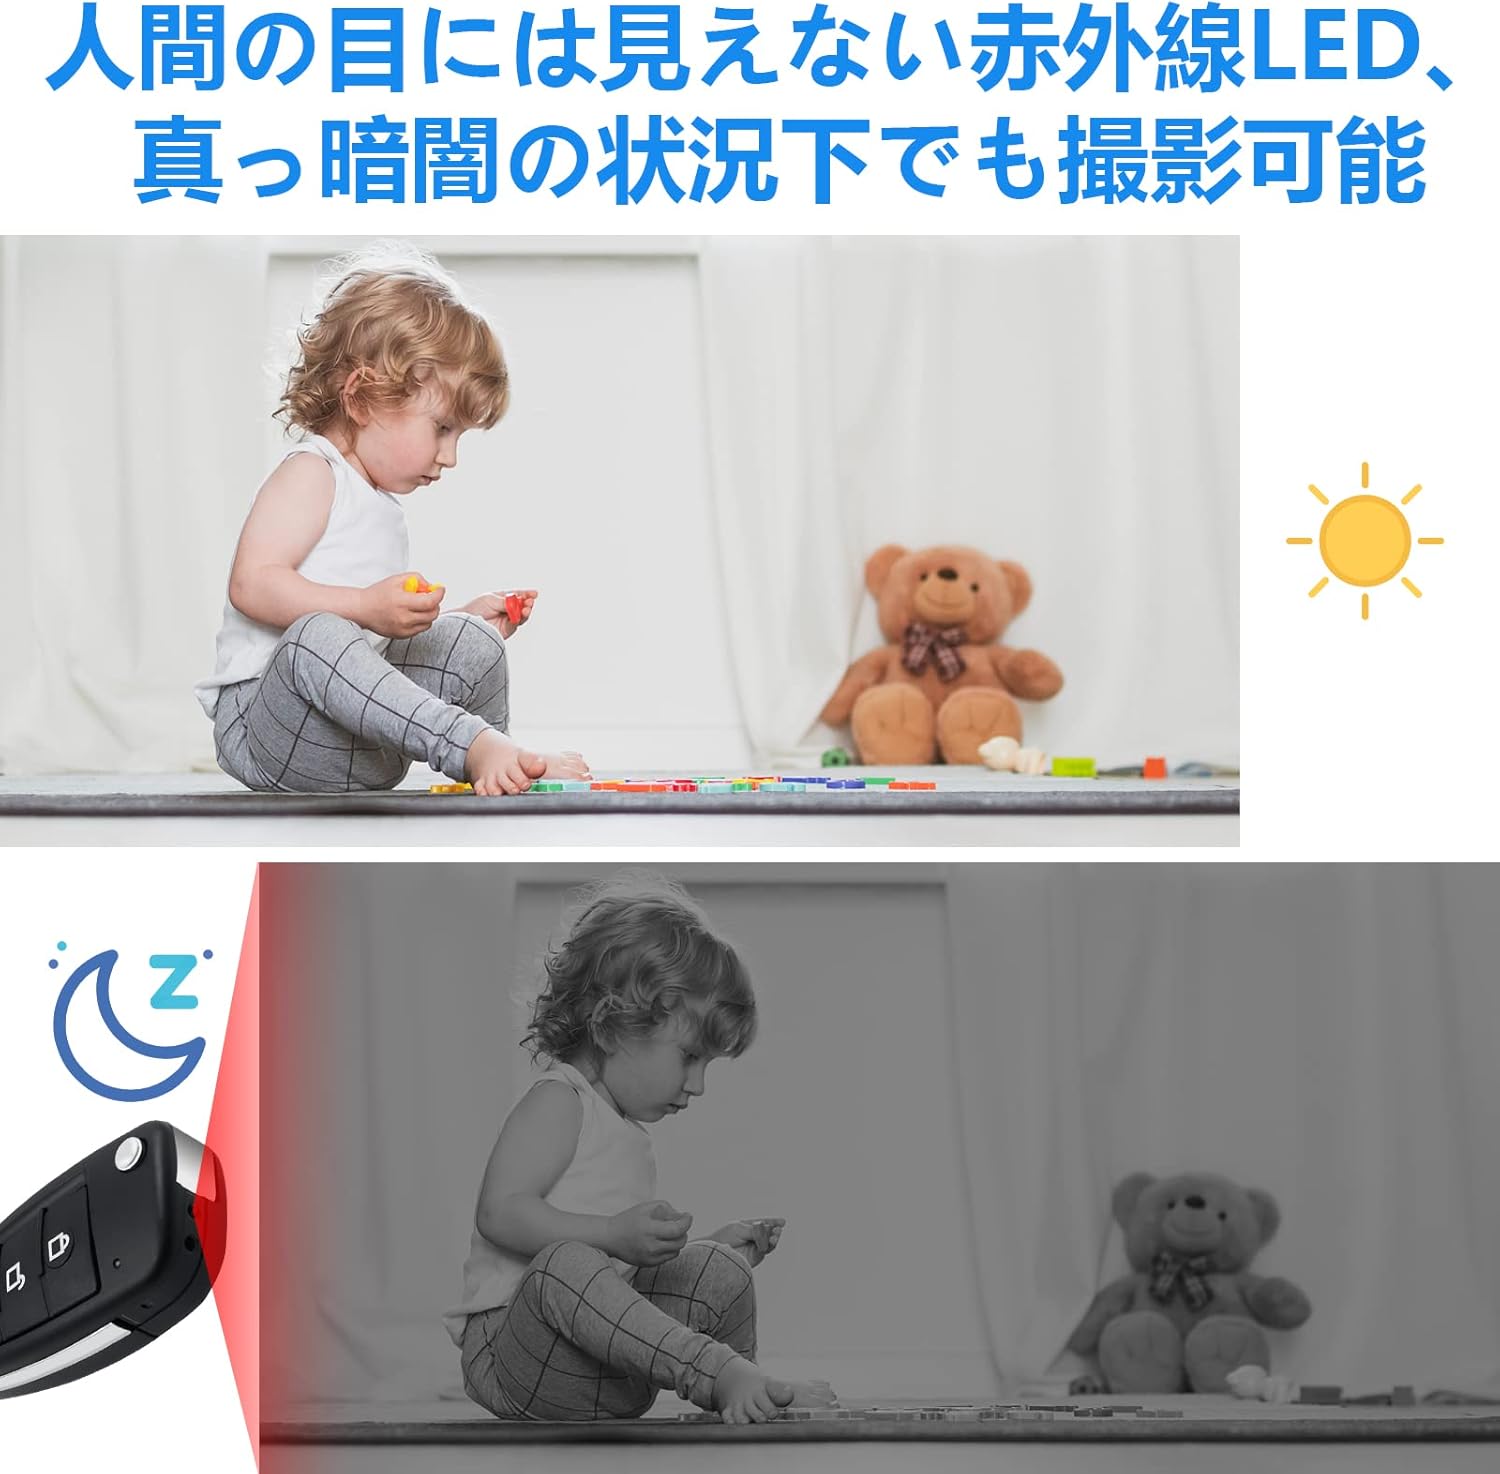
Image: The keyless hidden camera illustrating its night vision capability, showing a scene recorded in both bright and dark conditions using invisible infrared light.
5. Motion Detection Mode
In motion detection mode, the camera will automatically start recording when it detects movement and stop when movement ceases, conserving memory and battery life.
- To enter motion detection mode, follow the specific button sequence outlined in the full instruction manual (typically a long press or combination press of certain buttons).
- The camera will enter standby mode and begin recording only when motion is detected.
- To exit motion detection mode, repeat the activation sequence or power off the device.

Image: The keyless hidden camera showcasing its motion detection feature, illustrating how it records only when movement is detected, saving memory.
Maintenance
- Cleaning: Use a soft, dry cloth to clean the camera body and lens. Avoid using harsh chemicals or abrasive materials.
- Storage: When not in use for extended periods, store the camera in a cool, dry place away from direct sunlight and extreme temperatures. Ensure the battery is partially charged (around 50%) before long-term storage.
- Battery Care: To prolong battery life, avoid fully discharging the battery frequently. Recharge the camera regularly, even if not in active use.
- Micro SD Card: Periodically back up important recordings from your Micro SD card to a computer. Consider formatting the card every few months to maintain optimal performance and prevent data corruption.
Troubleshooting
| Problem | Possible Cause | Solution |
|---|---|---|
| Camera does not power on. | Low battery; device frozen. | Charge the camera fully. If unresponsive, press the Reset Button with a thin object (e.g., paperclip). |
| Cannot record video/take photos. | No Micro SD card; card not formatted; card full; incorrect card class. | Insert a Micro SD card. Format the card on a PC. Delete old files or replace with a new card. Use a Class 10 or higher card. |
| Poor video/image quality. | Insufficient lighting; dirty lens; low battery. | Ensure adequate lighting or activate night vision. Clean the camera lens. Charge the battery. |
| Timestamp is incorrect or not displayed. | Date/time file not set correctly or missing. | Connect to PC and ensure the time.txt file is correctly formatted and saved in the root directory of the Micro SD card. |
| Camera becomes unresponsive. | Software glitch. | Press the Reset Button with a thin object (e.g., paperclip) to restart the device. |
Specifications
| Feature | Detail |
|---|---|
| Model Number | HUT10 |
| Video Format | AVI |
| Video Resolution | 1920 x 1080 pixels (Full HD) |
| Frame Rate | 30fps |
| Aspect Ratio | 4:3 |
| Still Image Format | JPG |
| Still Image Resolution | 2592 x 1944 pixels |
| Weight | 41g |
| Dimensions (L x W x T) | 67mm x 32mm x 25mm |
| Operating Time (Battery) | 130-150 minutes (approx. 2.5 hours) |
| Charging Time | 1.5-2 hours |
| Supported Memory Card | Micro SD card (8GB - 128GB, Class 10 or higher recommended) |
| Battery Type | Lithium-ion |
| Connectivity | Wired (USB for data transfer/charging) |
| Recommended Media Players | MX Player, KMPlayer, VLC Media Player |
Warranty and Support
UYIKOO is committed to providing high-quality products and satisfactory service. Our products undergo strict quality control and double inspection before sale.
Warranty Information
This product comes with a 3-month warranty period from the date of purchase. In case of initial defects or natural failures, we offer free, unconditional exchange. Please contact us immediately if you encounter any issues.
Customer Support
We provide comprehensive support, including a detailed Japanese instruction manual. For any unclear points or questions regarding usage, please do not hesitate to contact us via email. We are dedicated to responding promptly and courteously to your inquiries.
How to Contact Support:
- Go to your Amazon account service.
- Navigate to your order history.
- Find the purchased product.
- Select the seller and choose "Ask a question."

Image: Information regarding comprehensive support and warranty details provided by the seller.
Applications and Discreet Design
The UYIKOO Keyless Hidden Camera's design allows for highly discreet placement and use in various scenarios:
- Home Security: Monitor entrances, living areas, or children's rooms.
- Office Surveillance: Place on desks, bookshelves, or conference tables for recording meetings or deterring theft.
- Evidence Collection: Ideal for documenting incidents of harassment, bullying, or other suspicious activities without detection.
- Pet Monitoring: Keep an eye on your pets while you're away.
- Caregiver Monitoring: Ensure the safety and well-being of elderly family members or children under care.

Image: Examples of discreet placement for the keyless hidden camera, including an entryway, TV table, bookshelf, conference table, and lecture hall.

Image: Illustrations of diverse applications for the keyless hidden camera, such as pet monitoring, elderly care, preventing theft, and collecting evidence.

Image: The keyless hidden camera seamlessly integrated into different settings, such as an office desk, a car's interior, and held in hand, demonstrating its excellent concealment.
Related Documents - HUT10
 |
H01 Camera User Manual and Power Bank Guide This manual provides instructions for the H01 Camera, covering its features, operation, charging, and reset procedures. It also details its functionality as a power bank. |
 |
UYIKOO Glasses Camera Instructions - User Manual Comprehensive user manual for the UYIKOO Glasses Camera, providing setup, operation, safety instructions, and troubleshooting for this 1080P HD wearable spy camera. |
 |
UYIKOO Mini Action Cam: User Manual and Operating Instructions Comprehensive guide to operating the UYIKOO Mini Action Cam, covering power, recording, photography, file viewing, charging, and safety precautions for this 1080P HD sports camera. |
Ask a question about this manual
Ask about setup, troubleshooting, compatibility, parts, safety, or missing instructions. Manuals+ will review the question and use this page’s manual context to help answer it.