1. Product Overview
The MELLCOM 12' x 20' Hardtop Gazebo is designed to provide a durable and aesthetically pleasing outdoor living space. It features a wood-grain aluminum frame and a galvanized steel double roof, offering protection from various weather conditions. This manual provides detailed instructions for assembly, operation, and maintenance to ensure proper use and longevity of your gazebo.

Image 1.1: The MELLCOM 12' x 20' Hardtop Gazebo, showcasing its wood-looking frame and double roof design in an outdoor setting next to a swimming pool.
2. Safety Guidelines
Adherence to the following safety guidelines is crucial for safe assembly and use of the gazebo:
- Anchoring: It is recommended to anchor the gazebo securely to the ground for stability, especially in windy conditions.
- Assembly Caution: Exercise caution during assembly. Ensure all components are securely fastened before use.
- Weather Conditions: While designed to withstand heavy snow and wind, take necessary precautions during extreme weather. Consider removing snow accumulation from the roof to prevent excessive load.
- Tools: Use appropriate tools and follow all steps carefully to prevent injury or damage to the product.
3. Package Contents
The MELLCOM 12' x 20' Hardtop Gazebo is shipped in multiple boxes (typically 6). Verify all parts are present before beginning assembly. Key components include:
- Wood-Grain Aluminum Frame Components (posts, beams, connectors)
- Galvanized Steel Double Roof Panels
- Curtains and Nettings (with binding belts)
- Hardware Kit (bolts, nuts, washers, anchoring plates, U & J hooks)
- Assembly Manual
4. Assembly Guide
4.1. Before You Begin
- Tools Required: A cordless drill with appropriate bits (Allen wrenches can be cut to fit), a rubber mallet, a ladder, and a silicone sealant (recommended for roof seams).
- Personnel: Assembly typically requires 2-3 people and takes approximately 5 hours.
- Preparation: Unpack all boxes and identify each part by comparing it with the parts list in the included manual. Organize hardware for easy access.
4.2. Step-by-Step Assembly
- Frame Assembly:
Assemble the wood-grain aluminum frame components according to the detailed diagrams in your manual. The posts feature a wood-looking powder coating, providing a natural aesthetic while maintaining the durability of aluminum, which resists decay, cracking, and rust.

Image 4.1: Cross-section diagram illustrating the composition of the wood-looking aluminum frame, highlighting the wood grain painting, metal material, and aluminum core.
- Roof Assembly:
Install the galvanized steel double roof panels. This design facilitates ventilation and reduces wind speed. When installing roof panels, it is advisable to secure the bottom of each panel joint first to hold the previous panel in place, preventing clips from dislodging. Apply silicone sealant to roof seams during construction to enhance waterproofing and prevent minor seepage.

Image 4.2: Detail of the galvanized steel double roof, showing its anti-UV and ventilation features, along with the integrated rain gutter system for efficient water drainage.
- Anchoring:
The gazebo is built with 4.8"x4.8" triangular aluminum frames for stability. While the manual may suggest anchoring early, it is often more practical to complete the main assembly, square up the structure, and then anchor the pre-drilled bases to your desired surface (e.g., concrete, deck) using appropriate fasteners. This allows for minor adjustments before permanent fixing.
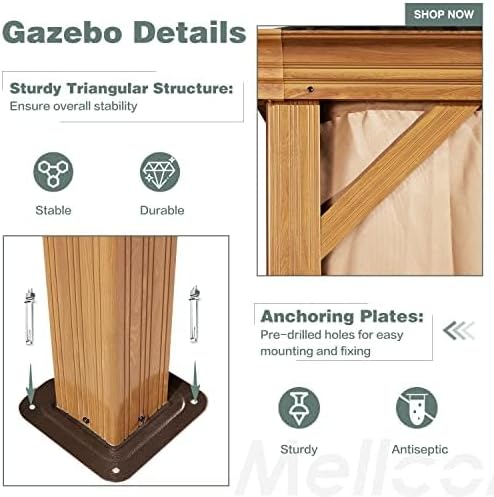
Image 4.3: Illustration of the sturdy triangular post structure and the pre-drilled anchoring plates designed for secure ground installation.
- Curtains and Nettings Installation:
Install the privacy curtains and nettings using the double-track system. Each post is equipped with three binding belts to bundle any layer as desired. The curtains are made from 180g/M2 polyester waterproof fabric, offering protection from dust, sun, rain, and snow.

Image 4.4: Details of the double-track system for curtains and nettings, including top hooks for accessories and binding belts for securing the fabric layers.
- Accessory Hooks:
Utilize the 'U' and 'J' hooks located on the top roof beams to hang lights or fans. The roof has a hanging weight capacity of up to 33 lbs.

Image 4.5: Close-up view of the 'J' and 'U' hooks integrated into the gazebo roof structure, designed for hanging lights and fans.
5. Operating Instructions
The MELLCOM Hardtop Gazebo is designed for ease of use and adaptability to your outdoor needs.
- Curtains and Nettings: The double-track system allows for independent operation of the privacy curtains and insect nettings. Slide them open or closed as needed. Use the binding belts to secure them to the posts when open.
- Drainage System: The professional water gutter design ensures efficient drainage. Rainwater flows from the edge of the roof into the poles and then to the ground, preventing water accumulation on the roof and enhancing snow load capacity.
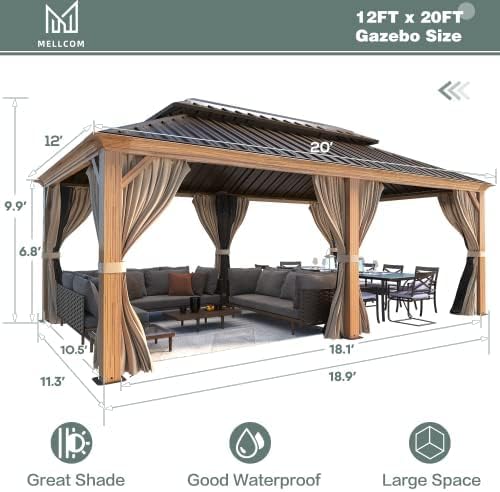
Image 5.1: Visual representation of the gazebo's dimensions (12' x 20') and how the curtains can be configured for fully open, semi-open, or fully closed states.
6. Care and Maintenance
Regular maintenance will extend the life and appearance of your gazebo.
- Frame: Clean the aluminum frame with mild soap and water. Avoid abrasive cleaners that could damage the wood-grain finish.
- Roof: Periodically inspect the galvanized steel roof for debris and clear any accumulation. The roof is designed to be fade-resistant and rust-resistant.
- Curtains and Nettings: These can be spot cleaned with mild soap and water. For deeper cleaning, follow care instructions on the fabric tags. Ensure they are dry before storing or closing for extended periods to prevent mildew.
- Winterization: While the gazebo is built to withstand snow, it is advisable to clear heavy snow accumulation from the roof to prevent structural stress.

Image 6.1: The gazebo demonstrating its resilience in both winter conditions, holding up to 5-inch thick snow, and summer, withstanding winds up to 50 MPH.
7. Common Issues and Solutions
| Issue | Possible Cause | Solution |
|---|---|---|
| Roof panel clips detach during assembly | Panels not fully secured before moving to next section. | Secure the bottom of each panel joint first to hold the previous panel in place before proceeding. |
| Slight water seepage along main trusses | Unsealed roof seams. | Apply silicone sealant to all roof seams during assembly. |
| Difficulty tightening bolts | Bolt length may be minimal for some connections. | Ensure components are aligned and apply slight pressure to expose threads. Using a cordless drill with a low clutch setting can assist. |
| Gazebo not perfectly square after assembly | Anchoring done too early. | Do not fully anchor the legs until the main structure is complete and squared up. Then tighten and secure. |
8. Product Specifications
| Feature | Detail |
|---|---|
| Brand | MELLCOM |
| Model | 12'x20' Hardtop Gazebo |
| Frame Material | Wood-Looking Aluminum (Alloy Steel, Aluminum, Iron, Metal, Wood components) |
| Roof Material | Galvanized Steel Double Top |
| Color | Wood-Looking |
| Product Dimensions | 226.8 x 135.6 x 118.8 inches (Length x Width x Height) |
| Floor Area | 240 Square Feet |
| Item Weight | 451.07 Pounds |
| Water Resistance Level | Waterproof |
| UV Protection | Yes |
| Assembly Required | Yes |
| Roof Hanging Capacity | Up to 33 lbs |
9. Warranty and Customer Support
For warranty information, missing parts, or technical assistance, please refer to the contact details provided in your product packaging or visit the official MELLCOM website. Ensure you have your purchase details and model information available when contacting support.