1. Introduction
This manual provides detailed instructions for the safe installation, operation, and maintenance of your American Standard ASH-110 Hot Water Dispenser. Please read all instructions carefully before beginning installation or use to ensure proper function and longevity of the product.
Important Safety Information:
- Always disconnect power to the unit before performing any service or maintenance.
- Ensure the unit is properly grounded according to local electrical codes.
- This hot water dispenser is designed to work exclusively with open vent faucets. Using any other type of faucet will void the product warranty and may cause damage to the unit.
- Do not operate the unit if the power cord is damaged.
- Keep children away from the hot water faucet to prevent burns.
2. Package Contents
Verify that all components are present before beginning installation:
- American Standard ASH-110 Hot Water Dispenser Tank
- Dual Handle Faucet (Brushed Nickel)
- Installation Hardware (mounting nuts, washers, connection tubing)
- User Manual
3. Product Specifications
| Feature | Specification |
|---|---|
| Model Number | ASH-110 (41-ASH-110-F560-BN) |
| Capacity | 2.5 Quarts (approx. 2.37 Liters) |
| Power Supply | 110-120V AC, 60Hz |
| Wattage | 780 Watts |
| Temperature Range | 140°F to 200°F (60°C to 93°C) |
| Tank Material | Stainless Steel |
| Faucet Finish | Brushed Nickel |
| Dispensing Capacity | Up to 60 cups per hour (near boiling) |
| Tank Dimensions (D x W x H) | 7.75" x 11.75" x 8.75" (197mm x 298mm x 220mm) |
| Safety Feature | Self-resetting thermal fuse |
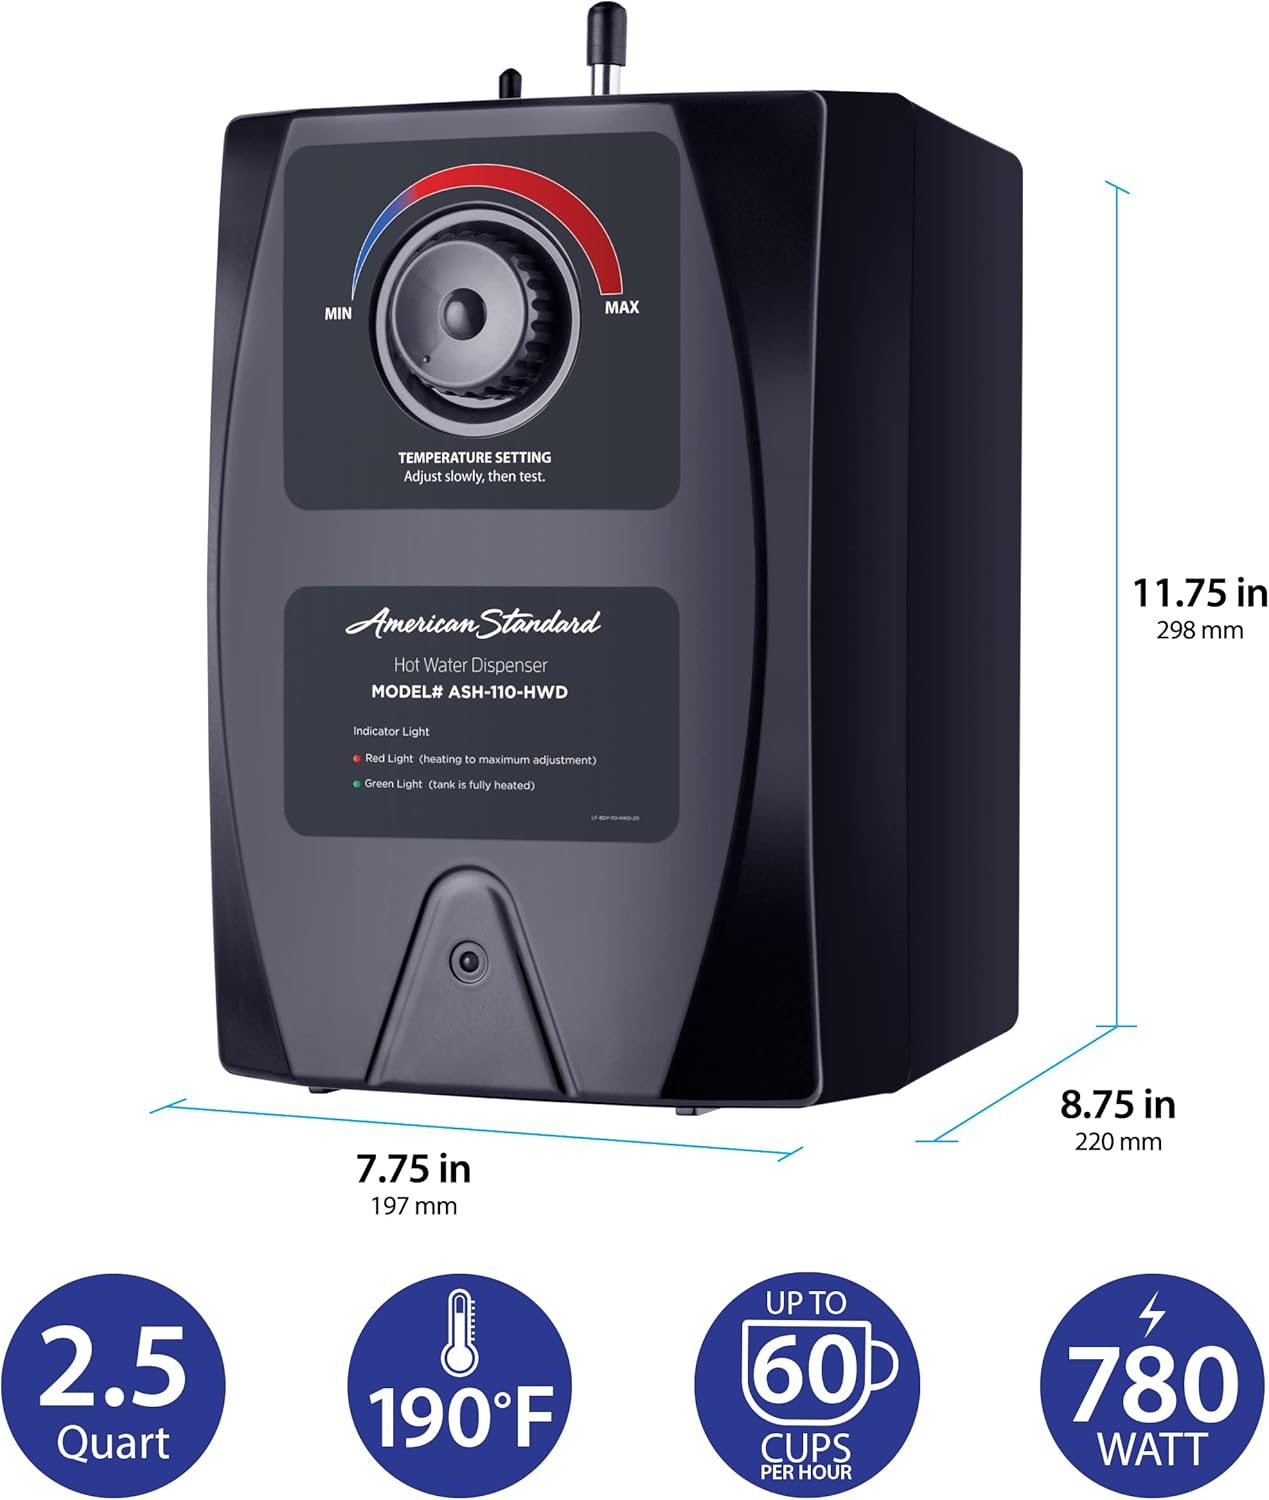
Figure 1: American Standard ASH-110 Hot Water Dispenser showing overall dimensions (7.75"D x 11.75"W x 8.75"H) and key features including 2.5 Quart capacity, 190°F maximum temperature, up to 60 cups per hour, and 780 Watt power.
4. Setup and Installation
4.1 Pre-Installation Checklist
- Power: A grounded 110-120V AC electrical outlet is required under the sink.
- Water Supply: A cold water supply line with a shut-off valve is needed.
- Sink Hole: Ensure a standard 1-3/8 inch (3.5 cm) diameter hole is available in the sink or countertop for the faucet.
- Space: Verify sufficient space under the sink for the dispenser tank (7.75"D x 11.75"W x 8.75"H).
4.2 Recommended Tools
- Adjustable wrench
- Screwdriver (Phillips and flathead)
- Drill (if creating a new sink hole)
- Plumber's tape
- Bucket and towels for spills
4.3 Installation Steps
- Turn Off Water and Power: Locate the main water supply shut-off valve and turn it off. Disconnect power to the under-sink area.
- Install Faucet: Mount the dual-handle faucet into the designated sink hole. Secure it from underneath the sink using the provided mounting hardware. Ensure the faucet is oriented correctly.
- Connect Faucet to Tank: Connect the hot water line from the faucet to the stainless steel outlet on top of the dispenser tank. Connect the cold water line from the faucet to the cold water supply.
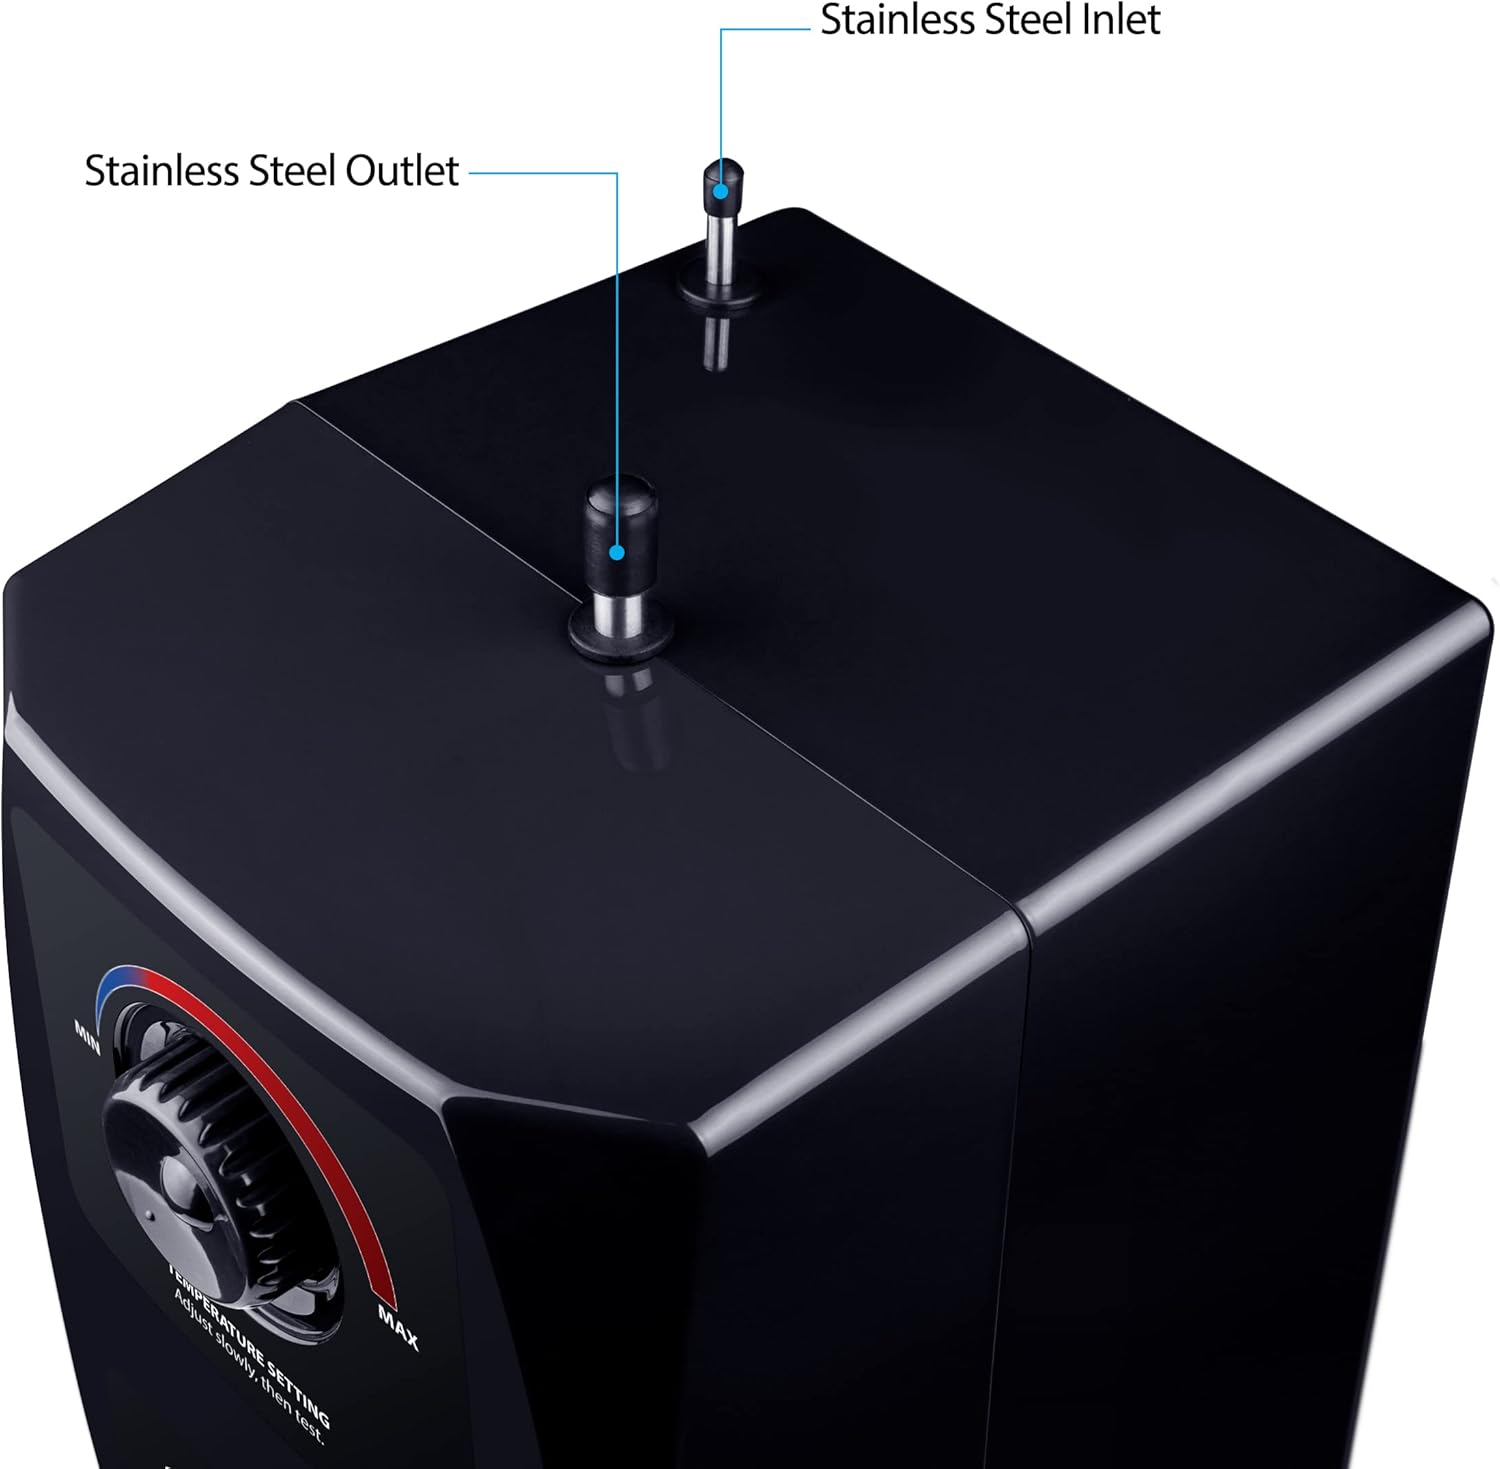
Figure 2: Stainless steel inlet and outlet ports on the top of the dispenser tank. The inlet connects to the cold water supply, and the outlet connects to the hot water faucet line.
- Connect Tank to Cold Water Supply: Connect the cold water inlet on the dispenser tank to the cold water supply line using appropriate fittings and plumber's tape to prevent leaks.
- Mount Tank: Place the dispenser tank in a suitable location under the sink. It is recommended to secure it to the cabinet wall to prevent movement.
- Check for Leaks: Slowly turn on the main water supply and check all connections for leaks. Tighten any leaking connections.
- Plug In Unit: Once all water connections are secure and leak-free, plug the dispenser's power cord into the grounded electrical outlet.
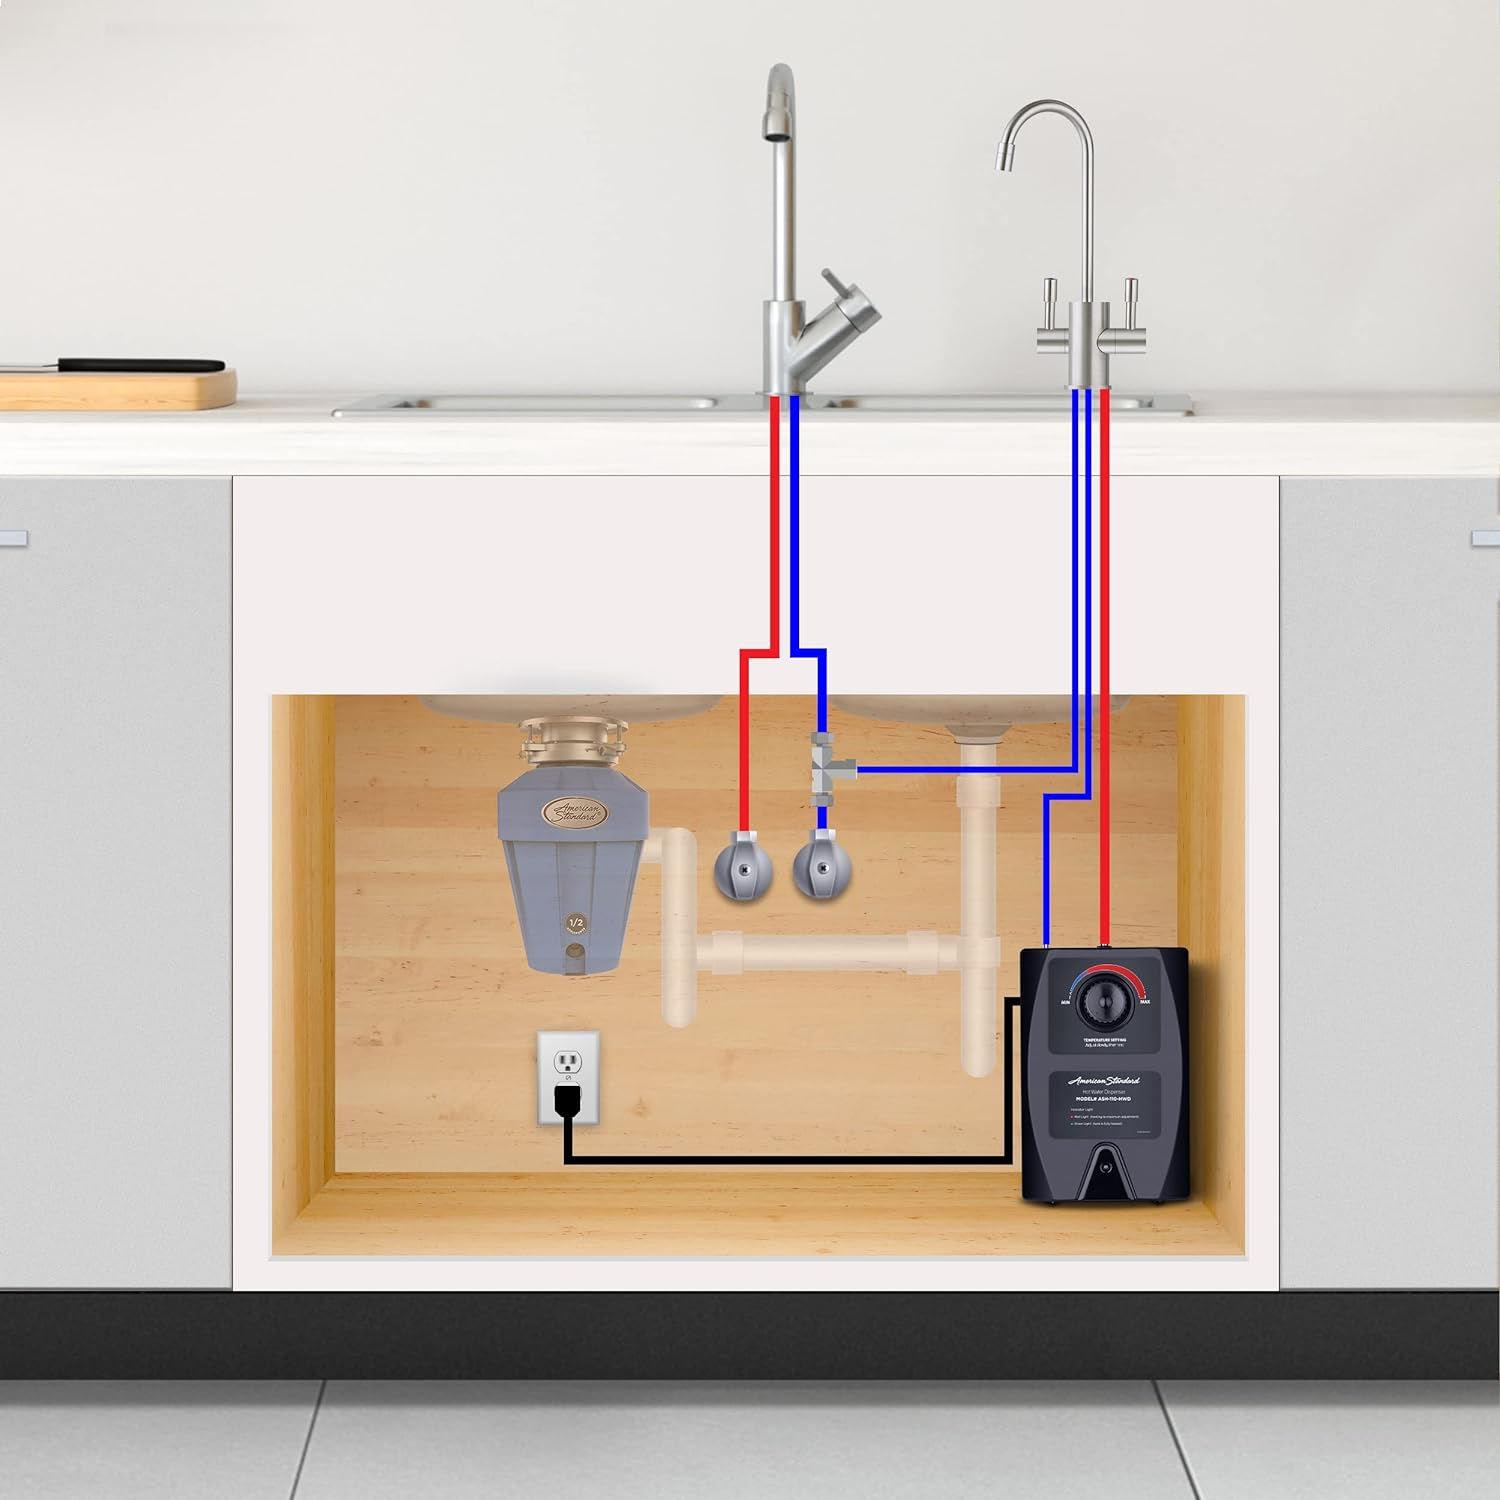
Figure 3: Typical under-sink installation diagram showing the hot water dispenser tank connected to the cold water supply, faucet, and electrical outlet.

Figure 4: Dimensions of the dual-handle faucet, showing height (11.63 in / 295 mm), spout reach, and base diameter for installation planning.
5. Operating Instructions
5.1 Initial Startup
- Fill Tank: Before plugging in the unit, open the hot water handle on the faucet and allow water to flow until it runs smoothly, indicating the tank is full and air has been purged. Close the hot water handle.
- Power On: Plug the unit into a grounded electrical outlet. The indicator light will illuminate.
- Heating Cycle: The unit will begin heating the water. This may take 10-15 minutes for the first cycle.
5.2 Temperature Adjustment
The temperature setting dial on the front of the dispenser allows you to adjust the water temperature between 140°F (60°C) and 200°F (93°C). Turn the dial slowly towards 'MAX' for hotter water or 'MIN' for cooler water. After adjustment, allow several minutes for the water temperature to stabilize before testing.
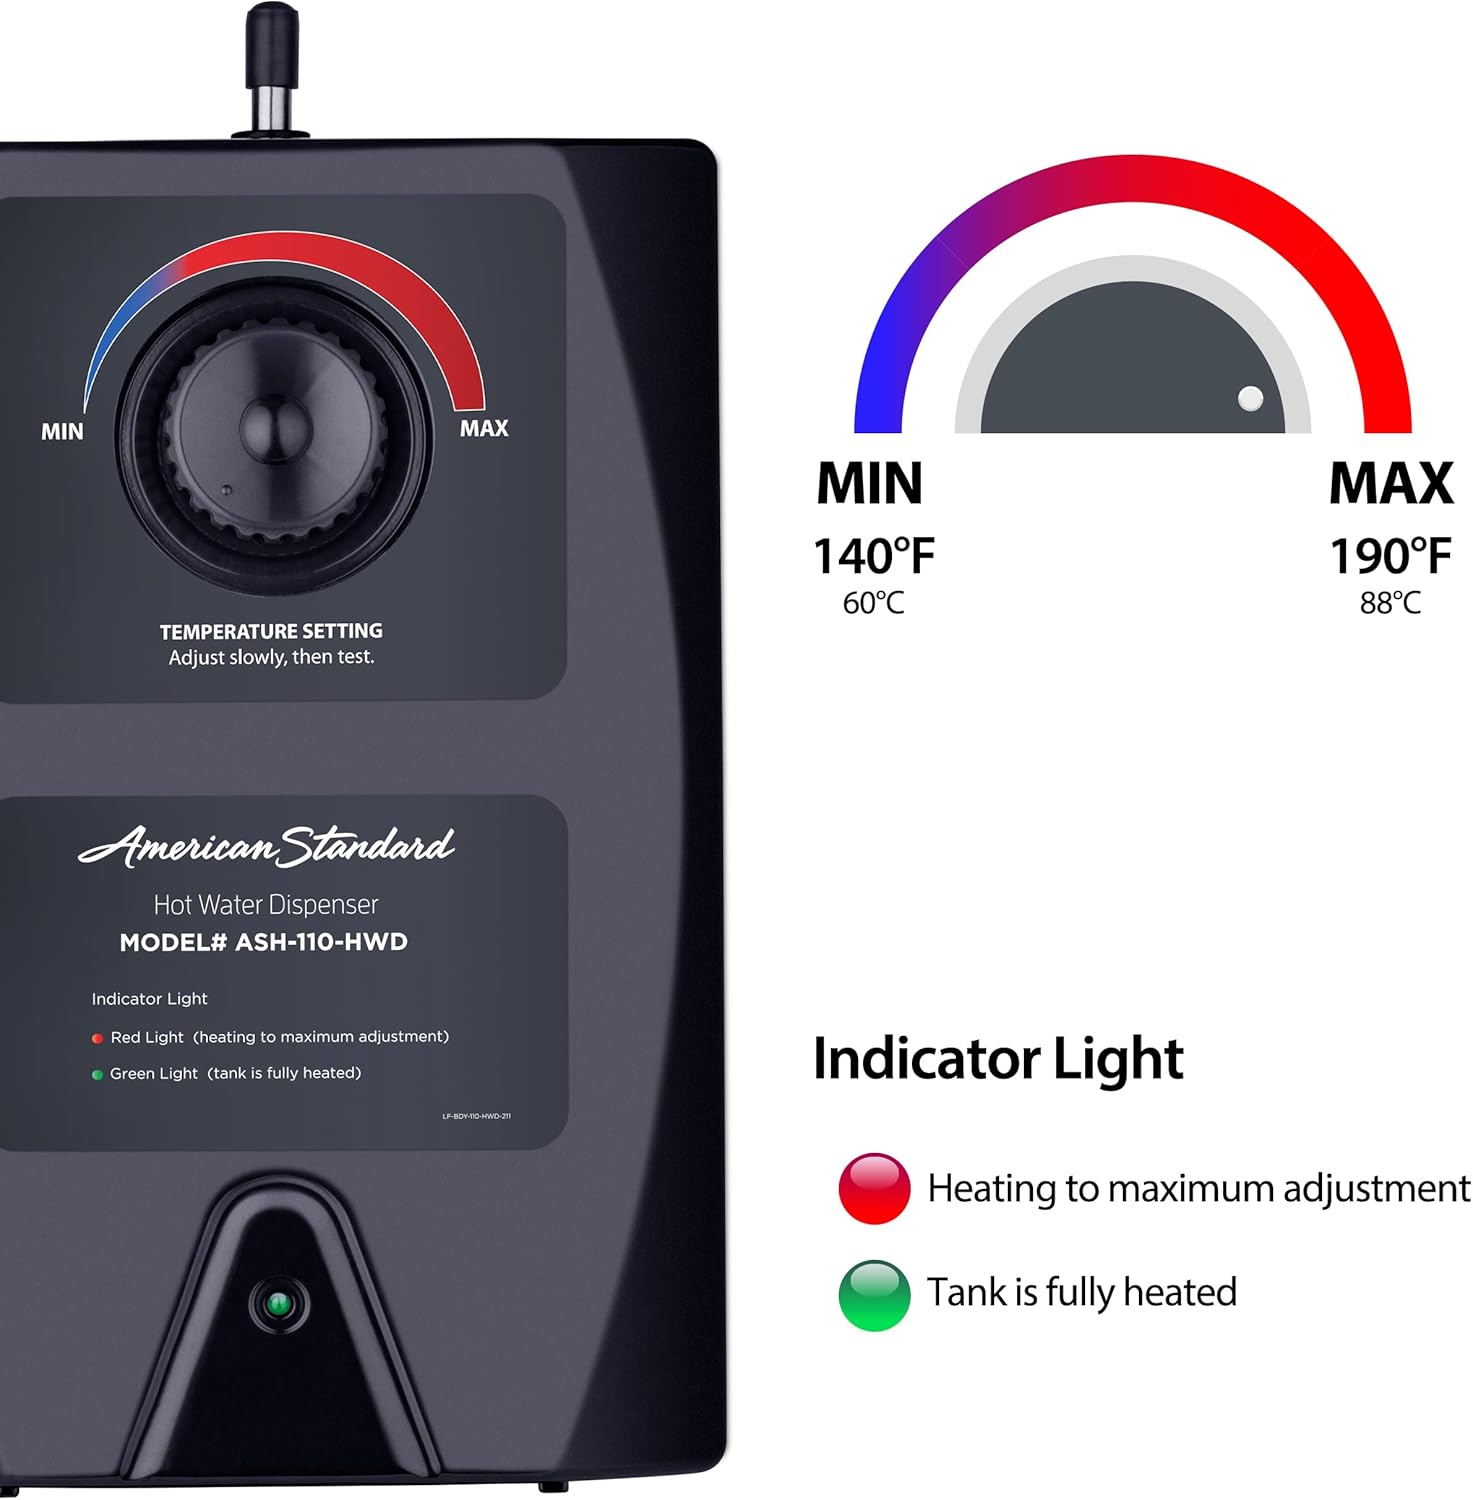
Figure 5: Close-up view of the temperature setting dial and indicator lights on the front of the dispenser. The dial adjusts the water temperature, and the lights show heating status.
5.3 Indicator Lights
- Red Light: Indicates the unit is actively heating water to the maximum set temperature.
- Green Light: Indicates the tank is fully heated and the water has reached the set temperature.
5.4 Dispensing Hot Water
To dispense hot water, activate the hot water handle on your faucet. For safety, many hot water faucets include a child safety lock mechanism that requires pushing down or pulling forward before turning the handle. Refer to your faucet's specific instructions for operation.

Figure 6: A hand holding a mug under the faucet, demonstrating the dispensing of hot water for beverages.
6. Maintenance
Regular maintenance ensures optimal performance and extends the life of your hot water dispenser.
- Cleaning: Clean the exterior of the dispenser tank and faucet with a soft, damp cloth. Do not use abrasive cleaners or solvents.
- Descaling: In areas with hard water, mineral deposits (scale) can build up inside the tank. If you notice a decrease in hot water output or efficiency, the tank may need descaling. Consult a qualified plumber or refer to specialized descaling instructions for hot water tanks.
- Leak Checks: Periodically inspect all water connections under the sink for any signs of leaks. Address any leaks immediately to prevent water damage.
- Thermal Fuse: The unit is equipped with a self-resetting thermal fuse to prevent tank burnout. If the unit stops heating, ensure it is properly filled with water and check the power supply. The fuse will reset automatically once the condition causing the overheat is resolved.
7. Troubleshooting
| Problem | Possible Cause | Solution |
|---|---|---|
| No hot water | Unit not plugged in; no power to outlet; thermal fuse tripped; water supply off; tank not filled. | Check power connection and outlet; ensure water supply is on; open faucet to fill tank; allow time for thermal fuse to reset. |
| Water not hot enough | Temperature setting too low; insufficient heating time; excessive hot water usage. | Adjust temperature dial to a higher setting; allow 10-15 minutes for water to heat; reduce continuous hot water draw. |
| Water leaking from unit or connections | Loose connections; damaged tubing; faulty O-ring. | Turn off water supply and power. Inspect all connections and tighten as necessary. Replace any damaged components. If leak persists, contact customer support. |
| Circuit breaker trips | Overloaded circuit; electrical short in unit. | Ensure the dispenser is on a dedicated circuit or one not overloaded by other appliances. If tripping continues, disconnect the unit and contact a qualified electrician or customer support. |
| Slow water flow | Mineral buildup (scale) in tank or faucet; kinked water line. | Check water lines for kinks. Consider descaling the tank (professional service recommended). |
8. Warranty Information
The American Standard ASH-110 Hot Water Dispenser is covered by a manufacturer's warranty against defects in materials and workmanship. Please note that the use of any faucet other than an open vent type will void this warranty. For specific warranty duration and terms, please refer to the warranty card included with your product or visit the official American Standard website.
9. Customer Support
For technical assistance, replacement parts, or warranty inquiries, please contact American Standard customer service. Contact information, including phone numbers and online support resources, can typically be found on the manufacturer's official website or on the product packaging.


