1. Introduction
This user manual provides essential information for the proper installation, operation, and maintenance of your WEELIAO Intel Mini PC, Model FB8265U8G. Please read this manual thoroughly before using the device to ensure optimal performance and longevity. Keep this manual for future reference.
2. Product Overview
The WEELIAO Intel Mini PC is a compact desktop computer designed for various computing tasks, offering a balance of performance and small form factor. It features an 8th Generation Intel Core i5 processor, 8GB RAM, and a 256GB SSD, pre-installed with Windows 11 Pro.
Key Features:
- Operating System: Windows 11 Pro 64 Bit
- Processor: 8th Generation Intel Core i5-8265U Processor (Up to 3.9GHz), 4 Cores, 8 Threads
- Graphics: Intel Iris Xe Graphics
- Memory: 8GB Soldered-down dual channel LPDDR3 memory
- Storage: 256GB SSD (expandable via M.2 slots)
- Connectivity: Dual HDMI 2.0a (supports dual 4K@60Hz displays), Dual RJ45 Ethernet, Multiple USB 3.1 Gen 2 and USB 2.0 ports, Intel Wi-Fi 6, Bluetooth 5
- Compact Design: Mini size (7.87 x 5.70 x 1.38 inches) and lightweight (approximately 4.4 pounds)
Ports and Connectors:
The Mini PC is equipped with a variety of ports for versatile connectivity. Refer to the images below for port identification.

Image 2.1: Front and rear views of the Mini PC, highlighting the power button, USB ports, HDMI outputs, and Ethernet ports.
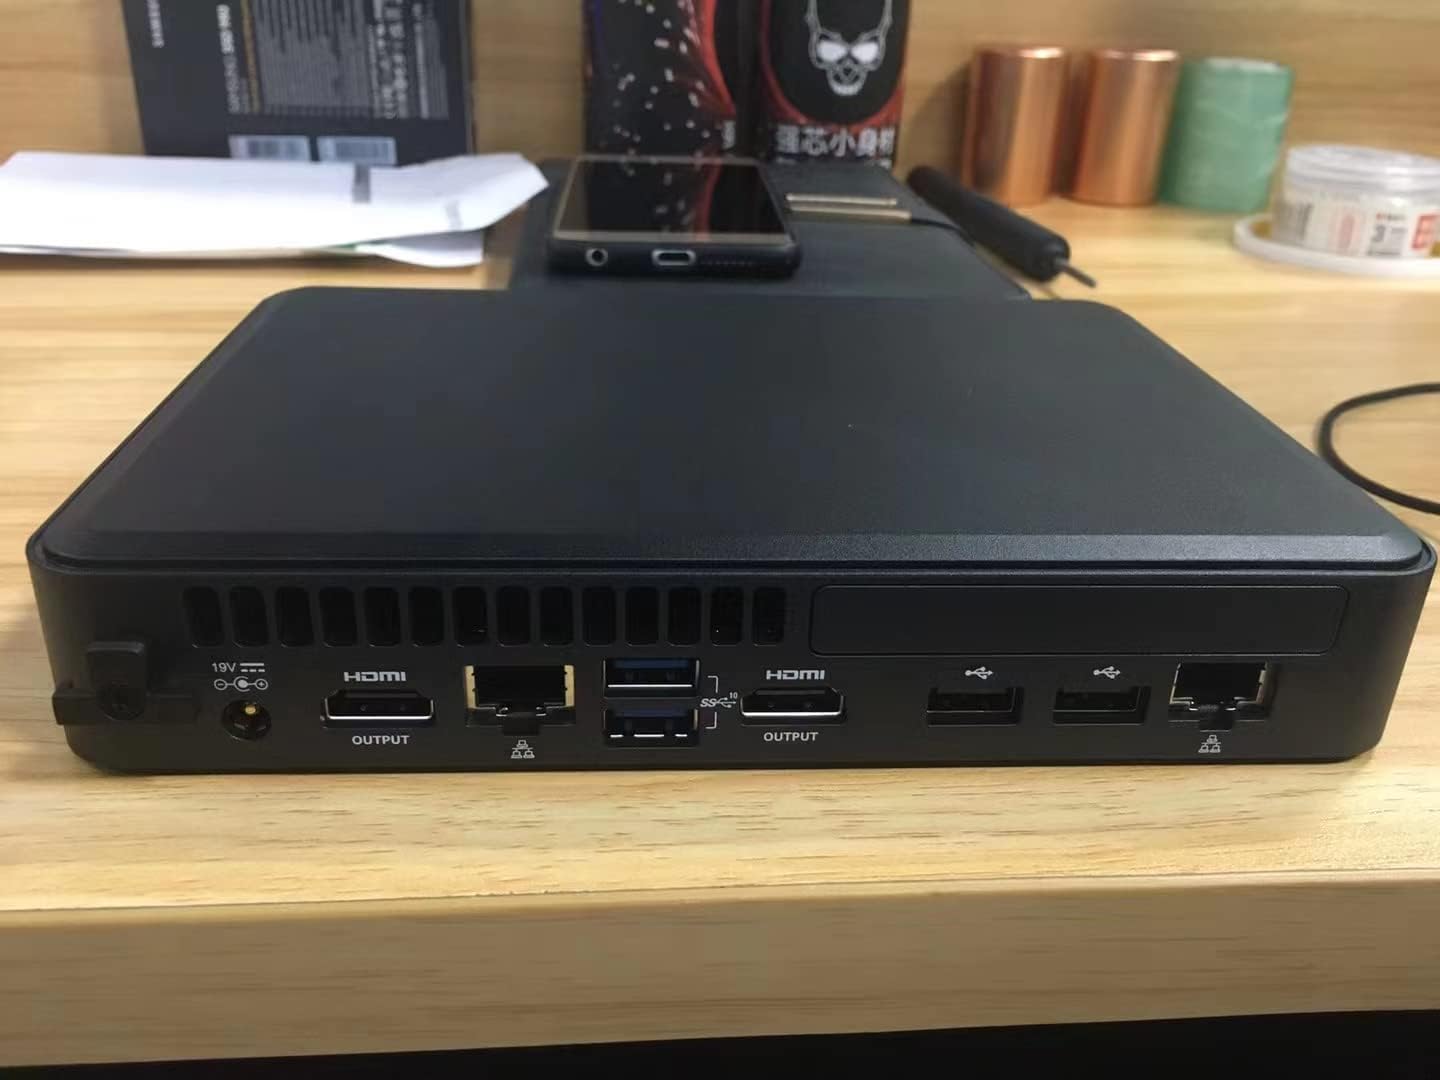
Image 2.2: Detailed view of the rear panel ports, including DC power input, two HDMI outputs, two RJ45 Ethernet ports, and multiple USB ports.
- Front Panel: Power button, USB 3.2 Gen 2 Type-A port, USB 2.0 Type-A port.
- Rear Panel: DC 19V power input, 2x HDMI 2.0a output ports, 2x RJ45 Ethernet ports (Intel i219-LM and Intel i211-AT), 2x USB 3.2 Gen 2 Type-A ports, 2x USB 2.0 Type-A ports.
3. Setup Instructions
3.1 Unpacking and Initial Inspection
- Carefully remove the Mini PC and all accessories from the packaging.
- Inspect the device for any signs of damage during transit. If damage is found, contact your retailer immediately.
- Ensure all components listed in the packing list are present.
3.2 Connecting Peripherals
- Connect Display: Connect your monitor(s) to the HDMI output ports on the rear panel using HDMI cables. The Mini PC supports dual 4K@60Hz displays.
- Connect Keyboard and Mouse: Plug your USB keyboard and mouse into any available USB ports (USB 2.0 or USB 3.2) on the front or rear panel.
- Connect Network: For a wired internet connection, connect an Ethernet cable from your router or modem to one of the RJ45 Ethernet ports on the rear panel. For wireless connectivity, ensure your Wi-Fi network is available during initial setup.
- Connect Power: Plug the power adapter into the DC 19V input port on the rear panel, then plug the power cord into a wall outlet.

Image 3.1: Example setup of the Mini PC connected to a monitor, keyboard, and mouse on a desk.
3.3 First Boot and Windows Setup
- Press the power button on the front panel to turn on the Mini PC.
- The system will boot into Windows 11 Pro. Follow the on-screen instructions to complete the initial Windows setup, including language, region, network connection, and user account creation.
- Once Windows setup is complete, the desktop will appear, and your Mini PC is ready for use.
4. Operating Instructions
4.1 Power On/Off
- Power On: Press the power button on the front panel.
- Power Off: Click the Start button in Windows, then select Power > Shut down. Alternatively, press and hold the power button for 4 seconds to force a shutdown (use only when necessary).
- Restart: Click the Start button in Windows, then select Power > Restart.
- Sleep: Click the Start button in Windows, then select Power > Sleep.
4.2 Connecting to Wi-Fi
- Click the Network icon (Wi-Fi or Ethernet) in the taskbar.
- Select your desired Wi-Fi network from the list.
- Click 'Connect' and enter the network security key (password) if prompted.
- The Mini PC will connect to the Wi-Fi network.
4.3 Using Bluetooth Devices
- Ensure your Bluetooth device is in pairing mode.
- In Windows, go to Settings > Bluetooth & devices.
- Turn on Bluetooth and click 'Add device'.
- Select 'Bluetooth' and choose your device from the list to pair.
4.4 Storage Expansion
The Mini PC supports additional storage via M.2 slots. You can install an M.2 22x80 NVMe or SATA SSD, and an M.2 22x42/80 SATA SSD. This requires opening the chassis. Consult a qualified technician if you are unsure about this procedure.
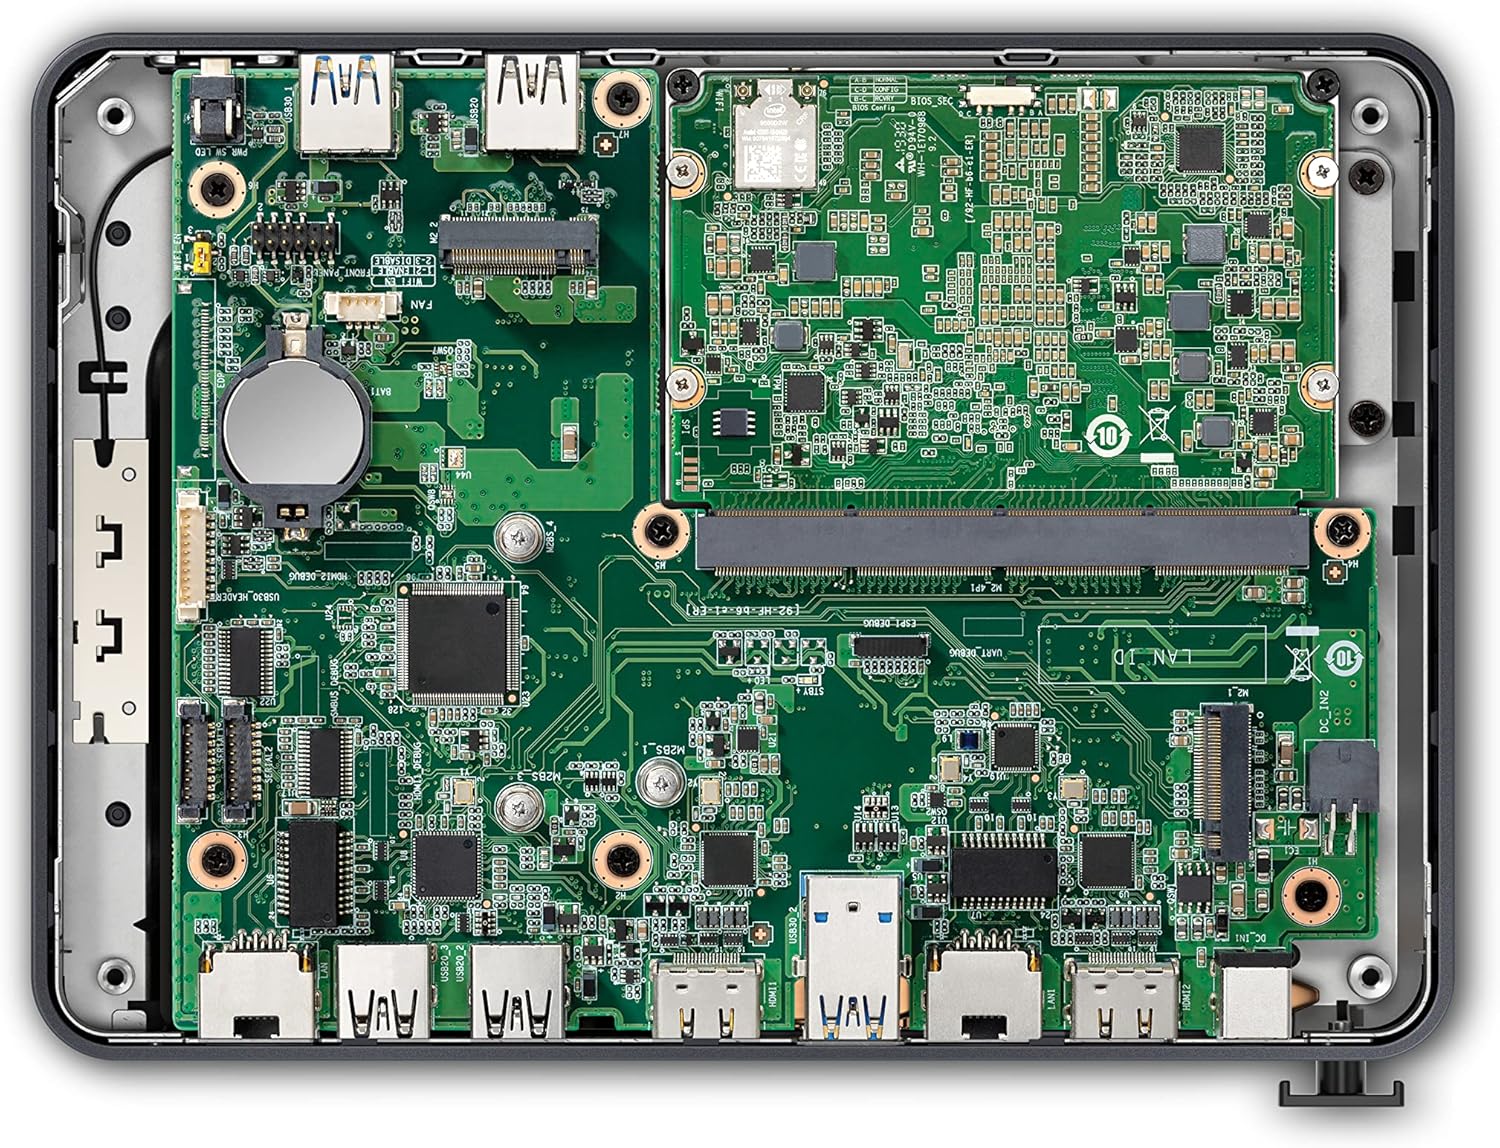
Image 4.1: Internal view of the Mini PC, showing the motherboard layout and available M.2 slots for storage expansion.
5. Maintenance
5.1 Cleaning
- Always power off the Mini PC and disconnect it from the power outlet before cleaning.
- Use a soft, dry cloth to wipe the exterior of the device.
- For stubborn marks, lightly dampen the cloth with water or a mild, non-abrasive cleaner.
- Use compressed air to clear dust from ventilation openings and ports. Do not spray liquid directly onto the device.
5.2 Software Updates
- Regularly check for and install Windows updates to ensure system security and performance. Go to Settings > Windows Update.
- Keep device drivers updated. You can typically find driver updates through Windows Update or the WEELIAO support website.
5.3 Environmental Considerations
- Operate the Mini PC in a well-ventilated area to prevent overheating.
- Avoid exposing the device to extreme temperatures, direct sunlight, or high humidity.
- Keep the device away from liquids and strong magnetic fields.
6. Troubleshooting
This section addresses common issues you might encounter with your Mini PC. For more complex problems, please contact customer support.
6.1 No Power
- Ensure the power adapter is securely connected to both the Mini PC and a working power outlet.
- Test the power outlet with another device to confirm it is functional.
- Verify the power adapter is the correct one supplied with the Mini PC.
6.2 No Display Output
- Check that the HDMI cables are securely connected to both the Mini PC and the monitor(s).
- Ensure the monitor is powered on and set to the correct input source (e.g., HDMI 1, HDMI 2).
- Try connecting to a different monitor or using a different HDMI cable to rule out faulty peripherals.
6.3 No Internet Connection
- Wired: Check the Ethernet cable connection to both the Mini PC and your router/modem. Verify that your router/modem is working correctly.
- Wireless: Ensure Wi-Fi is enabled in Windows settings. Confirm you are connected to the correct network and have entered the password correctly. Restart your router/modem.
6.4 System Slowdown or Freezing
- Close unnecessary applications running in the background.
- Check Task Manager (Ctrl+Shift+Esc) for processes consuming excessive CPU, memory, or disk resources.
- Ensure the system has adequate ventilation and is not overheating.
- Run a disk cleanup and defragmentation (for HDD, not SSD) or optimize drives (for SSD).
- Perform a virus/malware scan.
7. Specifications
Below are the detailed technical specifications for the WEELIAO Intel Mini PC Model FB8265U8G.
Video 7.1: An overview of the Intel NUC Pro Element Chassis, detailing its various ports, internal components, and potential use cases in different environments. This video highlights the modularity and connectivity options of the NUC platform.
| Component | Specification |
|---|---|
| Model Name | FB8265U8G |
| Processor | 8th Generation Intel Core i5-8265U (Up to 3.9 GHz), 4 Cores, 8 Threads |
| Graphics | Intel Iris Xe Graphics |
| RAM | 8 GB LPDDR3 (Soldered-down dual channel) |
| Storage | 256 GB SSD (M.2 22x80 M-key slot for PCIe x4 NVMe or SATA SSDs, M.2 22x42/80 M-key slot for SATA SSDs) |
| Operating System | Windows 11 Pro |
| Video Output | 2x HDMI 2.0a (supports dual 4K@60Hz displays) |
| Ethernet | 2x RJ45 (Intel i219-LM 10/100/1000 Mbps, Intel i211-AT 10/100/1000 Mbps) |
| USB Ports | 3x USB 3.1 Gen 2 Type-A, 3x USB 2.0 Type-A |
| Wireless Connectivity | Intel Wi-Fi 6, Bluetooth 5 |
| Dimensions (LxWxH) | 7.87 x 5.7 x 1.38 inches |
| Item Weight | 4.4 pounds |
| Power Source | AC Adapter |
8. Warranty Information
The WEELIAO Intel Mini PC Model FB8265U8G comes with a 3-Year Limited Warranty. This warranty covers defects in materials and workmanship under normal use. It does not cover damage caused by accident, misuse, abuse, unauthorized modification, or external causes such as power surges. Please retain your proof of purchase for warranty claims.
9. Support
For technical assistance, troubleshooting beyond this manual, or warranty inquiries, please contact WEELIAO customer support through the following channels:
- Online Support: Visit the official WEELIAO store on Amazon for product information and support resources: WEELIAO Amazon Store
- Seller Contact: You can also contact the seller directly through your Amazon order history for specific product support.