Introduction
This manual provides detailed instructions for the installation, operation, and maintenance of your AllAboutAdapters USB Digital HD TV Tuner/Terrestrial Receiver + MPEG DVR Adapter for PC. This device allows you to watch and record free over-the-air digital broadcast TV channels (ATSC) and unencrypted Clear QAM channels directly on your computer.
Safety Information
- Do not expose the device to moisture or extreme temperatures.
- Avoid dropping or subjecting the device to strong impacts.
- Do not attempt to disassemble or repair the device yourself. Refer to qualified service personnel.
- Ensure proper ventilation around your computer during operation.
Package Contents
Please verify that all items are present in your package:
- USB Digital HD TV Tuner
- Mini Antenna (for basic reception)
- Software CD (or download link for drivers and TVR software)
- Quick Start Guide (this manual)
Setup
1. Hardware Connection
- Connect a digital TV antenna (either the included mini antenna or a larger outdoor/indoor antenna) to the antenna input port on the USB TV tuner.
- Plug the USB TV tuner into an available USB port on your desktop or laptop PC.

Figure 1: Hardware connection diagram. Connect your digital antenna to the tuner, then plug the tuner into your PC's USB port.
2. Software Installation
- Insert the provided software CD into your computer's optical drive, or download the latest drivers and TVR software from the manufacturer's official website.
- Follow the on-screen instructions to install the device drivers and the TVR application. It is recommended to temporarily disable any antivirus software during installation to prevent conflicts, especially if prompted about high memory or process access. Re-enable antivirus after installation.
- For Windows 11 users, if you encounter issues with the driver loading, you may need to temporarily turn off "Core Isolation" in Windows Security settings during installation and initial setup. Consult Windows documentation for details on managing this setting.
- Restart your computer after the installation is complete.
3. Initial Channel Scan
- Launch the TVR software.
- Navigate to the settings or channel scan menu within the software.
- Select your region (e.g., USA, Canada) and initiate an ATSC channel scan to find over-the-air digital channels. If applicable, also perform a Clear QAM scan for unencrypted cable channels.
- The software will search for available channels and create a channel list. This process may take several minutes.
Operating Instructions
1. Watching Live TV
- After the channel scan, select a channel from the channel list to begin watching live TV.
- Use the software's control panel to change channels, adjust volume, and access other features.

Figure 2: Digital TVR Software Panel. This panel provides controls for TV channel selection, recording, playback, volume, and signal strength.
2. Time-Shift Function
The Time-Shift function allows you to pause live TV, rewind, or fast-forward. This is useful for pausing during commercials or replaying a missed moment.
- While watching live TV, click the Pause button on the TVR software panel.
- Click Play to resume from where you left off, or use the Rewind/Fast Forward buttons.
3. Recording TV Programs
The device supports both instant and scheduled recording of TV programs.
Instant Recording:
- Click the Record button on the TVR software panel to start recording the current program.
- Click the Stop Recording button to end the recording.
Scheduled Recording:
- Access the scheduling feature, usually found by right-clicking on the TVR software window or through a dedicated menu option.
- Follow the on-screen steps to set a task name, select the recording mode (Record or Watch only), choose the TV input, program, start time, and duration.
- You can set recordings for once, daily, weekly, or specific days.

Figure 3: TVR Timer List. This interface allows you to schedule recordings or set reminders to watch specific programs.

Figure 4: Schedule Recording of TV Channels in 4 Steps. This visual guide demonstrates how to set up a recording schedule within the TVR software.
4. Picture-On-Picture (PIP) Viewing
The PIP function allows you to watch TV in a resizable window while using other applications on your computer.
- Activate PIP mode from the software's menu (often accessible via right-click).
- The TV window can be moved and resized, and it can be set to always stay on top of other applications.

Figure 5: TV Screens Always Stay On Top Of Software Or Browser Window. This image illustrates the Picture-On-Picture feature, allowing TV viewing alongside other computer tasks.
5. Channel Management and EPG
- To view the channel list, click the "CH" button on the TVR software panel or right-click and select "Channel list."
- The Electronic Program Guide (EPG) provides program information for upcoming shows. Access it via the "EPG" button or right-click menu.
- You can edit channels, rename them, add/delete, and organize favorite lists within the software settings.

Figure 6: Right Click On Mouse To Call Up All The TVR Features And Options. This image shows the context menu for quick access to various TVR functions.
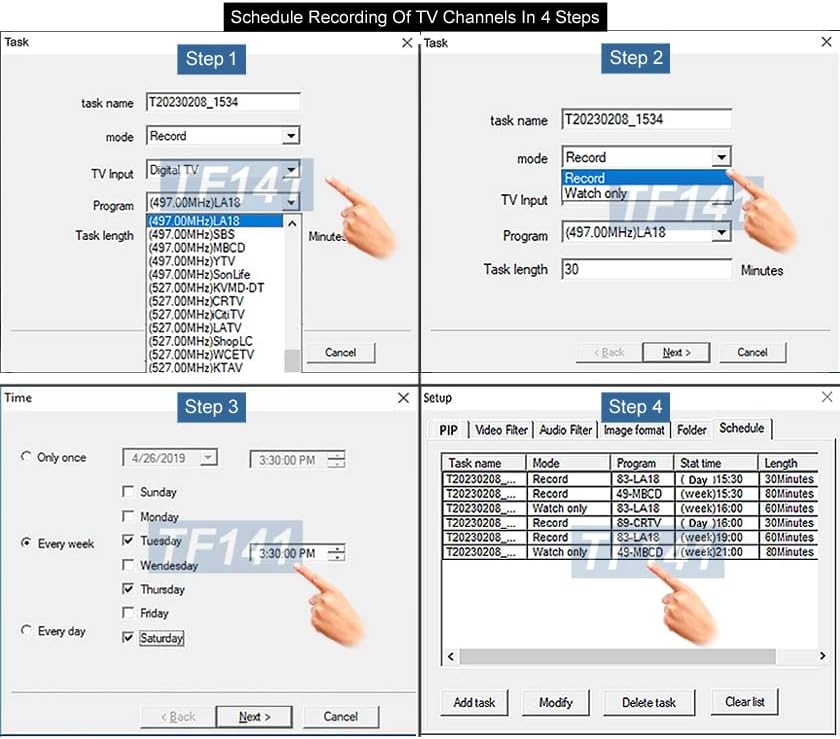
Figure 7: Press "CH" Button On The TVR Software Panel To Turn On TV Channel List. This image highlights the button to access the channel list and shows the EPG button.
6. Viewing Recorded Files
Recorded TV shows are saved as TS files (compressed MPEG-2) on your PC's hard drive or an external USB drive. The files are typically named with the date, time, and TV station name.
- You can access recorded files directly from the TVR software's recording library or by navigating to the designated recording folder using your computer's file explorer.
Maintenance
Cleaning:
- Wipe the device with a soft, dry cloth. Do not use liquid cleaners or abrasive materials.
Software Updates:
- Periodically check the AllAboutAdapters website for updated drivers or TVR software versions to ensure optimal performance and compatibility with the latest operating systems.
Troubleshooting
If you encounter issues, please refer to the following common problems and solutions:
- No Signal / No Channels Found:
Ensure your antenna is properly connected and positioned for optimal reception. Perform a new channel scan. Check your location's digital TV broadcast availability. - Software Not Launching / Driver Issues:
Verify that the drivers are correctly installed. Try reinstalling the software and drivers. Temporarily disable antivirus or Windows security features like "Core Isolation" during installation if they interfere, then re-enable them. Ensure your operating system is supported. - Poor Picture Quality / Freezing:
This may indicate a weak signal. Adjust your antenna position or consider a stronger antenna. Close other demanding applications on your PC. - Recording Problems:
Ensure you have sufficient free disk space on your PC. Check recording settings and scheduled tasks for correctness. - Device Not Recognized:
Try plugging the USB tuner into a different USB port. Restart your computer. Ensure drivers are installed.
Specifications
| Brand | AllAboutAdapters |
| Model Number | USBTF-DTV3 |
| Item Weight | 4 ounces |
| Compatible Devices | Laptop, Desktop |
| Connectivity Technology | USB |
| Tuner Type | ATSC (Over-The-Air Digital TV), Clear QAM (Unencrypted Cable) |
| Max Resolution | 1080p / 1920x1080 pixels |
| Supported OS | Windows 11, 10, 8.1/8, 7, Vista, XP |
Warranty Information
This product comes with a limited manufacturer's warranty. For specific details regarding warranty coverage, duration, and terms, please refer to the documentation included with your purchase or visit the official AllAboutAdapters website.
Support
For technical assistance, driver downloads, or further inquiries, please visit the AllAboutAdapters official website or contact their customer support. Contact information can typically be found on the product packaging or the manufacturer's website.