Introduction
This manual provides detailed instructions for the installation, operation, and maintenance of your Flastec DS-500/DS-501 series momentary push button switch. Please read this manual thoroughly before installation and use to ensure safe and correct operation. This switch is designed for various electrical applications requiring a temporary contact closure or opening.
Safety Information
Warning: Electrical work should only be performed by qualified personnel. Always disconnect power before installing, wiring, or servicing the switch to prevent electric shock or equipment damage.
- Ensure the switch's electrical ratings (current and voltage) are compatible with your application.
- Do not exceed the specified current (1A) or voltage (250VAC).
- Protect the switch from moisture and extreme temperatures unless specifically rated for such environments.
- Verify all connections are secure to prevent short circuits or loose contacts.
Product Overview
The Flastec DS-500/DS-501 series push button switch is a compact, panel-mount component. It features a momentary action, meaning the switch returns to its original state once the button is released. These switches are available in Normally Open (NO) and Normally Closed (NC) configurations.
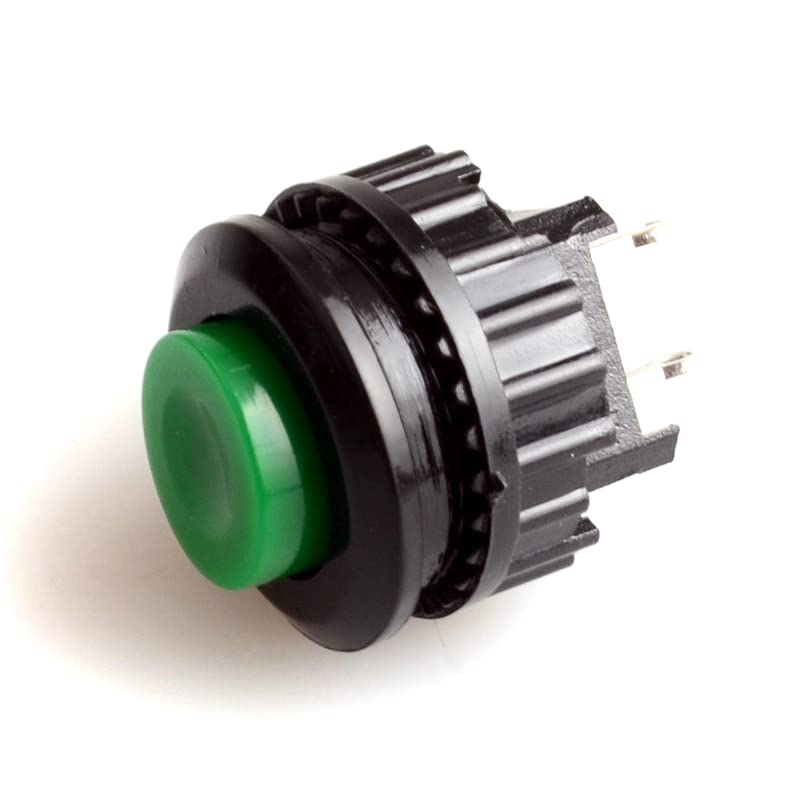
Figure 1: Front view of Flastec DS-500/DS-501 momentary push button switches. One switch has a red button, and the other has a green button, illustrating common color options.
Contact Configurations (NO/NC)
- Normally Open (NO): In its resting state (button not pressed), the circuit is open, and no current flows. When the button is pressed, the circuit closes, allowing current to flow.
- Normally Closed (NC): In its resting state (button not pressed), the circuit is closed, and current flows. When the button is pressed, the circuit opens, interrupting the current flow.
The specific model (DS-500 or DS-501) indicates its contact configuration. For example, DS-501 NC refers to a Normally Closed switch.
Setup and Installation
Required Tools and Materials:
- Drill with 14mm drill bit (for panel mounting)
- Wire strippers
- Crimping tool (if using crimp terminals) or soldering iron (if soldering)
- Appropriate gauge electrical wire
Mounting Instructions:
- Ensure power is disconnected from the circuit where the switch will be installed.
- Drill a 14mm diameter hole in the desired mounting panel.
- Remove the mounting nut from the switch body.
- Insert the threaded portion of the switch through the drilled hole from the front of the panel.
- Secure the switch by screwing the mounting nut onto the threaded portion from the back of the panel. Tighten firmly but do not overtighten.

Figure 2: Rear view of Flastec DS-500/DS-501 switches, showing the threaded body, mounting nut, and electrical terminals. This image illustrates the components involved in panel mounting and wiring.
Wiring Instructions:
The switch has two terminals for electrical connection. Refer to the markings on the switch body or the product specifications to identify the correct terminals for your NO or NC configuration.
- Strip approximately 5-7mm of insulation from the ends of your electrical wires.
- Connect the wires to the switch terminals. This can be done by soldering the wires directly to the terminals or by using appropriate crimp connectors (e.g., spade terminals) that fit the switch's terminal size.
- Ensure all connections are secure and insulated to prevent accidental contact or short circuits.
- Once wiring is complete, double-check all connections before restoring power.
Operating the Switch
The Flastec DS-500/DS-501 is a momentary switch. This means its electrical state changes only while the button is physically pressed. Once the button is released, it springs back to its original position, and the electrical contacts revert to their resting state (either open or closed, depending on whether it's an NO or NC switch).
- To activate: Press the button firmly.
- To deactivate: Release the button.
The specific action (e.g., turning a light on or off) will depend on how the switch is wired into your circuit and whether it is a Normally Open or Normally Closed type.
Maintenance
These switches are designed for durability and typically require minimal maintenance. However, periodic inspection can help ensure long-term reliability.
- Cleaning: If the switch becomes dirty, gently wipe the button and surrounding area with a clean, dry, or slightly damp cloth. Avoid using harsh chemicals or abrasive cleaners. Ensure no liquid enters the switch mechanism.
- Inspection: Periodically check the wiring connections to ensure they remain secure. Look for any signs of wear, damage, or corrosion on the terminals or switch body.
- Environmental Protection: Ensure the switch remains protected from excessive dust, moisture, or corrosive environments, which can degrade performance over time.
Troubleshooting
| Problem | Possible Cause | Solution |
|---|---|---|
| Switch does not activate/deactivate circuit. |
|
|
| Intermittent operation. |
|
|
| Button sticks or feels stiff. |
|
|
Specifications
| Model Series | DS-500 / DS-501 |
| Switch Type | Momentary Push Button Switch |
| Contact Configuration | Normally Open (NO) or Normally Closed (NC) |
| Current Rating | 1A |
| Voltage Rating | 250VAC |
| Mounting Hole Diameter | 14mm |
| Material | Plastic |
| Manufacturer | Flastec |
| Part Number | Fla3-AL36-SW3-1363 |
Warranty Information
This Flastec push button switch comes with a 90-day warranty from the date of purchase. This warranty covers defects in materials and workmanship under normal use. It does not cover damage resulting from improper installation, misuse, abuse, unauthorized modification, or natural disasters. Please retain your proof of purchase for warranty claims.
Customer Support
If you encounter any issues or have questions regarding the installation or operation of your Flastec DS-500/DS-501 series momentary push button switch that are not addressed in this manual, please contact your retailer or the manufacturer for assistance. Provide your product model number and a detailed description of the issue when seeking support.