1. Introduction
Thank you for choosing the Calor GV9820C0 Pro Express Vision Steam Generator Iron. This manual provides essential information for the safe and efficient use, maintenance, and troubleshooting of your appliance. Please read these instructions carefully before first use and keep them for future reference.
2. Important Safety Instructions
- Always connect the appliance to an earthed socket.
- Do not leave the iron unattended while it is switched on or connected to the mains.
- Keep the iron and its cord out of reach of children.
- Never immerse the appliance in water or any other liquid.
- Do not touch the hot soleplate or steam.
- Unplug the appliance before filling the water tank, cleaning, or performing maintenance.
- Use only tap water. Do not add perfume, vinegar, starch, descaling agents, or other chemicals to the water tank.
- Ensure the steam generator is placed on a stable, heat-resistant surface.
3. Product Overview
Familiarize yourself with the components of your Calor GV9820C0 steam generator iron.

Figure 1: Front view of the steam generator base unit, showing the control panel with 'Boost', 'On/Off', 'OK', 'Anti-Calc', and 'Water' indicators.
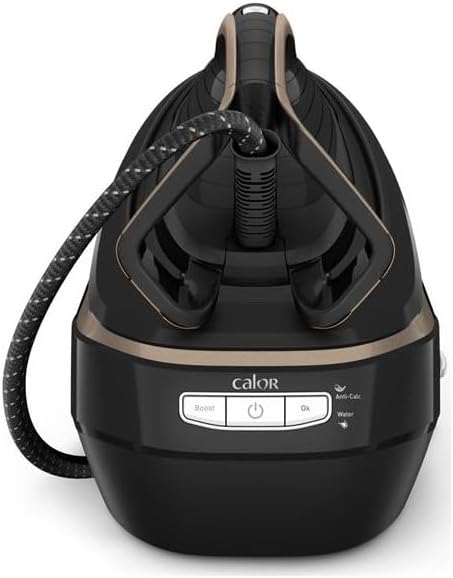
Figure 2: The iron securely docked on the base unit, ready for use or storage.
- Iron: Equipped with a Durilium AirGlide Autoclean soleplate for smooth gliding.
- Steam Hose: Connects the iron to the base unit.
- Base Unit: Houses the water tank, boiler, and control panel.
- Water Tank: Removable, 1.1-liter capacity.
- Control Panel: Includes power button, steam boost button, and indicator lights for water level and descaling.
- Anti-Calc Collector: Removable part for collecting limescale.
4. Setup
4.1 Unpacking
Carefully remove all packaging materials and stickers from the appliance. Retain the packaging for potential future transport or storage.
4.2 Filling the Water Tank
- Ensure the appliance is unplugged from the mains.
- Remove the water tank from the base unit.
- Fill the tank with clean tap water up to the 'MAX' level indicator. Do not overfill.
- Reinsert the water tank firmly into the base unit until it clicks into place.

Figure 3: The iron being placed onto the base unit, illustrating the accessible water tank for refilling.
4.3 First Use
- Place the steam generator on a stable, heat-resistant ironing board or surface.
- Plug the power cord into an earthed electrical outlet.
- Press the On/Off button. The appliance will begin to preheat. This takes approximately 2 minutes.
- Once the 'OK' indicator light stops flashing and remains solid, the appliance is ready for use.
- For the first use, or after a long period of storage, press the steam trigger several times away from garments to prime the steam system and remove any condensation.
5. Operating Instructions
5.1 Ironing
- Adjust the temperature setting on the iron according to the fabric type.
- Press the steam trigger under the handle to release continuous steam.
- For stubborn creases, press the 'Boost' button on the control panel for an extra powerful steam shot (750g/minute).
- The iron can be used for vertical steaming of hanging garments or curtains. Hold the iron a few centimeters away from the fabric and press the steam trigger.
5.2 Automatic Shut-off
For safety and energy saving, the appliance features an automatic shut-off function. If the iron is left unused for a certain period, it will automatically turn off.
6. Maintenance
Regular maintenance ensures optimal performance and extends the lifespan of your steam generator iron.
6.1 Emptying the Water Tank
After each use, or when storing the appliance, it is recommended to empty any remaining water from the tank.
- Unplug the appliance and allow it to cool completely.
- Remove the water tank and pour out any remaining water.
- Replace the water tank.
6.2 Cleaning the Soleplate
The Durilium AirGlide Autoclean soleplate requires minimal cleaning. If necessary, use a damp cloth to wipe it clean after the iron has cooled down. Do not use abrasive cleaners or metallic scouring pads.
6.3 Descaling (Anti-Calc System)
Your steam generator iron is equipped with an Anti-Calc collector to prevent limescale buildup. The 'Anti-Calc' indicator light will illuminate when the collector needs to be cleaned.
- Ensure the appliance is unplugged and has cooled down for at least 2 hours.
- Unscrew and remove the Anti-Calc collector located on the side of the base unit.
- Rinse the collector thoroughly under running water to remove limescale deposits.
- Screw the Anti-Calc collector back into its housing until it is secure.

Figure 4: Removing the Anti-Calc collector for cleaning, a key maintenance step.
6.4 Storage
Once the appliance has cooled down, you can secure the iron to its base unit for easy transport and storage. The steam hose can be wrapped around the base. Store the appliance in a dry, safe place.
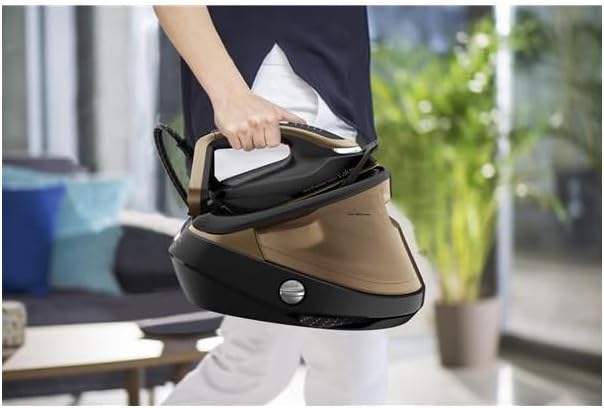
Figure 5: The steam generator iron secured for carrying, demonstrating its portability.
7. Troubleshooting
| Problem | Possible Cause | Solution |
|---|---|---|
| No steam is produced. | Water tank is empty. Appliance not heated up. | Refill the water tank. Wait for the 'OK' indicator light to become solid. |
| Water droplets appear on fabric. | Iron temperature is too low for steam. First use condensation. | Increase iron temperature. Press steam trigger away from fabric a few times. |
| 'Anti-Calc' light is on. | Anti-Calc collector needs cleaning. | Clean the Anti-Calc collector as described in Section 6.3. |
| Appliance does not turn on. | Not plugged in. Power outage. | Check power connection. Verify power supply. |
8. Specifications
| Feature | Detail |
|---|---|
| Model Number | GV9820C0 |
| Brand | Calor |
| Power | 3000 Watts |
| Steam Pressure | 9 Bars |
| Continuous Steam Output | 180 g/minute |
| Steam Boost | 750 g/minute |
| Water Tank Capacity | 1.1 Liters |
| Preheating Time | 2 minutes |
| Soleplate Technology | Durilium AirGlide Autoclean |
| Special Functions | Automatic Shut-off, Anti-Calc Collector |
| Weight | 5.34 Kilograms |
| Voltage | 230 Volts (AC) |
9. Warranty and Support
This product is covered by a manufacturer's warranty. For detailed warranty terms and conditions, please refer to the warranty card included with your purchase or visit the official Calor website. For technical support, spare parts, or service, please contact Calor customer service or an authorized service center.