Product Overview
The GLOBACT Flysky FS-A3 is a compact and lightweight 3-channel receiver designed for use with Flysky's AFHDS 2A protocol transmitters. It provides stable and reliable signal reception for various remote-controlled vehicles, including cars, trucks, crawlers, and boats. Its advanced anti-jamming technology ensures consistent performance in diverse environments.

Image: Two Flysky FS-A3 3-channel receivers, showcasing their compact design and antenna.

Image: A visual representation of the FS-A3 receiver, highlighting its key features such as 3 channels, anti-jamming capabilities, compact size, operating frequency, and broad compatibility with Flysky wireless protocols.
Technical Specifications
| Feature | Detail |
|---|---|
| Model Number | RCP311 |
| Channels | 3 |
| Wireless Protocol | AFHDS 2A |
| Working Frequency | 2.40GHz - 2.4835GHz |
| Input Voltage | 4-6.5V |
| Receiving Range | 100-200 meters |
| Item Weight | 0.317 ounces |
| Package Dimensions | 5.43 x 2.48 x 0.94 inches |
| Manufacturer Recommended Age | 14 years and up |

Image: A detailed comparison table outlining specifications for various Flysky receivers, including the FS-A3, for easy reference.
Compatibility
The FS-A3 receiver is exclusively compatible with Flysky brand transmitters utilizing the AFHDS 2A wireless protocol. This ensures seamless communication and optimal performance with your remote control system.
Compatible Transmitters:
- Flysky FS-GT5
- Flysky FS-GT2E
- Flysky FS-GT2F
- Flysky FS-GT2G
- Flysky FS-iT3B
- Flysky FS-iT3C

Image: The FS-A3 receiver displayed alongside compatible Flysky transmitters, illustrating the AFHDS 2A protocol compatibility.
Broad Application:
This receiver is suitable for a wide range of RC models, including:
- RC Cars
- RC Trucks
- RC Crawlers
- RC Buggies
- RC Boats

Image: A collection of different RC vehicles, such as boats, cars, and trucks, illustrating the versatile application of the FS-A3 receiver.
Setup Guide
Initial Inspection:
Before installation, carefully inspect the receiver for any visible damage. Ensure the antenna wire is intact and not kinked. Verify that all connection pins are straight and clean.
Connecting the Receiver:
Connect the receiver to your Electronic Speed Controller (ESC), servos, and other electronic components. The FS-A3 receiver supports an input voltage range of 4-6.5V. Ensure your power source and components are within this range.
- Connect the ESC to Channel 1 (CH1) or the designated throttle channel.
- Connect the steering servo to Channel 2 (CH2).
- Connect any additional components (e.g., auxiliary lights, gear shift servos) to Channel 3 (CH3).
- Ensure correct polarity when connecting all components to avoid damage.

Image: A close-up view of the FS-A3 receiver with wires connected, demonstrating the proper input voltage connection (4-6.5V).
Binding Procedure:
Binding is the process of linking the receiver to your transmitter, allowing them to communicate wirelessly. Follow these steps to bind your FS-A3 receiver:
- Ensure your transmitter is turned off.
- Insert the binding plug (often included with the receiver or transmitter) into the B/VCC port on the FS-A3 receiver.
- Connect power to the receiver (e.g., via the ESC or a separate battery). The receiver's LED should start flashing rapidly, indicating it's in binding mode.
- While holding the bind button on your Flysky transmitter (or following its specific binding procedure), turn on the transmitter.
- The receiver's LED should stop flashing and become solid, indicating a successful bind.
- Turn off both the receiver and the transmitter.
- Remove the binding plug from the receiver.
- Turn on the transmitter first, then power on the receiver. The receiver's LED should illuminate solid, confirming the connection.
Note: Always refer to your specific Flysky transmitter's manual for detailed binding instructions, as procedures may vary slightly between models.
Operation
Receiving Range:
The FS-A3 receiver offers a reliable remote control range of 100-200 meters (approximately 328-656 feet). This range is suitable for most RC hobby applications, providing ample distance for control without significant signal loss. Factors such as environmental interference, obstacles, and battery levels can affect the actual range.

Image: A visual depiction of the FS-A3 receiver's remote control range, showing a typical operating distance of 100-200 meters in an open environment.
Anti-jamming Technology:
The FS-A3 receiver utilizes Flysky's advanced AFHDS 2A (Automatic Frequency Hopping Digital System 2A) technology. This system operates by dividing the 2.40GHz-2.4835GHz frequency band into 160 frequency points. Each system uses 16 points and employs 160 hopping frequencies to actively avoid interference and jamming from other 2.4GHz devices. This results in a highly stable and reliable connection, even in environments with multiple RC users.
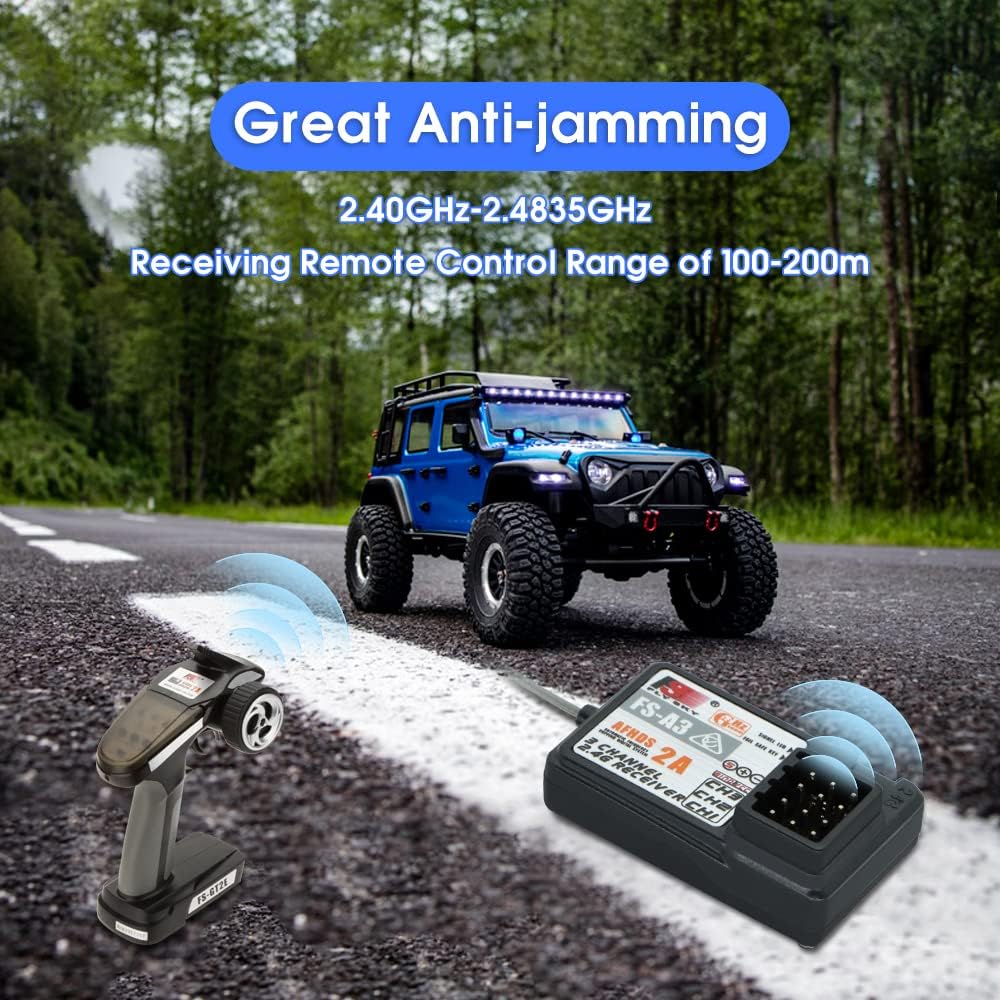
Image: A graphic illustrating the anti-jamming capabilities of the FS-A3 receiver, showing stable signal transmission in a typical RC operating environment.
Maintenance and Care
- Keep Clean: Regularly clean the receiver and its connections using a soft, dry cloth. Avoid using solvents or harsh chemicals.
- Protect from Moisture: The FS-A3 is not waterproof. Keep it away from water, moisture, and high humidity to prevent damage to internal electronics.
- Antenna Care: Ensure the antenna wire is not cut, kinked, or excessively bent. Position the antenna for optimal signal reception, typically perpendicular to the ground and away from metal objects.
- Temperature: Operate and store the receiver within recommended temperature ranges. Extreme temperatures can affect performance and lifespan.
- Secure Mounting: Mount the receiver securely within your model to prevent vibrations or impacts from dislodging connections or damaging the unit.
- Power Supply: Always ensure your power supply (ESC or battery) provides voltage within the specified 4-6.5V range. Over-voltage can permanently damage the receiver.
Troubleshooting
| Problem | Possible Cause | Solution |
|---|---|---|
| Receiver LED not solid after binding/power on. | Not successfully bound; incorrect power connection; faulty receiver. | Re-attempt binding procedure carefully; check power supply and polarity; test with another receiver if available. |
| No control response from model. | Receiver not powered; transmitter off; incorrect channel connections; binding lost. | Ensure receiver is powered and LED is solid; turn on transmitter; verify all servo/ESC connections; re-bind receiver. |
| Intermittent signal or short range. | Antenna damage/poor positioning; environmental interference; low transmitter/receiver battery. | Check antenna for damage and proper orientation; move to an area with less interference; replace/recharge batteries. |
| Servos/ESC not responding correctly. | Incorrect channel assignment; faulty servo/ESC; reversed polarity. | Verify connections to correct channels; test components individually; check polarity of connections. |