Kongzee Wireless TENS & EMS Unit (B0B2WGRSB3)
Wireless TENS & EMS Unit Instruction Manual
Brand: Kongzee | Model: Wireless TENS & EMS Unit (B0B2WGRSB3)
1. Introduction
The Kongzee Wireless TENS & EMS Unit is designed to provide effective pain relief therapy and muscle conditioning. Featuring a wireless sync mode with 6 electrode points, it allows for simultaneous massage and stimulation across multiple body areas. With 10 distinct modes and 39 intensity levels, this versatile device can be tailored to your specific needs for relaxation and muscle workout. Its compact and portable design ensures convenience for both home use and travel.

The unit is suitable for various body areas for pain relief and muscle conditioning.

Ideal for relieving exercise soreness and aiding in sports injury recovery.
2. What's in the Box
Your Kongzee Wireless TENS & EMS Unit package includes the following components:

All components included in the Kongzee Wireless TENS & EMS Unit package.
- 1 x Storage Bag
- 2 x 2"x4" Electrode Pads
- 4 x 2"x2" Electrode Pads
- 2 x Receivers
- 1 x Controller
- 1 x USB Charging Cable
- 2 x Electrode Wires
3. Setup
3.1 Charging the Unit
Before first use, ensure the main controller and receiver units are fully charged. Connect the provided USB charging cable to the charging port on each unit and plug it into a compatible USB power source. The charging indicator light will show the charging status. A full charge typically takes a few hours.
3.2 Attaching Electrode Pads
The unit comes with reusable electrode pads in two sizes. Ensure your skin is clean and dry before application. Peel the protective film from the electrode pad. Attach the pad firmly to the desired area of your body. Connect the electrode wires to the receivers, and then attach the receivers to the electrode pads via the snap connectors. The pads have good self-adhesive properties and can be used multiple times with proper care.

Proper application of the high-quality electrode pads.
4. Operating Instructions
4.1 Powering On and Pairing
Press and hold the power button on the main controller to turn it on. The display will light up. Turn on the receiver units. The controller and receivers should automatically pair. If not, refer to the troubleshooting section.
4.2 Selecting Modes and Intensity
Use the 'M' button on the remote controller to cycle through the 10 available massage modes. The current mode will be displayed on the controller's screen. Use the '+' and '-' buttons to adjust the intensity level, with 39 levels available. Start with a low intensity and gradually increase it to a comfortable level. The wireless sync mode allows all connected electrode points to operate with the same mode and strength.
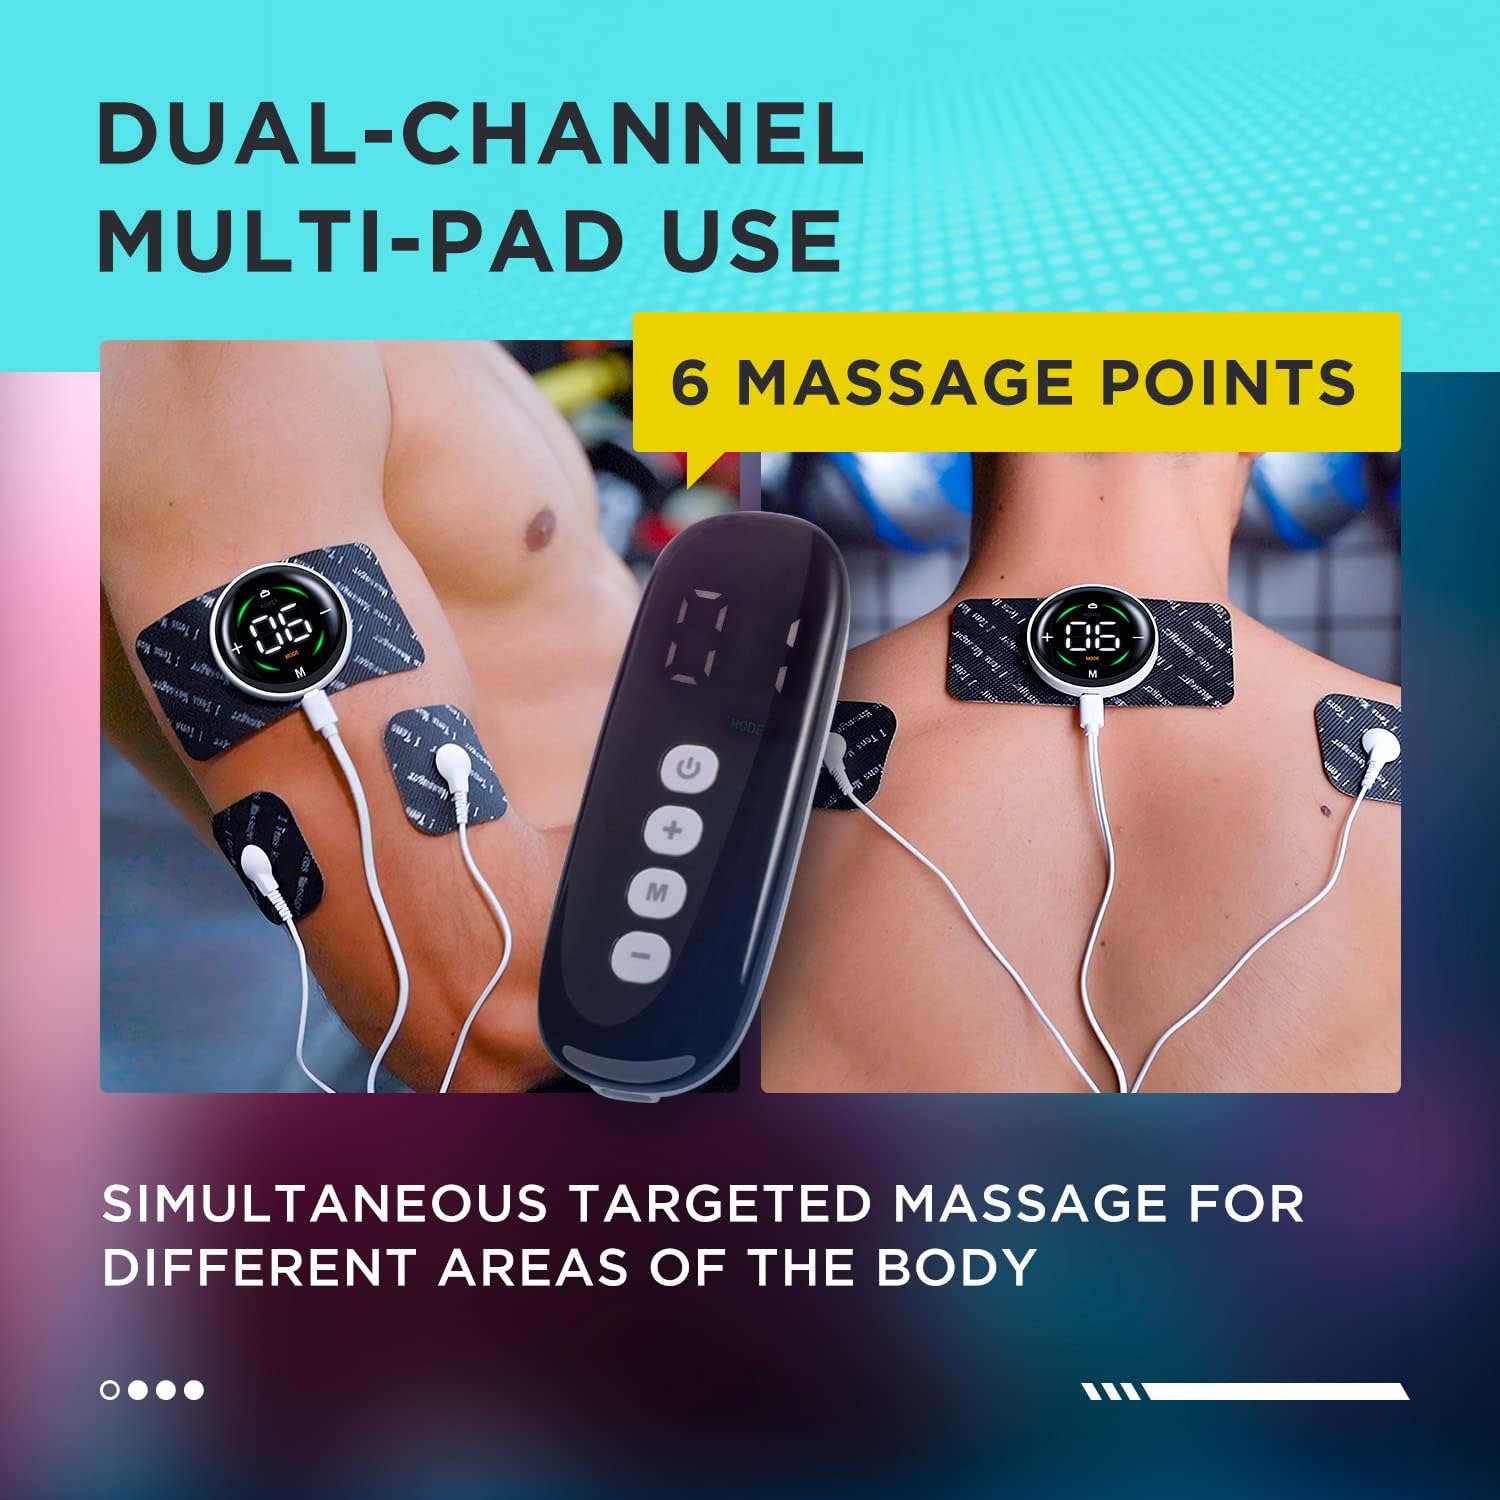
The unit supports dual-channel multi-pad use for up to 6 massage points simultaneously.

Choose from 10 modes and 39 intensity levels for personalized therapy.
4.3 Official Product Video
Watch this video for a visual guide on setting up and using your Wireless TENS & EMS Therapy Unit, including details on the 6 electrode pads.
5. Maintenance
5.1 Electrode Pad Care
To maximize the lifespan of your electrode pads (up to 30 uses with care), always reapply the protective film after each use. If the pads lose their adhesiveness, gently clean the adhesive surface with a damp cloth and allow them to air dry. Do not use harsh chemicals or abrasive materials.
5.2 Cleaning the Unit
Wipe the main controller and receiver units with a soft, dry cloth. Do not immerse the units in water or use liquid cleaners.
5.3 Storage
Store the unit and all accessories in the provided portable carry case when not in use. Keep it in a cool, dry place away from direct sunlight and extreme temperatures. This ensures the product remains in optimal condition and is easy to transport for travel.

The compact design and included case make the unit highly portable.
6. Troubleshooting
| Problem | Possible Cause | Solution |
|---|---|---|
| Unit does not power on. | Low battery; Unit not charged. | Ensure the unit is fully charged using the provided USB cable. |
| No sensation or weak sensation. | Intensity too low; Pads not properly attached; Pads have lost adhesiveness. | Increase intensity gradually. Ensure pads are firmly attached to clean, dry skin. Replace pads if adhesiveness is lost. |
| Remote control not responding. | Remote battery low; Not paired correctly. | Check remote battery. Ensure both controller and receivers are powered on and within range. |
| Pads not sticking. | Skin is oily/dirty; Pads are worn out. | Clean skin thoroughly before application. Gently clean pads with a damp cloth and air dry. Replace pads if they are no longer effective. |
7. Specifications
| Feature | Detail |
|---|---|
| Package Dimensions | 7.4 x 4.45 x 1.97 inches; 7.05 ounces |
| Batteries | 1 Lithium Metal battery required (included) |
| Manufacturer | Kongzee |
| ASIN | B0B2WGRSB3 |
| Modes | 10 |
| Intensity Levels | 39 |
8. Warranty and Support
Specific warranty details and direct support contact information are not provided within this manual. For warranty claims, technical support, or further assistance, please refer to the product packaging, the manufacturer's official website, or contact the retailer from whom you purchased the product.
Ask a question about this manual
Ask about setup, troubleshooting, compatibility, parts, safety, or missing instructions. Manuals+ will review the question and use this page’s manual context to help answer it.