Vivitar DRCX3-NOC-STK-4
Vivitar Foldable Drone W/ 720p HD Wi-Fi Camera Instruction Manual
Model: DRCX3-NOC-STK-4
1. Introduction
Thank you for purchasing the Vivitar DRCX3 Foldable Drone with 720p HD Wi-Fi Camera. This drone is designed for ease of use and offers a range of features for an enjoyable flying experience, including real-time video transmission and various flight modes. Please read this manual thoroughly before operating the drone to ensure safe and proper use.
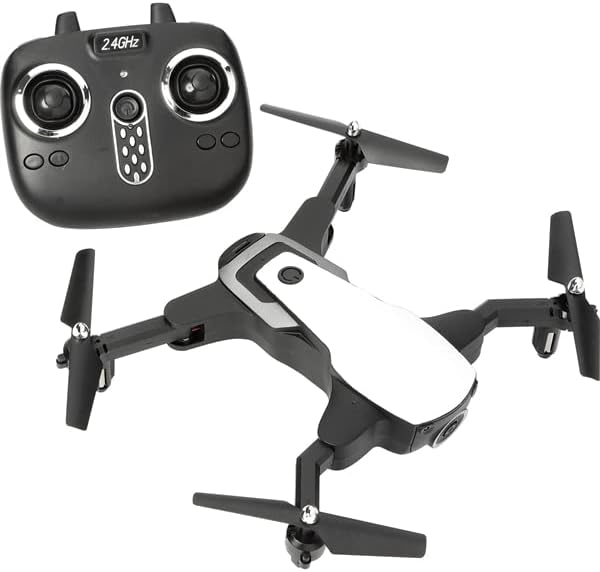
Image: The Vivitar DRCX3 Foldable Drone shown alongside its 2.4GHz remote control. The drone features a sleek black and white design with four foldable arms, each equipped with a propeller. The remote control is black with joysticks and various control buttons.
2. Safety Information
Operating a drone requires attention to safety. Adhere to the following guidelines to prevent injury or damage:
- Adult Supervision: This product is recommended for adults. Younger users should always be supervised by an adult.
- Flight Environment: Fly in open, clear areas, away from people, animals, buildings, and power lines. Avoid flying in strong winds or adverse weather conditions.
- Pre-Flight Check: Always inspect the drone and remote control for any damage before each flight. Ensure propellers are securely attached and unobstructed.
- Battery Safety: Use only the specified battery and charging equipment. Do not overcharge or short-circuit batteries. Discontinue use if batteries show signs of damage or swelling.
- Propeller Safety: Keep hands, face, and loose clothing away from rotating propellers.
- Line of Sight: Always maintain visual line of sight with the drone during flight.
- Respect Privacy: Be mindful of privacy when using the camera feature.
- Legal Compliance: Be aware of and comply with local drone regulations and laws.
3. Package Contents
Verify that all items are present in your package:
- Vivitar DRCX3 Foldable Drone
- Wi-Fi Camera (integrated)
- Remote Control
- USB Charging Cable
- Spare Propellers
- Phone Holder (for remote control)
- User Manual (this document)

Image: Various accessories for the Vivitar drone, including a black phone holder designed to attach to the remote control, two spare black propellers, and a black USB charging cable with a standard USB-A connector on one end and a smaller connector on the other.
4. Product Features
The Vivitar DRCX3 drone is equipped with several advanced features for enhanced flight control and aerial photography:
- Foldable Design: Compact and portable for easy transport.
- 720p HD Wi-Fi Camera: Capture high-definition photos and videos with real-time image transmission to your smartphone.
- One-Key Automatic Return: Simplifies the process of bringing the drone back to its takeoff point.
- Auto Hovering: Maintains altitude automatically for stable flight.
- 3D Roll & 3D Flip: Perform acrobatic maneuvers with ease.
- Headless Mode: Eliminates the need to adjust the drone's position before flight, making it easier for beginners.
- App Control: Control the drone and access camera features via a dedicated smartphone application.
- 50 Meter Range: Offers a substantial flight range for exploration.

Image: A diagram highlighting key components of the Vivitar Foldable Drone. Labels point to the Power On/Off button, Battery Slot, HD Camera Lens, and the Foldable Wings, illustrating the drone's main functional parts.
5. Setup Guide
5.1 Charging the Drone Battery
The drone is powered by a Lithium Ion battery. Ensure the battery is fully charged before each flight.
- Locate the battery slot on the drone.
- Connect the drone's charging port to the USB charging cable.
- Plug the USB cable into a compatible USB power source (e.g., computer USB port, USB wall adapter).
- The charging indicator light will show the charging status (refer to the drone's specific LED behavior for full charge indication).
- Once fully charged, disconnect the cable.
5.2 Installing the App
To utilize the Wi-Fi camera and advanced control features, download the official Vivitar drone application on your smartphone.
- Search for the "Vivitar Drone" app in your device's app store (e.g., Apple App Store for iOS, Google Play Store for Android).
- Download and install the application.
- Ensure your smartphone's Wi-Fi is enabled.
5.3 Pairing the Drone and Remote Control
Follow these steps to establish a connection between the drone and its remote control:
- Place the drone on a flat, level surface.
- Turn on the drone's power switch. The drone's indicator lights will flash.
- Turn on the remote control.
- Push the left joystick (throttle) all the way up, then pull it all the way down. The drone's lights will stop flashing and become solid, indicating successful pairing.
- To connect to the Wi-Fi camera, go to your smartphone's Wi-Fi settings and connect to the drone's Wi-Fi network (usually named "Vivitar_DRCX3" or similar).
- Open the Vivitar drone app to view the live camera feed and access app-specific controls.
6. Operating Instructions
6.1 Basic Flight Controls
Familiarize yourself with the remote control layout and basic flight movements:
- Left Joystick (Throttle):
- Push up: Ascend
- Pull down: Descend
- Push left/right: Rotate left/right (Yaw)
- Right Joystick (Direction):
- Push up: Fly forward
- Pull down: Fly backward
- Push left: Fly left (Sideward)
- Push right: Fly right (Sideward)
- One-Key Takeoff/Landing Button: Initiates automatic takeoff or landing.
- One-Key Return Button: Activates the automatic return function.
- Speed Switch Button: Toggles between different flight speeds (e.g., low, medium, high).
- Flip Button: Press and then move the right joystick to perform a 3D flip.
6.2 Flight Modes and Special Functions
- Auto Hovering: The drone will automatically maintain its current altitude when the throttle joystick is released, providing stable flight.
- Headless Mode: When activated, the drone's orientation becomes irrelevant. Forward will always be the direction the drone was facing when headless mode was engaged, relative to the pilot.
- 3D Roll/Flip: Press the dedicated flip button, then quickly move the right joystick in the desired direction (forward, backward, left, or right) to perform an aerial stunt.
- One-Key Automatic Return: Press this button to command the drone to fly back towards its takeoff position. Ensure a clear path for return.
6.3 Camera Operation
The integrated 720p HD Wi-Fi camera allows for real-time video streaming and recording.
- Live View: Once connected to the drone's Wi-Fi network and the app is open, you will see a live video feed from the drone's camera on your smartphone screen.
- Photo Capture: Tap the camera icon in the app to take still photographs (JPEG format).
- Video Recording: Tap the video camera icon in the app to start and stop video recording (MP4 format).
- Saving Media: Photos and videos are saved directly to your smartphone's gallery or the app's media folder. The drone does not have a memory card slot.

Image: A person's hand holding the Vivitar Foldable Drone, demonstrating its compact and portable size when unfolded. The drone's black and white body and propellers are clearly visible, fitting comfortably in the palm of a hand.
7. Maintenance
Proper maintenance ensures the longevity and optimal performance of your drone.
- Cleaning: Use a soft, dry cloth to wipe down the drone after use. Avoid using harsh chemicals or solvents.
- Propeller Inspection: Regularly check propellers for cracks, bends, or damage. Replace any damaged propellers immediately using the provided spare parts.
- Motor Care: Keep motors free from dust and debris. Do not attempt to lubricate the motors.
- Storage: Store the drone and its accessories in a cool, dry place, away from direct sunlight and extreme temperatures. Remove the battery if storing for extended periods.
- Battery Care: Do not store batteries fully charged or completely depleted for long periods. Charge them to about 50% for optimal long-term storage.
8. Troubleshooting
If you encounter issues with your Vivitar drone, refer to the following common problems and solutions:
| Problem | Possible Cause | Solution |
|---|---|---|
| Drone does not respond to remote control. | Not paired correctly; low battery on drone or remote; interference. | Re-pair the drone and remote control. Charge drone battery and replace remote control batteries. Move to an area with less interference. |
| Drone drifts during flight. | Not calibrated; uneven takeoff surface; wind. | Perform gyroscope calibration (refer to app or remote control instructions). Take off from a flat surface. Avoid flying in windy conditions. |
| Camera feed is choppy or disconnected. | Weak Wi-Fi signal; too far from drone; app issue. | Ensure smartphone is connected to drone's Wi-Fi. Fly closer to the drone. Restart the app and drone. |
| Drone does not take off. | Low battery; propellers blocked; not armed. | Charge battery. Check for obstructions around propellers. Ensure drone is armed (e.g., push both joysticks down and out). |
9. Specifications
| Feature | Detail |
|---|---|
| Brand | Vivitar |
| Model Name | DRCX3 |
| Item Model Number | DRCX3-NOC-STK-4 |
| Special Features | One-key Automatic Return, Auto Hovering, 3D Roll, 3D Flip, Headless Mode |
| Age Range (Description) | Adult |
| Video Capture Resolution | 720p |
| Connectivity Technology | Wi-Fi |
| Included Components | Drone, Wi-Fi Camera |
| Skill Level | Beginner |
| Video Capture Format | MP4 |
| Remote Control Technology | Wi-Fi |
| Control Type | App Control |
| Maximum Range | 50 Meters |
| Material | Plastic |
| Battery Cell Composition | Lithium Ion |
| Are Batteries Included | No (for remote control, drone battery is rechargeable and included) |
| Rechargeable Battery Included | Yes (for drone) |
| Supported Image Format | JPEG |
| Video Output Resolution | 1280x720 Pixels |
| Optical Sensor Technology | CMOS |
| Item Weight | 2.59 pounds |
| Package Dimensions | 18.03 x 13.07 x 7.8 inches |
| UPC | 681066506929 |
| Date First Available | May 31, 2022 |
10. Warranty and Support
For warranty information, technical support, or service inquiries, please refer to the official Vivitar website or contact their customer service directly. Keep your purchase receipt as proof of purchase.
Vivitar Official Website: www.vivitar.com