GRIFEMA GB2001-2
GRIFEMA Dual Monitor Arm GB2001-2 User Manual
Model: GB2001-2
Brand: GRIFEMA
1. Introduction
Welcome to the user manual for your GRIFEMA Dual Monitor Arm GB2001-2. This product is designed to enhance your workspace by providing a flexible and ergonomic solution for mounting two LCD/LED screens. Please read this manual thoroughly before installation and use to ensure proper setup and safe operation.

Figure 1: GRIFEMA Dual Monitor Arm GB2001-2 and included components.
2. Safety Information
Always observe the following safety precautions to prevent injury or damage to the product:
- Read all instructions carefully before assembly and installation.
- Do not exceed the maximum weight capacity of 9kg (19.8lbs) per arm.
- Ensure your desk surface is stable and strong enough to support the combined weight of the monitor arm and monitors.
- Use only the provided hardware and tools.
- Keep children and pets away during installation.
- If you have any doubts about the installation, consult a qualified professional.
3. Package Contents
Verify that all components are present and undamaged before beginning installation:
- Main Pole Assembly
- Dual Monitor Arms (2 sections per arm)
- C-Clamp Base
- Grommet Base Components
- VESA Plate Adapters (2 sets)
- Assorted Screws and Washers for Monitor Mounting
- Hex Keys (Allen wrenches)
- Cable Management Clips
4. Specifications
| Feature | Specification |
|---|---|
| Compatible Screen Size | 13 - 32 inches |
| Weight Capacity per Arm | Max. 9 kg (19.8 lbs) |
| VESA Compatibility | 75x75mm, 100x100mm |
| Rotation | 360° |
| Tilt Angle | ±90° |
| Swivel Angle | ±90° |
| Maximum Arm Extension | 420mm |
| Desk Thickness (C-Clamp) | 10 - 80mm |
| Material | Alloy Steel |
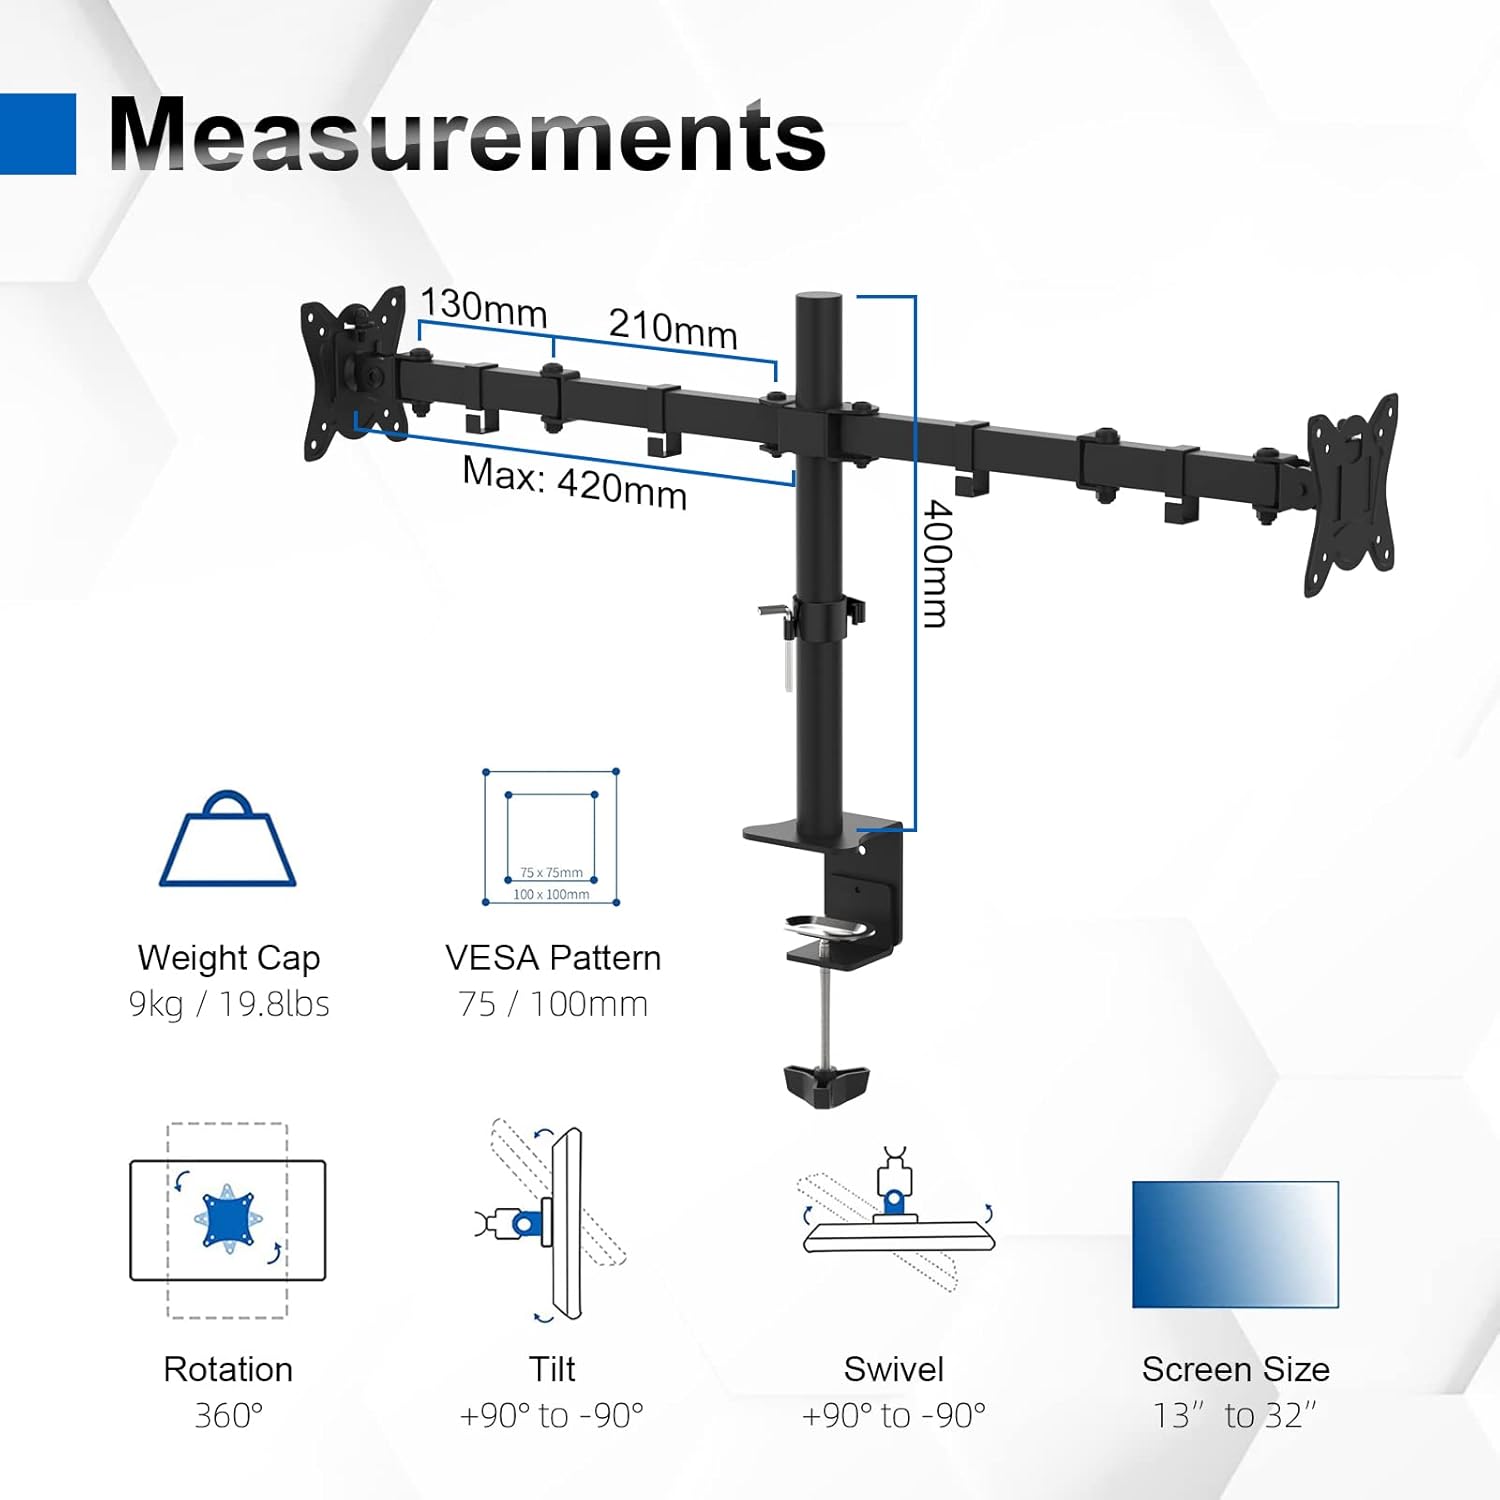
Figure 2: Key measurements and specifications of the monitor arm.
5. Setup and Installation
5.1. Before You Begin
- Ensure your monitor is VESA compatible (75x75mm or 100x100mm).
- Check your desk thickness to ensure it falls within the supported range (10-80mm).
- Clear your workspace and have all tools ready.
5.2. Installation Methods
The GRIFEMA Dual Monitor Arm supports two installation methods: C-Clamp mounting and Grommet mounting.

Figure 3: Two available installation choices: C-Clamp and Grommet mounting.
5.2.1. C-Clamp Mounting (for desk edges)
- Attach the C-clamp base to the bottom of the main pole.
- Position the C-clamp on the edge of your desk.
- Tighten the clamp screw until the arm is securely fastened to the desk. Ensure it is stable and does not wobble.
5.2.2. Grommet Mounting (for desks with a hole)
- Disassemble the C-clamp and attach the grommet base components to the main pole.
- Insert the pole through the grommet hole in your desk.
- Secure the grommet base from underneath the desk using the provided plate and screw. Tighten until stable.
5.3. Attaching Monitors
- Attach the VESA plates to the back of your monitors using the appropriate screws. Ensure a secure fit.
- Slide the monitors (with VESA plates attached) onto the monitor arm brackets.
- Secure the monitors by tightening any locking screws or clips on the arm brackets.
6. Operating Instructions
The GRIFEMA Dual Monitor Arm offers extensive adjustability to achieve your desired ergonomic setup.
6.1. Height Adjustment
To adjust the height of the monitors along the main pole, loosen the collar clamp on the main pole, slide the arms to the desired height, and then re-tighten the clamp securely.
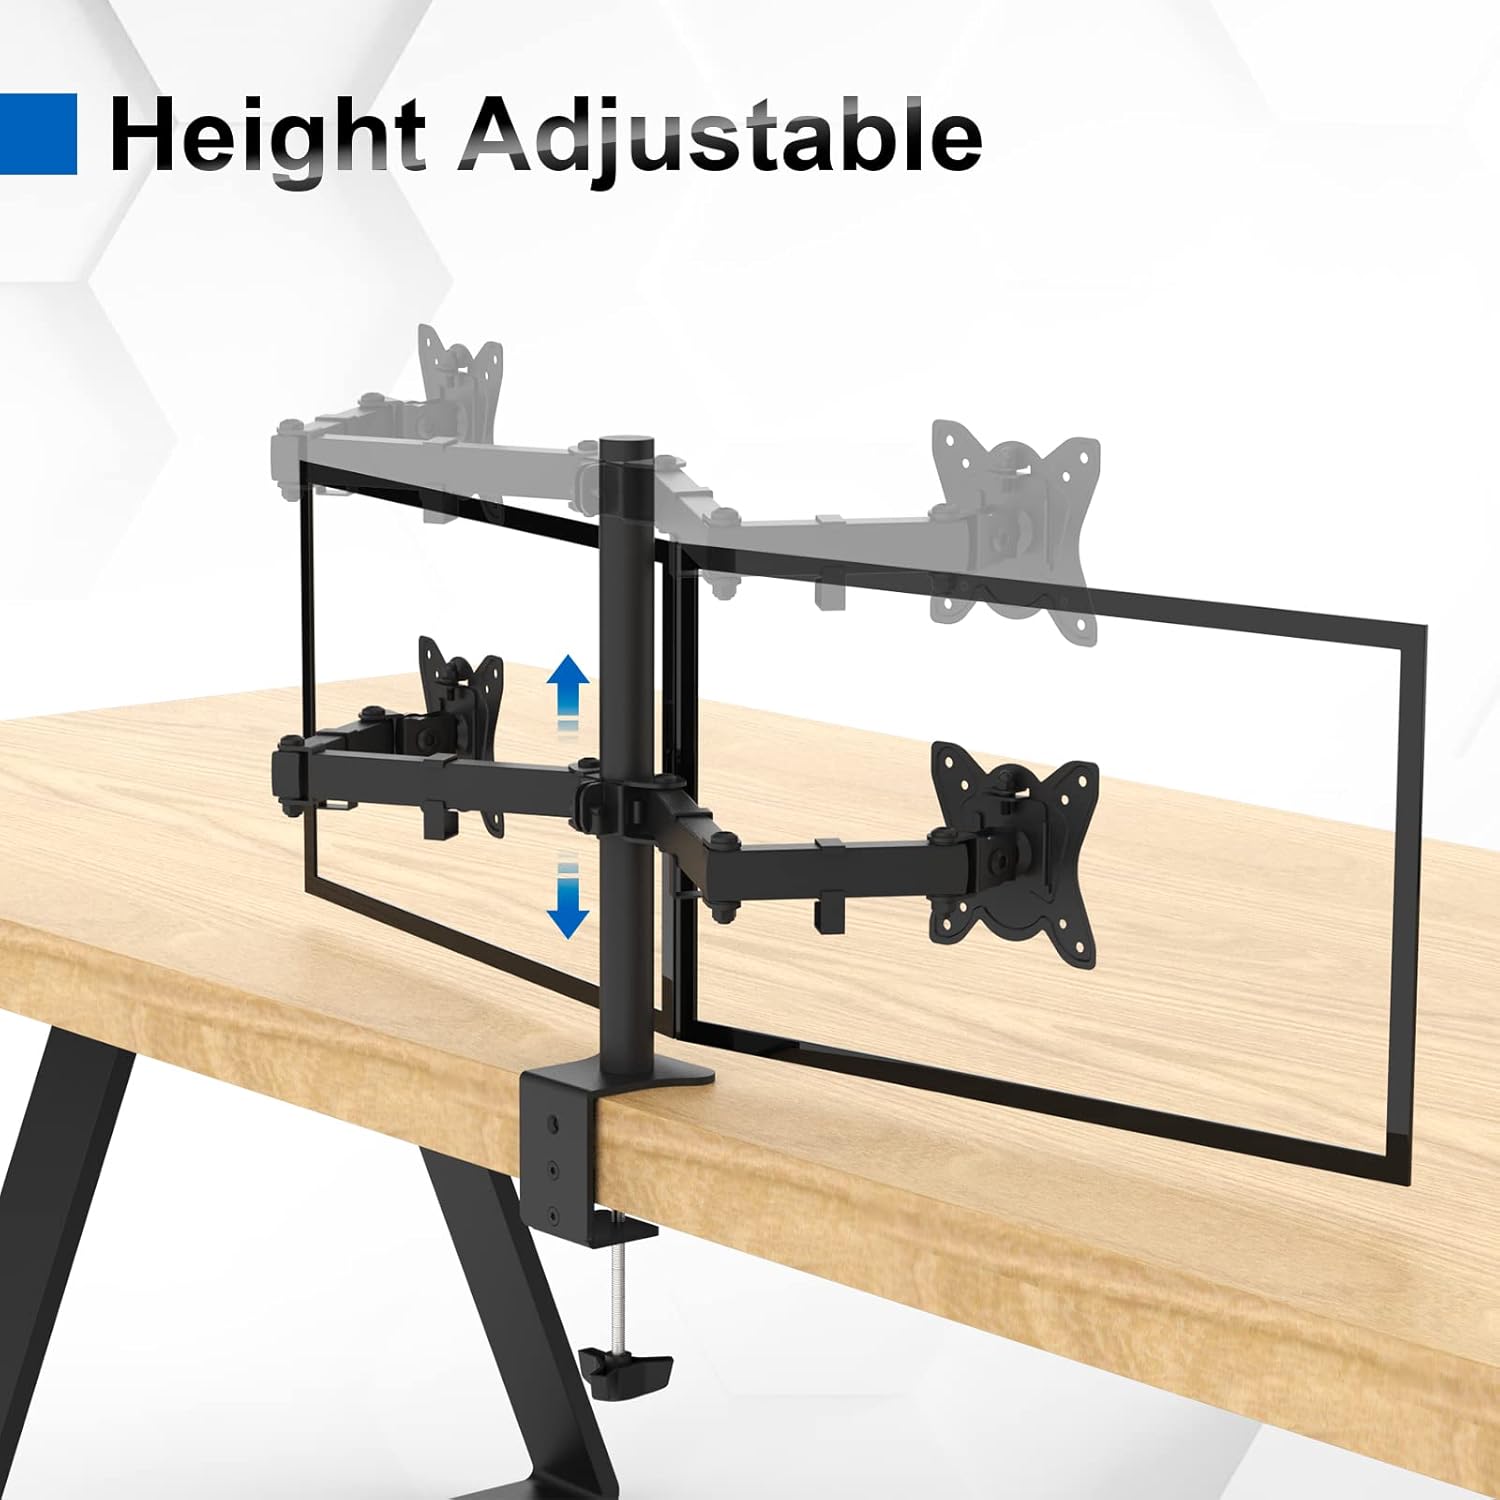
Figure 4: Adjusting the height of the monitor arms along the central pole.
6.2. Tilt Adjustment (Up/Down)
The monitor plates can be tilted ±90° (up or down) to reduce glare and optimize viewing angles. Loosen the tilt screw on the VESA plate, adjust the monitor to the desired angle, and then re-tighten the screw firmly.
6.3. Swivel Adjustment (Left/Right)
Each monitor arm can swivel ±90° at the VESA plate connection point, allowing you to angle your monitors independently.
6.4. Rotation (Portrait/Landscape)
The VESA plate allows for full 360° rotation, enabling you to switch your monitors between landscape and portrait orientations as needed.
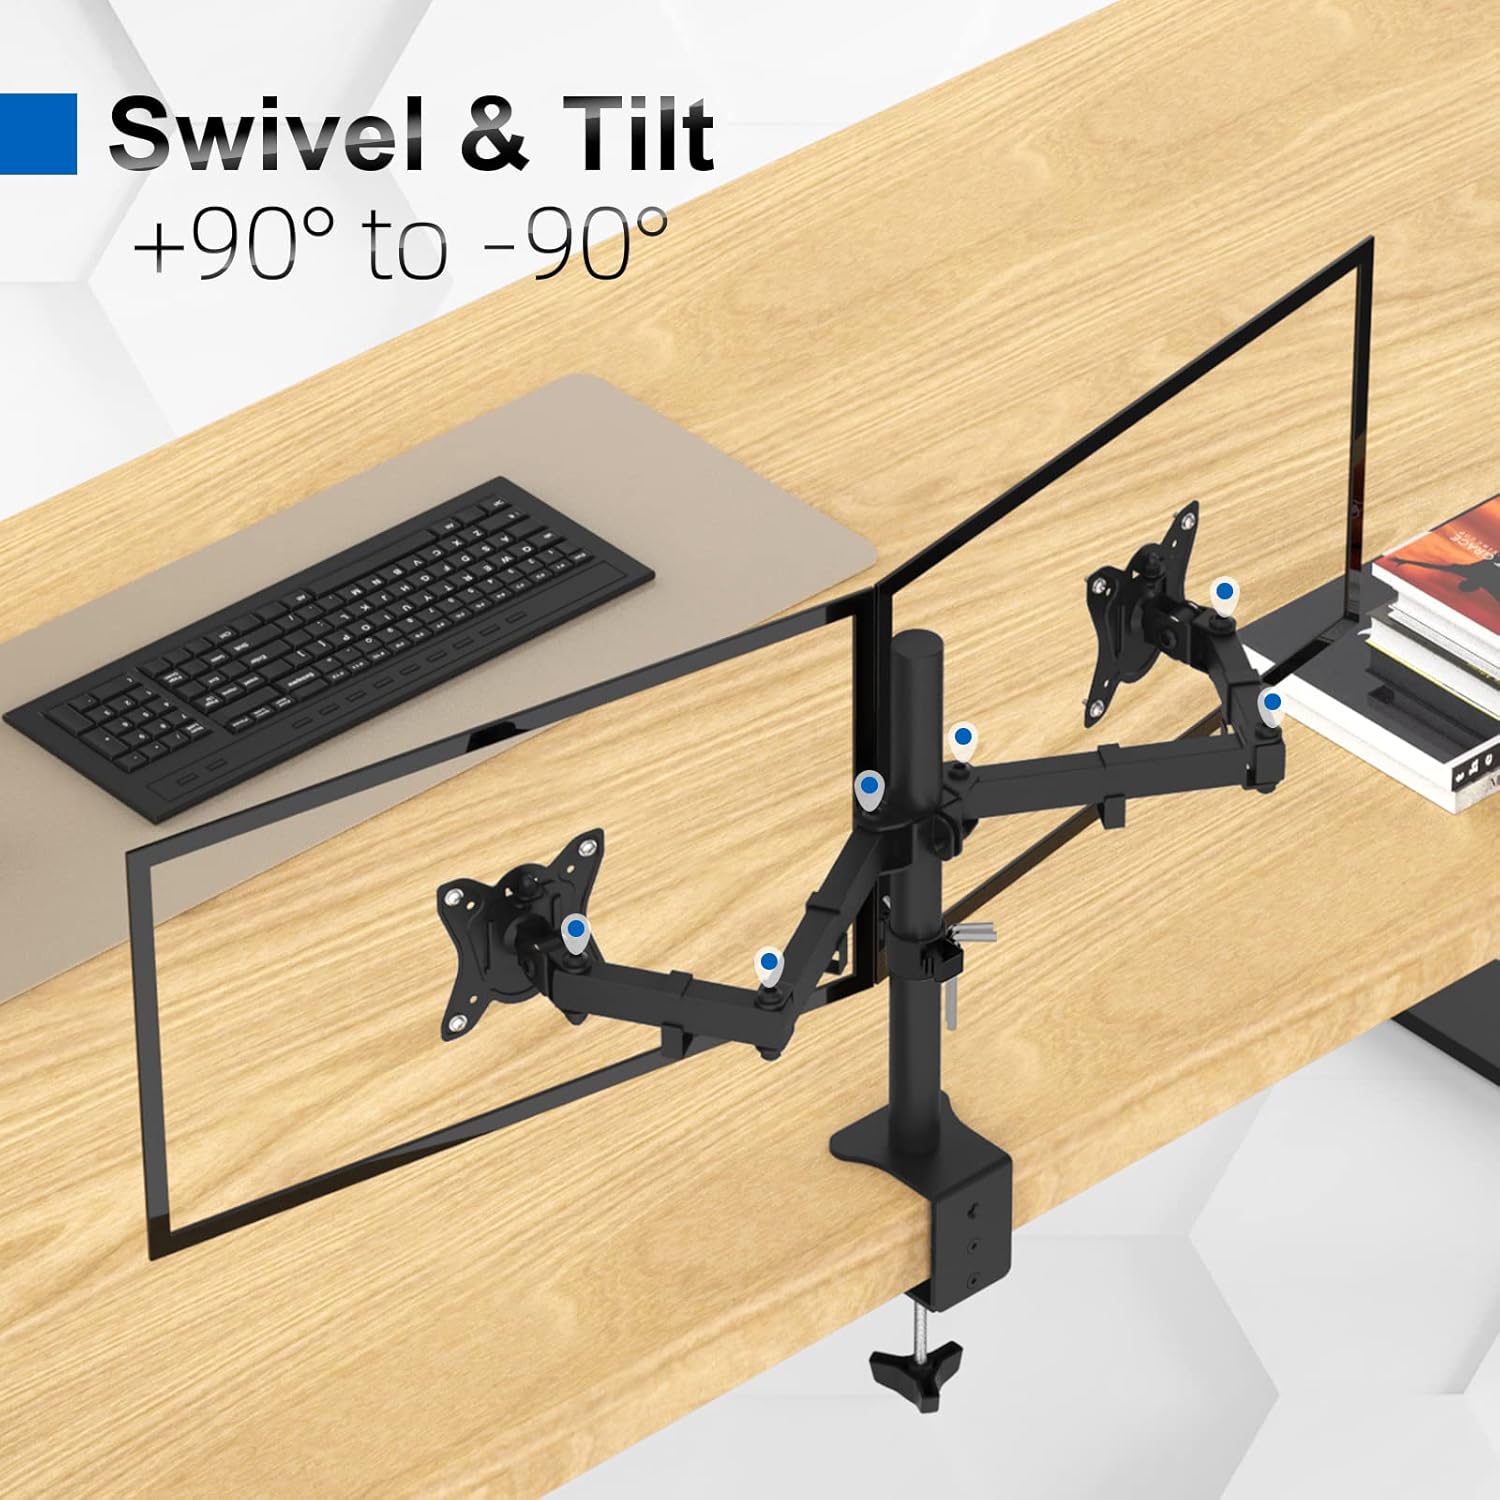
Figure 5: Demonstrating swivel and tilt adjustments for optimal viewing.
7. Cable Management
Integrated cable management clips are provided to help keep your workspace tidy and organized. Route your monitor and power cables along the arms and down the main pole using these clips.

Figure 6: Utilizing the integrated cable management system.
8. Maintenance
- Regularly check all screws and connections to ensure they remain tight and secure.
- Clean the monitor arm with a soft, damp cloth. Avoid abrasive cleaners or solvents.
- Do not lubricate any parts of the arm unless specifically instructed.
9. Troubleshooting
9.1. Monitor Arm is Sagging or Not Holding Position
- Ensure the weight of your monitors does not exceed the 9kg (19.8lbs) per arm capacity.
- Check and tighten all pivot point screws on the arms using the provided hex keys.
- Verify that the main pole's height adjustment clamp is securely tightened.
9.2. Monitors Are Not Level
- Slightly loosen the VESA plate screws, adjust the monitor to be level, and then re-tighten.
- Ensure the main pole is installed perfectly vertical on your desk.
9.3. Difficulty Adjusting Movement
- Some joints may require loosening or tightening with the hex keys to achieve the desired tension for movement. Refer to the assembly instructions for specific adjustment points.
10. Warranty and Support
For warranty information or technical support, please refer to the product packaging or contact GRIFEMA customer service directly. Keep your purchase receipt as proof of purchase.
Related Documents - GB2001-2
 |
VonHaus 3000169 Adjustable Height Sit-Stand Desk Manual Comprehensive instructions for assembling and using the VonHaus 3000169 adjustable height sit-stand desk. Learn about safe operation, maintenance, and product specifications. |
 |
MOUNT PRO Height Adjustable Dual Monitor Desk Mount Installation Guide This manual provides comprehensive, step-by-step instructions for assembling and using the MOUNT PRO Height Adjustable Dual Monitor Desk Mount. It covers clamp and grommet base installation, monitor attachment, tension adjustment, cable management, and product dimensions for dual monitors up to 32 inches. |
 |
FEZIBO Standing Desk Assembly Instructions and User Manual Comprehensive assembly instructions and user guide for FEZIBO electric height-adjustable standing desks, covering installation, operation, troubleshooting, and technical specifications. Includes BOM, step-by-step assembly, control panel functions, and warranty information. |
 |
Height Adjustable Single Monitor Desk Mount Instruction Manual Instruction manual for the MOUNTUP Height Adjustable Single Monitor Desk Mount. Provides detailed steps for assembly, installation using clamp or grommet base, monitor attachment, tension adjustment, cable management, and product dimensions. Includes safety warnings and maintenance guidelines. |
 |
UPLIFT 2-Leg Height Adjustable Standing Desk Assembly and User Manual Comprehensive assembly instructions and user guide for the UPLIFT 2-Leg Height Adjustable Standing Desk, including safety, usage, programming, and technical specifications for optimal ergonomic setup. |
 |
Height Adjustable Single Monitor Desk Mount - Instruction Manual Instruction manual for the Height Adjustable Single Monitor Desk Mount. Covers package contents, assembly steps, monitor attachment, tension adjustment, cable management, and product dimensions. Supports VESA 75x75/100x100 and monitors up to 32 inches and 17.6 lbs. |
Ask a question about this manual
Ask about setup, troubleshooting, compatibility, parts, safety, or missing instructions. Manuals+ will review the question and use this page’s manual context to help answer it.