1. Important Safety Instructions
Please read all instructions carefully before using your LOVIMELA Electric Meat Grinder. Keep this manual for future reference.
- Always ensure the appliance is unplugged before assembling, disassembling, or cleaning.
- Do not operate the appliance with wet hands or while standing on a wet surface.
- Keep fingers and utensils away from moving parts during operation. Always use the food pusher provided.
- Do not force meat into the grinder. Cut meat into appropriate sizes to prevent jamming.
- Ensure all parts are correctly assembled and securely fastened before use.
- This appliance is for household use only. Do not use outdoors.
- Do not immerse the motor unit in water or any other liquid.
- Supervise children closely when the appliance is in use.
2. Product Overview and Components
The LOVIMELA Electric Meat Grinder is a versatile kitchen appliance designed for grinding various meats and preparing sausages and kubbe. It features a powerful 2500W motor for efficient processing.

Image: The LOVIMELA Electric Meat Grinder with its main unit, grinding head, and various accessories laid out.
Included Accessories:
- Main Motor Unit: The core power unit of the grinder.
- Grinding Head: Attaches to the motor unit for grinding.
- Food Tray: Sits atop the grinding head to hold meat before grinding.
- Food Pusher: Used to safely guide meat into the grinding head.
- 3 Grinding Plates: Fine (2mm), Medium (5mm), and Coarse (7mm) for different textures.
- Cutting Blade: The sharp blade that works with the grinding plates.
- Sausage Stuffing Tubes: For making various sizes of sausages.
- Kubbe Maker Attachments: For preparing traditional kubbe.

Image: A visual representation of the sausage maker and kubbe kit attachments.
3. Setup and Assembly
Follow these steps to correctly assemble your meat grinder before use:
- Ensure the motor unit is unplugged from the power outlet.
- Attach the grinding head to the motor unit by aligning the grooves and twisting until it locks securely.
- Insert the auger (spiral shaft) into the grinding head.
- Place the cutting blade onto the end of the auger, ensuring the sharp edges face outwards towards the grinding plate.
- Select the desired grinding plate (fine, medium, or coarse) and place it over the cutting blade.
- Secure the grinding plate and blade with the locking ring, tightening it firmly but not excessively.
- Place the food tray on top of the grinding head.
Video: This official product video demonstrates the assembly process of the LOVIMELA Electric Meat Grinder, showing how to attach the grinding head, insert the auger, blade, and grinding plate, and secure the locking ring.
4. Operating Instructions
4.1. Preparing Meat for Grinding
- Cut meat into small pieces (approximately 1-inch cubes) that can easily fit into the feeding tube.
- Remove any bones, gristle, or tough tendons to prevent damage to the grinder.
- For best results, chill the meat and the metal parts of the grinder (grinding head, auger, blade, plates) in the freezer for 15-30 minutes before grinding. This helps prevent smearing and ensures a cleaner grind.
4.2. Meat Grinding
- Ensure the grinder is properly assembled with the desired grinding plate.
- Place a bowl or container under the grinding head to collect the ground meat.
- Plug the appliance into a suitable power outlet.
- Press the 'ON' button to start the motor.
- Feed the prepared meat pieces into the feeding tube using the food pusher. Do not use your fingers or other utensils.
- If the grinder jams, press the 'REV' (Reverse) button to clear the blockage, then press 'ON' again.
- After grinding, press the 'OFF' button and unplug the appliance.
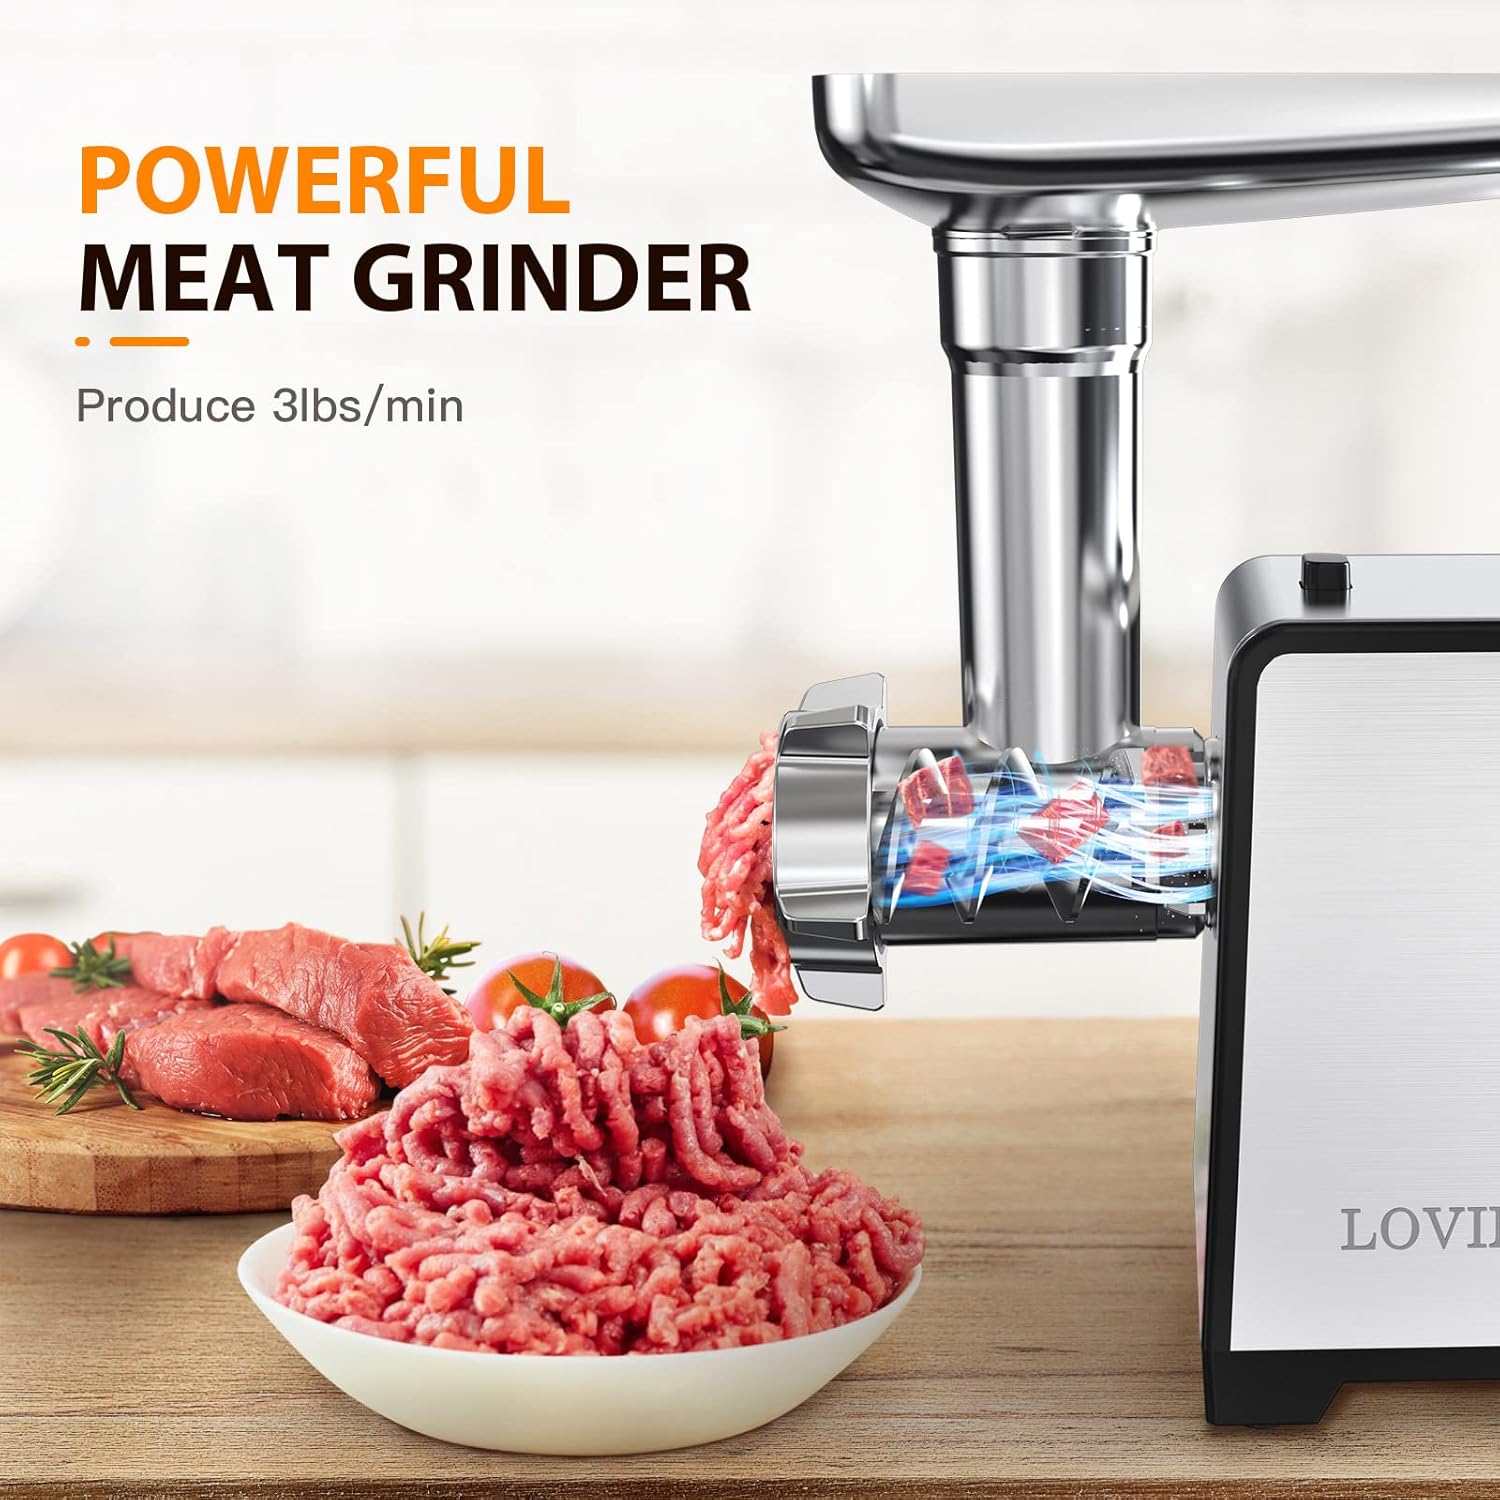
Image: The powerful LOVIMELA meat grinder efficiently processing meat, demonstrating its speed and effectiveness.

Image: Illustration of the grinder processing venison, chicken breast, and beef using 7mm, 5mm, and 2mm grinding plates respectively.
4.3. Sausage Stuffing
- Disassemble the grinding plate and cutting blade.
- Attach the appropriate sausage stuffing tube to the grinding head and secure it with the locking ring.
- Prepare your seasoned meat mixture for sausages.
- Slide the sausage casing onto the stuffing tube, leaving a small overhang at the end.
- Feed the meat mixture into the grinder, using the food pusher to guide it.
- As the meat fills the casing, gently guide it off the tube, ensuring it fills evenly without air pockets.
- Twist the filled casing at desired intervals to create individual sausages.

Image: The meat grinder configured with the sausage stuffing attachment, demonstrating the process of making homemade sausages.
4.4. Kubbe Making
- Disassemble the grinding plate and cutting blade.
- Attach the kubbe maker attachments to the grinding head and secure with the locking ring.
- Prepare your kubbe dough mixture.
- Feed the mixture into the grinder. The kubbe attachments will form hollow tubes.
- Cut the tubes to desired lengths and fill them with your preferred filling.
5. Cleaning and Maintenance
Proper cleaning and maintenance ensure the longevity and hygienic operation of your meat grinder.
- Always unplug the appliance before cleaning.
- Disassemble all removable parts: food tray, grinding head, auger, cutting blade, grinding plate, and any attachments used.
- Hand Wash Only: All attachments should be washed by hand with water (under 122°F / 50°C) and a neutral detergent.
- DO NOT use a dishwasher: The metal parts are not dishwasher safe and may discolor or be damaged.
- Rinse thoroughly and dry all parts immediately with a soft cloth to prevent rust or discoloration.
- Wipe the main motor unit with a damp cloth. Never immerse the motor unit in water.
- Store the clean, dry parts in a safe place.
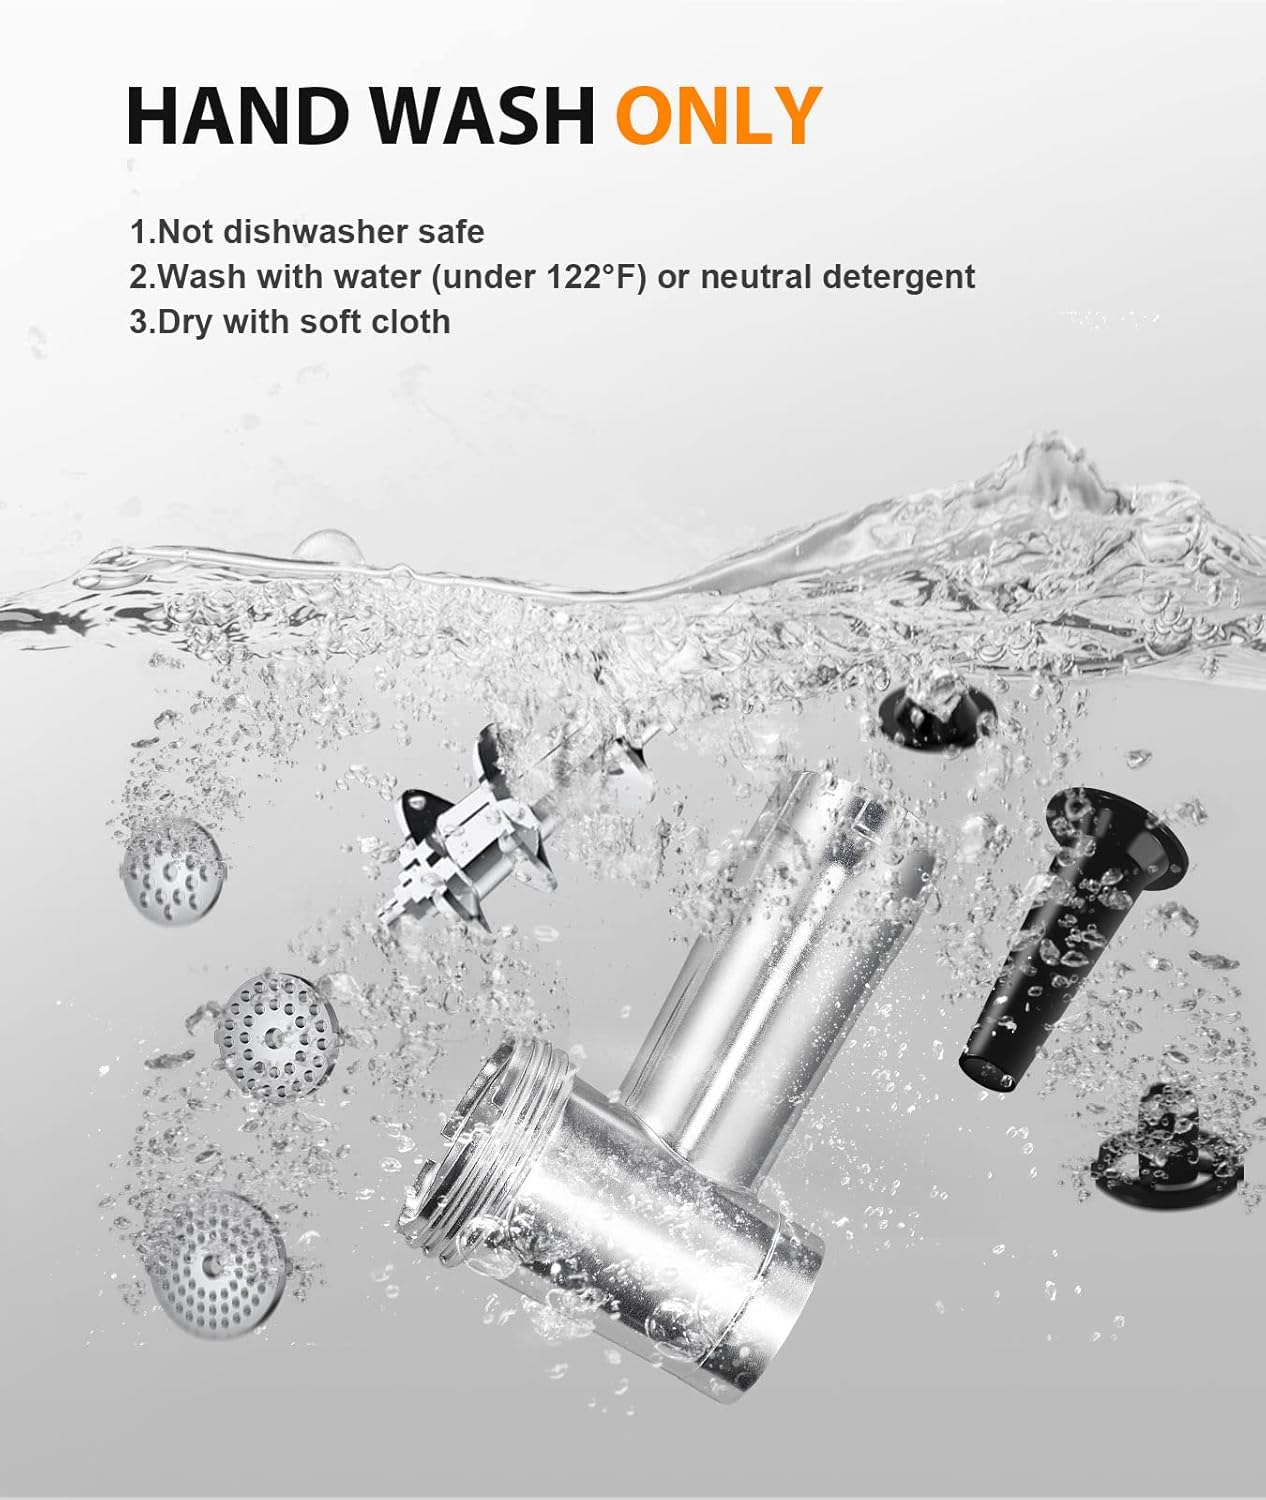
Image: Illustration emphasizing that all removable parts of the meat grinder must be hand washed and dried immediately.
6. Troubleshooting
If you encounter any issues with your meat grinder, please refer to the following common troubleshooting tips:
- Appliance does not turn on: Ensure the power cord is securely plugged into a working outlet. Check if the 'ON' button is pressed.
- Meat is not grinding or motor is struggling:
- Ensure meat is cut into small, boneless, and gristle-free pieces.
- Do not overload the grinder. Feed meat gradually.
- If jammed, press the 'REV' button to clear the blockage.
- Check if the cutting blade and grinding plate are correctly installed and not dull.
- Parts are loose or detach during operation: Ensure the locking ring is tightened firmly before starting the grinder. Always check assembly before use.
- Unusual noise or vibration: Turn off the appliance immediately. Disassemble and reassemble all parts to ensure they are correctly fitted. If the issue persists, contact customer service.
7. Specifications
| Feature | Specification |
|---|---|
| Brand | LOVIMELA |
| Model Number | MGN-12 |
| Power Source | Electric (Max 2500W) |
| Capacity | Up to 3 pounds of minced meat per minute |
| Material | Stainless Steel |
| Product Dimensions | 17"L x 7.4"W x 9.4"H |
| Item Weight | 9.04 pounds |
| Color | Sliver |
8. Warranty and Customer Support
LOVIMELA is committed to providing high-quality kitchen tools and excellent customer service.
- Warranty: This product comes with a ONE YEAR MANUFACTURER WARRANTY.
- Attachments Replacement: Enjoy 12 months of free attachment replacement.
- Money Back Guarantee: A 30-day money-back guarantee is offered.
- Customer Service: For any issues or inquiries, please contact our 24/7 customer service. Refer to your product packaging or the LOVIMELA official website for specific contact details.