Pard NV008S 850nm
Pard NV008S Night Vision Scope User Manual
Model: NV008S 850nm
Brand: Pard
Introduction
This user manual provides comprehensive instructions for the operation, maintenance, and troubleshooting of your Pard NV008S Night Vision Scope. Designed for hunting and outdoor observation, this device integrates advanced night vision capabilities with a ballistic calculator and video recording features. Please read this manual thoroughly before using the device to ensure proper functionality and safety.
Safety Information
- Do not look directly into the sun or any strong light source through the scope, as this may cause permanent eye damage.
- Keep the device away from extreme temperatures, humidity, and direct sunlight.
- Handle the device with care to prevent drops or impacts.
- Do not attempt to disassemble or modify the device. This will void the warranty and may cause damage.
- Ensure the device is securely mounted before use to prevent accidental detachment.
- Use only recommended batteries and chargers.
Package Contents
Verify that all items listed below are present in your package:
- Pard NV008S Night Vision Scope
- Weaver Mount
- Type-C Charging Cable
- User Manual
- Neck Strap
- Velvet Pouch
- Inner Case
- Accessories (specific small parts)

Image: The Pard NV008S Night Vision Scope with its various components and packaging.

Image: A detailed view of the Pard NV008S Night Vision Scope and its accessories, including the color box, inner case, velvet pouch, neck strap, mount, Type-C charging cable, and user manual.
Product Overview and Key Functions
Familiarize yourself with the main components and controls of your NV008S scope.

Image: Diagram illustrating the key functions and button layout of the Pard NV008S. Labels include OK/Recording/LRF/Ballistic Calculation button, IR/Mode switch/(-) button, Menu/Red dot button, Zoom (+)/Play button, and Power/Sleep button.
- Power/Sleep Button: Used to power the device on/off and to enter/exit sleep mode.
- OK/Recording/LRF/Ballistic Calculation Button: Confirms selections, starts/stops video recording, activates the Laser Range Finder (LRF), and initiates ballistic calculations.
- IR/Mode Switch/(-) Button: Adjusts the IR illuminator intensity or switches between modes, and navigates menus downwards.
- Menu/Red Dot Button: Accesses the main menu and toggles the red dot reticle.
- Zoom (+)/Play Button: Increases magnification, and in playback mode, plays recorded videos.
Setup
1. Battery Installation
The NV008S uses a rechargeable battery (not specified in input, assume standard type). Open the battery compartment, insert the battery according to the polarity indicators, and close the compartment securely.
2. Mounting the Scope
Attach the provided Weaver mount to your rifle's rail system. Secure the NV008S scope onto the mount using the appropriate screws, ensuring it is firmly seated and aligned. Refer to your rifle's manual for specific mounting instructions if necessary.
3. Initial Charging
Before first use, fully charge the device using the provided Type-C charging cable. Connect the cable to the scope's charging port and a suitable USB power adapter.
Operating Instructions
Power On/Off
- To power on: Press and hold the Power/Sleep Button until the display illuminates.
- To power off: Press and hold the Power/Sleep Button until the device shuts down.
- Sleep Mode: Briefly press the Power/Sleep Button to enter or exit sleep mode, conserving battery life.
Menu Navigation
Press the Menu/Red Dot Button to access the main menu. Use the IR/Mode Switch/(-) and Zoom (+)/Play buttons to navigate through menu options. Press the OK/Recording/LRF/Ballistic Calculation Button to confirm selections.
IR Illuminator (850nm / 940nm)
The NV008S features a 350M IR illuminator with selectable 850nm or 940nm wavelengths. The 850nm option provides a longer detection range with high sensitivity, while the 940nm option offers an invisible light source, ideal for evading detection by animals.
- To activate/adjust IR: Press the IR/Mode Switch/(-) Button to cycle through IR intensity levels (three levels available).
- To switch IR wavelength: This setting is typically found within the main menu under "IR Settings" or "System Settings".

Image: Visual representation of the 350M IR illuminator's effectiveness, showing clear visibility at 150m and 350m distances in low light conditions.
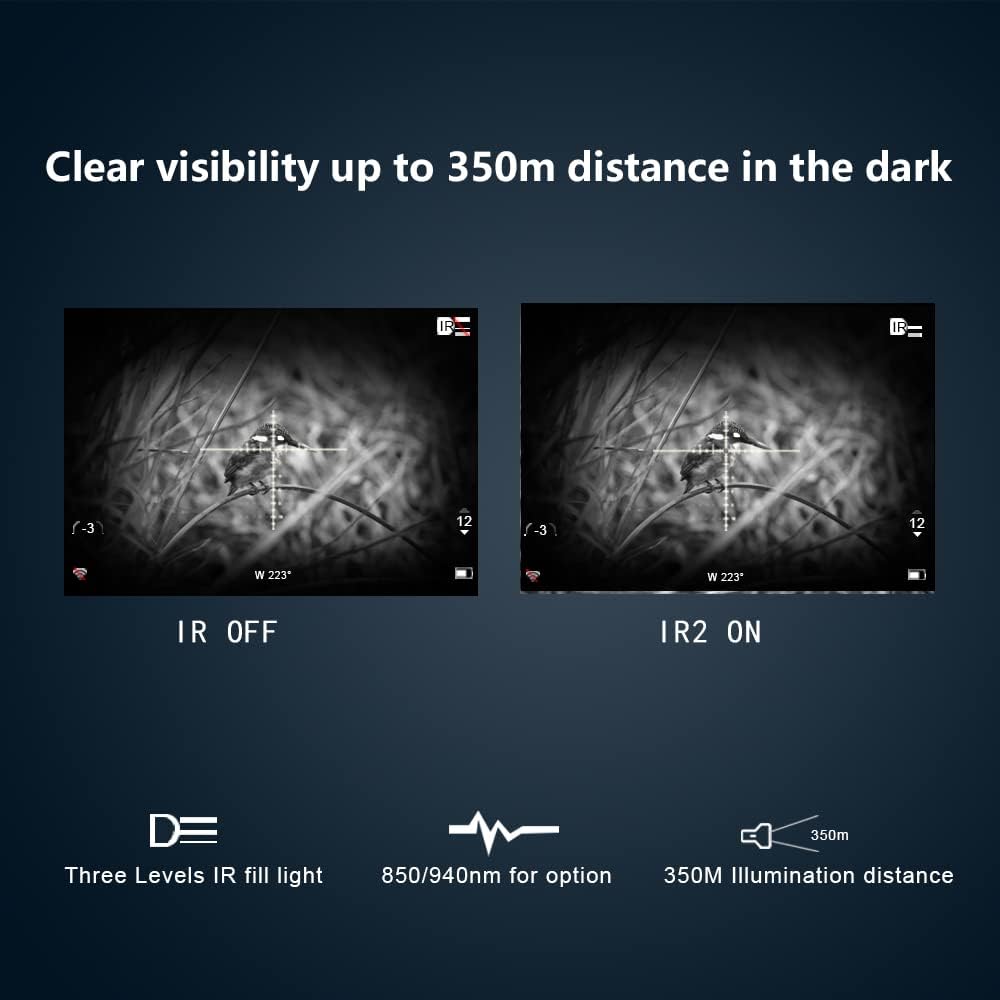
Image: Side-by-side comparison demonstrating the enhanced visibility with the IR illuminator turned on (IR2 ON) versus off (IR OFF) in dark environments, highlighting clear visibility up to 350m.
Ballistic Calculator
The integrated ballistic calculator allows for precise shot placement by accounting for various environmental factors. You can set up multiple profiles for different ammunition types or scenarios.
- To use: Access the ballistic calculator function via the OK/Recording/LRF/Ballistic Calculation Button or through the main menu. Input parameters such as range, angle to target, temperature, and humidity. The scope will then provide an adjusted aiming point.
Image: A display showing the ballistic calculation feature, with a deer target and an overlay indicating the calculated trajectory for a precise shot.
Recoil Activated Video Recording (RAV)
The RAV feature automatically records video when the scope senses recoil, ensuring you capture critical moments without manual intervention. This saves storage space by only recording relevant events.
- To enable/disable RAV: Navigate to the "Video Settings" or "Recording Settings" in the main menu and toggle the Recoil Activated Video option.
- Recordings are saved to an inserted SD card (not included).

Image: A screen capture from the scope's display, indicating the "Recoil Activated Video" feature is enabled, highlighting its space-saving, intelligent, and automatic recording capabilities.
One Shot Zero
This feature simplifies the zeroing process. After firing a shot, you can adjust the reticle to the point of impact with a single adjustment.
- To perform One Shot Zero: Fire a shot at a target. Access the "Zeroing" or "One Shot Zero" option in the menu. Adjust the reticle on the screen to align with the bullet's point of impact. Confirm the setting.
- It is recommended to perform this procedure when first setting up the scope on a new rifle.
Wi-Fi Connection
Connect your NV008S to a smartphone or tablet via Wi-Fi for remote viewing, control, and file transfer using the dedicated Pard application.
- To connect: Enable Wi-Fi on the scope via the main menu. On your mobile device, search for the scope's Wi-Fi network and connect. Open the Pard app to establish communication.

Image: Illustration depicting the wireless transmission capability of the Pard NV008S, showing the scope connected to a tablet via Wi-Fi for remote viewing.
Picture-in-Picture (PIP)
The PIP function displays an enlarged image of the reticle area in a smaller window on the main screen, allowing for precise aiming while maintaining situational awareness.
- To activate PIP: This option is typically found in the display settings within the main menu.

Image: A screen capture showing the "Picture in Picture" feature, where a magnified view of the reticle area is displayed in the top center of the main field of view for enhanced precision.
Maintenance
Cleaning
- Use a soft, lint-free cloth to clean the lens and body of the scope.
- For stubborn marks on the lens, use a lens cleaning solution specifically designed for optical devices.
- Do not use abrasive materials or harsh chemicals.
Storage
- Store the scope in a cool, dry place, away from direct sunlight and high humidity.
- If storing for extended periods, remove the battery to prevent leakage.
- Use the provided velvet pouch and inner case for protection during storage and transport.

Image: The Pard NV008S scope with water droplets, illustrating its IP67 water-resistant rating, which provides strong protection in severe environments.
Troubleshooting
| Problem | Possible Cause | Solution |
|---|---|---|
| Device does not power on. | Low or dead battery; incorrectly inserted battery. | Charge the battery; ensure battery is inserted with correct polarity. |
| Image is blurry or out of focus. | Improper focus adjustment; dirty lens. | Adjust the focus ring; clean the objective and eyepiece lenses. |
| IR illuminator not working. | IR is off or set to lowest intensity; IR emitter blocked. | Press the IR button to cycle through intensity levels; ensure nothing is obstructing the IR emitter. |
| Wi-Fi connection issues. | Wi-Fi not enabled on scope; incorrect app settings; interference. | Enable Wi-Fi in scope settings; restart app and scope; ensure no strong interference sources nearby. |
| Video recording not saving. | No SD card inserted; SD card full or corrupted; RAV not enabled. | Insert a compatible SD card; format or replace SD card; enable RAV in settings. |
Specifications
| Feature | Detail |
|---|---|
| Model Name | NV008S 850nm |
| Brand | Pard |
| Style | IR850nm (also available in IR940nm) |
| Objective Lens Diameter | 70mm |
| Magnification Minimum | 6.5x |
| IR Illuminator Range | Up to 350m |
| Material | Aluminum |
| Item Weight | 350 Grams |
| Mounting Type | Weaver Mount |
| Water Resistance | IP67 |
| Compatible Devices | Handgun (Note: Primarily designed for rifle scopes, but compatible with handguns as per data) |
Warranty and Support
Pard products are manufactured with high-quality standards. For warranty information, please refer to the warranty card included with your product or visit the official Pard website. Keep your proof of purchase for warranty claims.
For technical support, troubleshooting assistance, or service inquiries, please contact Pard customer service. Contact details can typically be found on the official Pard website or within the product packaging.
Manufacturer: PARD
Visit the Pard Store on Amazon for more information and product updates.
Ask a question about this manual
Ask about setup, troubleshooting, compatibility, parts, safety, or missing instructions. Manuals+ will review the question and use this page’s manual context to help answer it.