
Roland UVC-02
Roland UVC-02 Web Presentation Dock Instruction Manual
Model: UVC-02
1. Introduction
The Roland UVC-02 Web Presentation Dock is a compact broadcast control center designed to enhance your video presentations and live streams. It allows for the connection of high-quality HDMI cameras, professional microphones, and other audio sources, routing them to your computer via a single USB cable. This device provides hands-on control over audio and video elements, making it suitable for various web meeting and streaming platforms.
2. Safety Information
Please read and understand the following safety precautions before using the Roland UVC-02 Web Presentation Dock to ensure proper and safe operation.
- Do not expose the unit to rain, moisture, or extreme temperatures.
- Avoid placing the unit near heat sources or in direct sunlight.
- Do not disassemble or modify the unit. Refer all servicing to qualified personnel.
- Use only the specified power supply and cables.
- Keep the unit away from strong electromagnetic fields.
- Ensure proper ventilation around the unit during operation.
3. Product Overview
The Roland UVC-02 Web Presentation Dock integrates essential audio and video controls into a single desktop unit. It is designed to simplify the process of connecting external cameras and microphones to your computer for high-quality online communication.
3.1. Package Contents
Verify that all items are present in the package:
- Roland UVC-02 Web Presentation Dock
- USB 3.0 Cable
- Roland MIDI Cable
- Roland Microphone Cable
- Polishing Cloth
- "Read Me First" Leaflet
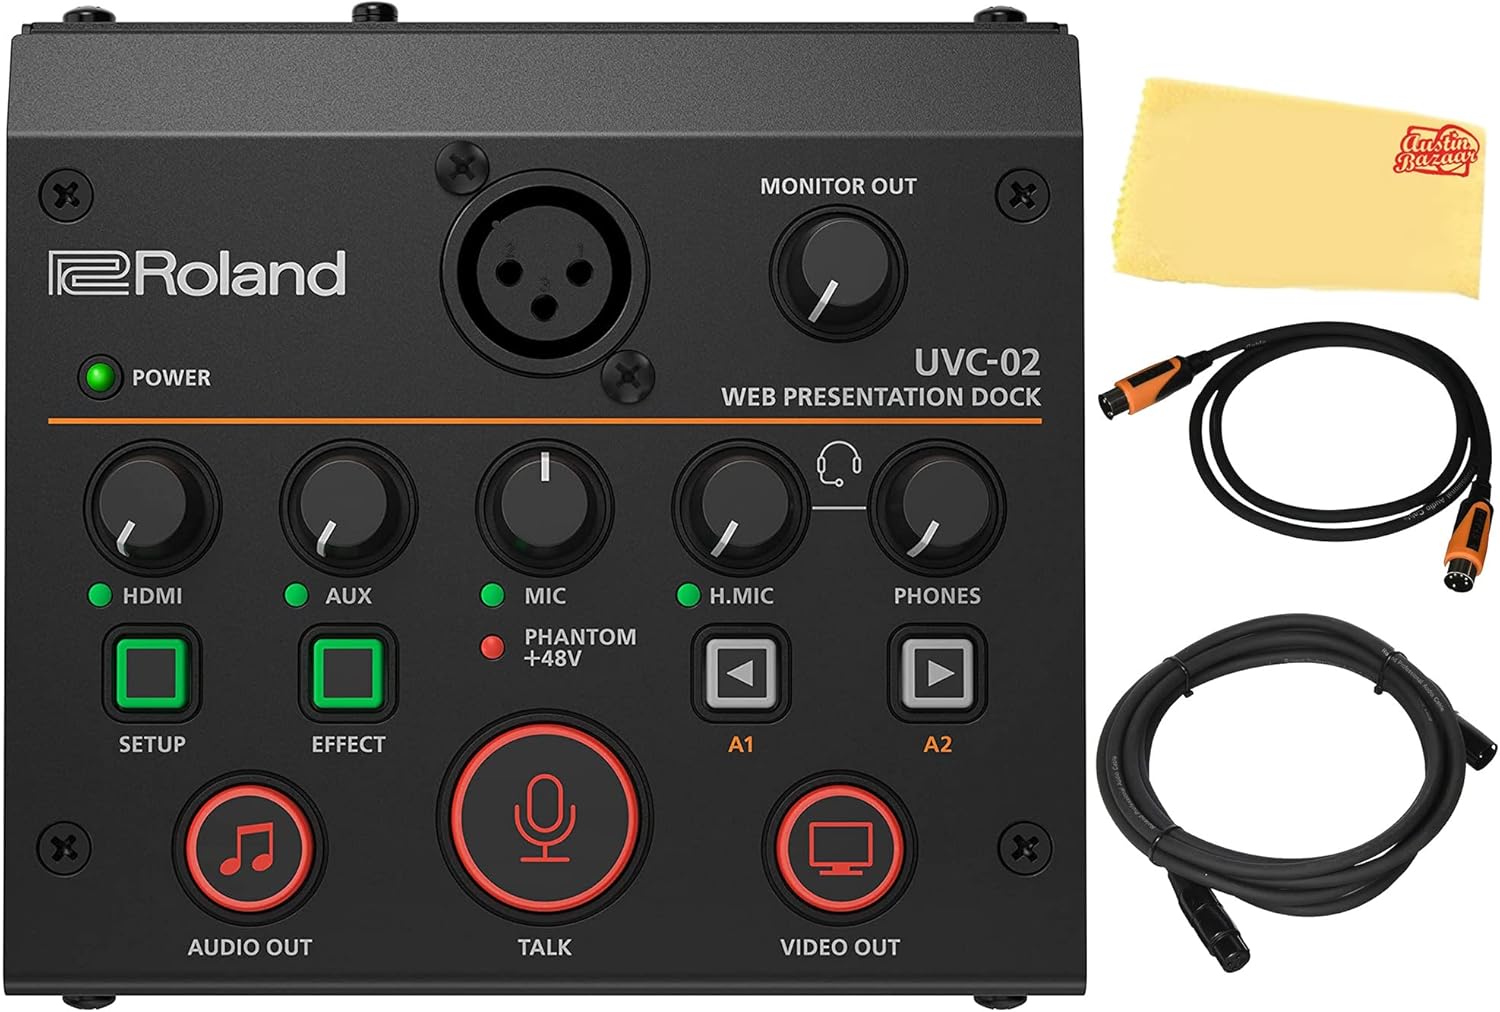
Figure 3.1: Roland UVC-02 Web Presentation Dock and bundled accessories.
3.2. Front Panel Controls
The front panel of the UVC-02 provides intuitive controls for managing your audio and video inputs.

Figure 3.2: Front Panel of the UVC-02.
- POWER Indicator: Illuminates when the unit is powered on.
- HDMI Knob: Adjusts the input level for the HDMI audio.
- AUX Knob: Adjusts the input level for the AUX IN audio.
- MIC Knob: Adjusts the input level for the XLR microphone input.
- H.MIC Knob: Adjusts the input level for the HEADSET microphone input.
- PHONES Knob: Adjusts the volume for the HEADSET output.
- MONITOR OUT Knob: Adjusts the volume for the MONITOR OUT.
- SETUP Button: Used for accessing setup menus or functions.
- EFFECT Button: Activates or deactivates audio effects.
- AUDIO OUT Button: Controls the main audio output.
- TALK Button: Mutes/unmutes the microphone.
- VIDEO OUT Button: Controls the main video output.
- A1/A2 Buttons: User-assignable buttons for custom functions.
3.3. Rear Panel Connections
The rear panel houses all the input and output ports for connecting your devices.
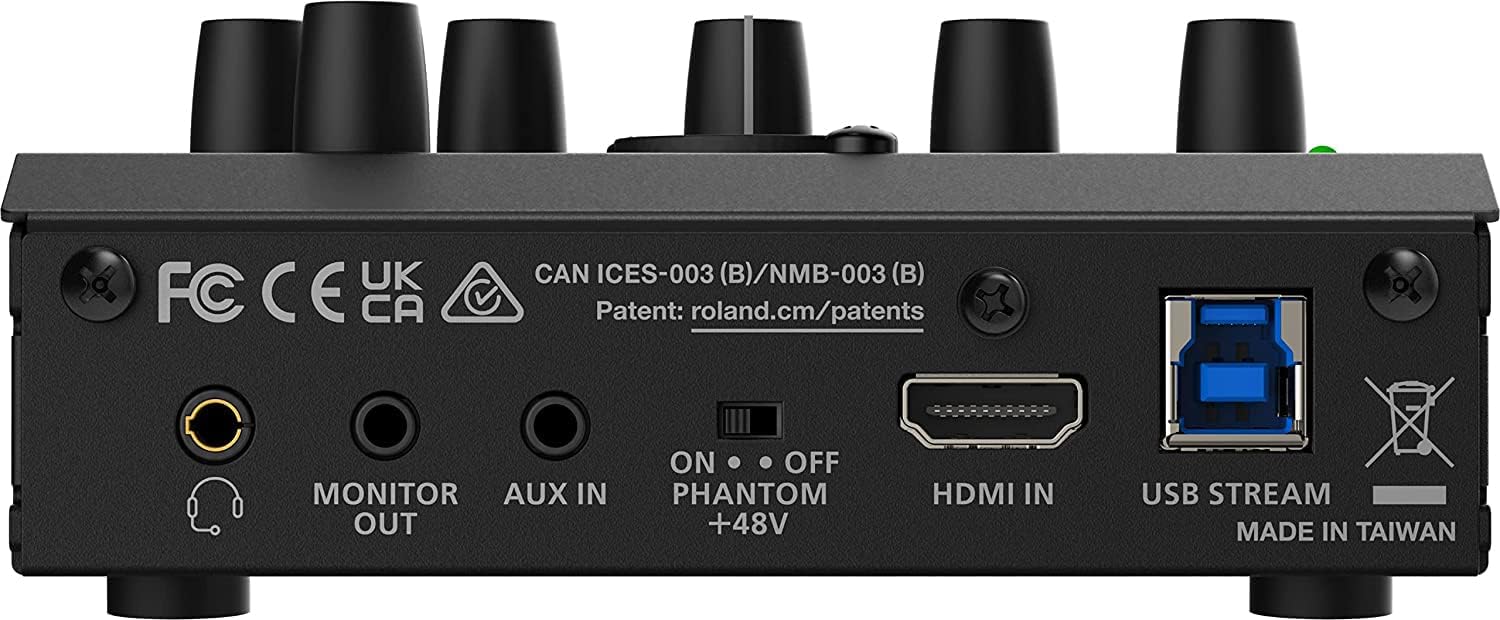
Figure 3.3: Rear Panel Connections of the UVC-02.
- MONITOR OUT: Stereo miniature phone type output for monitoring audio.
- AUX IN: Stereo miniature phone type input for external audio devices.
- MIC: XLR type input for balanced microphones, with switchable +48V Phantom power.
- HDMI IN: HDMI type A input for video and audio from a camera or other HDMI source.
- USB STREAM: USB 3.0 Type-B port for connection to a computer.
4. Setup
Follow these steps to set up your Roland UVC-02 Web Presentation Dock.
4.1. Connecting to a Computer
- Connect the supplied USB 3.0 cable from the USB STREAM port on the UVC-02 to an available USB 3.0 port on your computer.
- The UVC-02 will be recognized as a webcam and audio source by your computer without requiring additional drivers.
4.2. Connecting an HDMI Camera
- Connect an HDMI cable (not included) from your camera's HDMI output to the HDMI IN port on the UVC-02.
- Ensure your camera is set to output a compatible video resolution.
4.3. Connecting a Microphone
The UVC-02 supports both XLR microphones and headset microphones.
XLR Microphone Connection:
- Connect your XLR microphone to the MIC input on the rear panel.
- If your microphone requires phantom power, ensure the PHANTOM +48V switch on the rear panel is set to ON.

Figure 4.1: Roland Microphone Cable (XLR).
Headset Microphone Connection:
- Connect your headset (with a 4-pole stereo miniature plug, CTIA standard) to the HEADSET port on the front panel.
4.4. Connecting Auxiliary Audio Devices
- Connect an audio device (e.g., smartphone, music player) to the AUX IN port on the rear panel using a stereo miniature phone type cable.
4.5. Connecting Monitoring Devices
- Connect headphones or external speakers to the MONITOR OUT port on the rear panel for audio monitoring.
5. Operating the UVC-02
The UVC-02 is designed for plug-and-play operation with most web conferencing and streaming applications.
5.1. Basic Operation
- Once connected to your computer via USB, the UVC-02 will be recognized as a standard webcam and audio device.
- Open your preferred web meeting software (e.g., Zoom, Microsoft Teams, Webex by Cisco) or streaming application.
- In the application's settings, select "Roland UVC-02" as your video input and audio input/output device.
- Use the front panel knobs (HDMI, AUX, MIC, H.MIC) to adjust the input levels for your audio sources.
- Use the PHONES and MONITOR OUT knobs to adjust your monitoring volume.
5.2. Using Controls
- TALK Button: Press to mute or unmute your microphone. The button's indicator will change to show its status.
- AUDIO OUT / VIDEO OUT Buttons: These buttons control the main audio and video signals sent to your computer. Press to enable or disable the respective output.
- SETUP / EFFECT Buttons: Refer to the detailed Roland UVC-02 reference manual for advanced functions and customization options for these buttons.
- A1 / A2 Buttons: These are assignable buttons. Their functions can be configured via Roland's utility software (if available) or may have default actions depending on the firmware version.
6. Maintenance
Proper maintenance ensures the longevity and optimal performance of your UVC-02.
- Cleaning: Use the included polishing cloth or a soft, dry cloth to wipe down the unit. Do not use abrasive cleaners, waxes, or solvents.
- Storage: When not in use, store the unit in a cool, dry place away from direct sunlight and extreme temperatures.
- Cable Care: Handle cables carefully. Avoid sharp bends or kinks, and store them neatly to prevent damage.
7. Troubleshooting
If you encounter issues with your UVC-02, try the following troubleshooting steps.
7.1. No Video Output
- Ensure the HDMI cable is securely connected to both the camera and the UVC-02.
- Verify that your camera is powered on and outputting video via HDMI.
- Check the video settings in your computer's operating system and the web conferencing/streaming application to ensure "Roland UVC-02" is selected as the video input.
- Confirm the VIDEO OUT button on the UVC-02 is active.
7.2. No Audio Output/Input
- Check all audio cable connections (microphone, AUX IN, MONITOR OUT).
- Adjust the respective input level knobs (HDMI, AUX, MIC, H.MIC) on the front panel.
- For XLR microphones, ensure PHANTOM +48V is enabled if required by your microphone.
- Verify that "Roland UVC-02" is selected as the audio input and output device in your computer's sound settings and the application you are using.
- Confirm the AUDIO OUT button on the UVC-02 is active.
- If using a microphone, ensure the TALK button is not muting the microphone.
7.3. Unit Not Recognized by Computer
- Ensure the USB 3.0 cable is securely connected to both the UVC-02 and your computer.
- Try connecting to a different USB 3.0 port on your computer.
- Restart your computer and the UVC-02.
- Try using a different USB 3.0 cable.
8. Specifications
| Feature | Specification |
|---|---|
| Model Number | AUS-UVC-02-COMBO-STD |
| Item Weight | 1.3 pounds (0.59 kg) |
| Product Dimensions | 2.4"L x 4.6"W x 4.88"H (6.1 x 11.7 x 12.4 cm) |
| Input Connector (Video) | HDMI IN : HDMI type A |
| Output Connector (Computer) | USB STREAM : USB 3.0 Type-B |
| Audio Analog Connectors | MIC : XLR type (Balanced, Phantom power DC 48V, 14 mA Max) HEADSET : Stereo miniature phone type (CTIA, PLUG-IN power) AUX IN : Stereo miniature phone type MONITOR OUT : Stereo miniature phone type |
| Compatible Devices | Personal Computer |
| Operating System | Windows (and generally macOS, though not explicitly listed in provided data) |
| Wattage | 48 watts |
9. Warranty and Support
This Roland product is covered by a manufacturer's warranty. For detailed warranty information, please refer to the warranty card included with your product or visit the official Roland website.
For technical support, product registration, or further inquiries, please contact Roland customer support or visit their official support page. Keep your purchase receipt as proof of purchase for warranty claims.
Note: No official product videos were available in the provided data for embedding in this manual.
Ask a question about this manual
Ask about setup, troubleshooting, compatibility, parts, safety, or missing instructions. Manuals+ will review the question and use this page’s manual context to help answer it.