Introduction
This manual provides essential information for the safe and effective installation, operation, and maintenance of the Technical Precision replacement light bulb for the Nikon OL-5 Lensometer. Please read these instructions carefully before proceeding with installation or use.
Safety Information
Always prioritize safety when handling electrical components. Failure to follow these safety guidelines may result in injury or damage to equipment.
- Power Disconnection: Before attempting any installation or replacement, ensure the Nikon OL-5 Lensometer is completely powered off and unplugged from its electrical outlet.
- Cooling Period: Allow the existing bulb to cool down completely before removal. Hot bulbs can cause severe burns.
- Proper Handling: Handle the new bulb by its base to avoid touching the glass. Oils from skin can create hot spots on the bulb, potentially reducing its lifespan.
- Correct Voltage and Wattage: Use only bulbs with the specified voltage (120V) and wattage (15W) to prevent damage to the lensometer.
- Disposal: Dispose of old bulbs according to local regulations.
Product Overview and Specifications
The Technical Precision replacement light bulb is designed to provide reliable illumination for the Nikon OL-5 Lensometer. This product includes two bulbs per package.
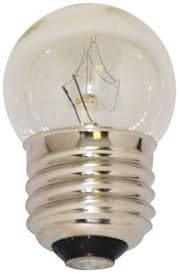
This image displays the Technical Precision replacement light bulb, featuring a clear glass globe and a standard screw-in base, designed for the Nikon OL-5 Lensometer.
Key Specifications:
- Model: OL-5 LENSOMETER (Replacement Bulb)
- Voltage: 120 Volts
- Wattage: 15 Watts
- Bulb Type: Incandescent
- Material: Copper base, Glass globe
- Usage: Indoor
- Quantity: 2 bulbs per package
Setup and Installation
Follow these steps to safely replace the light bulb in your Nikon OL-5 Lensometer:
- Power Off and Unplug: Ensure the Nikon OL-5 Lensometer is turned off and completely disconnected from the power supply.
- Locate Bulb Compartment: Refer to your Nikon OL-5 Lensometer's original manual to locate the light bulb access panel or compartment. This is typically found near the illumination source.
- Allow Cooling: If the lensometer was recently in use, wait for the old bulb to cool down completely before touching it.
- Remove Old Bulb: Carefully unscrew the old bulb counter-clockwise from its socket. If the bulb is broken, use appropriate tools to remove the base without damaging the socket.
- Install New Bulb: Holding the new Technical Precision bulb by its base, gently screw it clockwise into the socket until it is snug. Do not overtighten.
- Secure Access Panel: Replace any access panels or covers that were removed during the process.
- Reconnect Power: Plug the Nikon OL-5 Lensometer back into the power outlet.
Operation
Once the replacement bulb is installed, the operation of the illumination system remains unchanged. Simply power on your Nikon OL-5 Lensometer as you normally would. The new bulb will provide the necessary light for accurate measurements.
Maintenance
To ensure optimal performance and longevity of your replacement bulb and lensometer:
- Regular Inspection: Periodically check the bulb for any signs of dimming or flickering, which may indicate it is nearing the end of its lifespan.
- Cleanliness: Keep the lensometer's bulb compartment and optical path free from dust and debris. Use a soft, dry cloth for cleaning. Avoid using abrasive cleaners or solvents.
- Storage: When not in use for extended periods, store the lensometer in a clean, dry environment.
Troubleshooting
If the replacement bulb does not illuminate after installation, consider the following:
| Problem | Possible Cause | Solution |
|---|---|---|
| Bulb does not light up | 1. Lensometer not plugged in or powered on. 2. Bulb not screwed in properly. 3. Bulb is faulty. 4. Lensometer's internal fuse or wiring issue. | 1. Ensure the lensometer is plugged in and the power switch is on. 2. Carefully unscrew and re-screw the bulb to ensure a secure connection. 3. Try a different bulb from the 2-pack to rule out a faulty bulb. 4. If other bulbs also fail, consult a qualified technician for lensometer repair. |
| Bulb flickers or is dim | 1. Loose connection. 2. Bulb nearing end of life. 3. Inconsistent power supply. | 1. Check if the bulb is securely screwed into the socket. 2. Replace the bulb with a new one. 3. Ensure the lensometer is connected to a stable power source. |
Warranty and Support
For information regarding warranty coverage or technical support for your Technical Precision replacement light bulb, please refer to the packaging or contact Technical Precision directly through their official channels. Specific warranty details are not provided in this manual.