DEKOPRO 1
DEKO Digital 200A MIG/MMA Welder Instruction Manual
Model: 1 | Brand: DEKOPRO
1. Introduction
This manual provides essential information for the safe and effective operation of your DEKO Digital 200A MIG/MMA Welder. Please read this manual thoroughly before operating the machine to ensure proper use, maximize performance, and prevent injury or damage.

Figure 1.1: DEKO Digital 200A MIG/MMA Welder and standard accessories including wire brush, earthing cable, electrode holder, and welding gun.
2. Safety Information
Always prioritize safety when operating welding equipment. Failure to follow safety guidelines can result in serious injury or death.
2.1 General Safety Precautions
- Ensure the welding area is well-ventilated to avoid inhaling fumes.
- Wear appropriate personal protective equipment (PPE), including a welding helmet with proper shade, flame-resistant clothing, welding gloves, and safety shoes.
- Keep a fire extinguisher readily available.
- Do not operate the welder in damp or wet conditions.
2.2 Electrical Safety
- Connect the welder to a properly grounded power supply.
- Inspect power cords and welding cables for damage before each use. Replace if damaged.
- The machine features VRD (Voltage Reduction Device), which lowers the no-load voltage to enhance safety during operation.
2.3 Overheating Protection
The DEKO Digital 200A Welder is equipped with an overheating protection system. If the machine exceeds its specified duty cycle or operating temperature, it will automatically shut down to prevent damage. Allow the machine to cool down before resuming operation.
3. Product Features
The DEKO Digital 200A Welder incorporates advanced technology for versatile and efficient welding.
3.1 Multi-Functional Welding Modes
This SYNERGIC welder supports multiple welding processes, making it suitable for a wide range of applications:
- Gas MIG: Gas Metal Arc Welding with shielding gas.
- Flux Core MIG: Gasless Flux-Cored Arc Welding.
- Lift TIG: Lift Tungsten Inert Gas Welding (TIG torch not included).
- MMA (Stick): Manual Metal Arc Welding.
- Gas Free MIG: Similar to Flux Core MIG, indicating operation without external shielding gas.

Figure 3.1: Supported Welding Modes.
3.2 Dual Voltage Capability
The welder is designed to operate on both 110V and 220V power supplies, offering flexibility for various work environments.
- 110V: Suitable for lightweight work and home use.
- 220V: Ideal for construction site work and heavier duty applications.

Figure 3.2: Dual Voltage Operation.
3.3 IGBT Inverter Technology
Equipped with IGBT (Insulated Gate Bipolar Transistor) intelligent inverter technology, this welder offers improved reliability, higher efficiency, and reduced energy loss, resulting in superior welding performance.
3.4 Strong Heat Dissipation
The machine features an efficient cooling system designed for strong heat dissipation, preventing overheating and ensuring continuous operation for extended periods of welding.

Figure 3.3: Heat Dissipation System.
3.5 Applicable Materials
The DEKO Digital 200A Welder is capable of welding a wide range of metal materials, including:
- Cast Iron
- Mild Steel
- Sheet Metal
- Stainless Steel
- Square Pipe
- Metal Cage

Figure 3.4: Wide Range of Weldable Metals.
4. Setup
4.1 Unpacking and Inspection
- Carefully remove the welder and all accessories from the packaging.
- Inspect the machine and accessories for any signs of shipping damage. If damage is found, contact your supplier immediately.
- Verify that all components listed in the packing list are present.

Figure 4.1: Included Accessories.
4.2 Connecting Power
- Ensure the welder's power switch is in the OFF position.
- Connect the power conversion line if switching between 110V and 220V.
- Plug the power cord into a suitable, grounded electrical outlet.
4.3 Connecting Welding Accessories
- Earthing Cable: Connect the earthing clamp to the workpiece or welding table to ensure a good electrical ground.
- Electrode Holder (for MMA): Connect the electrode holder cable to the positive (+) terminal for most stick welding applications.
- Welding Gun (for MIG/TIG): Connect the welding gun cable to the appropriate terminal (usually positive for MIG with solid wire, negative for flux-cored).
4.4 Wire Installation (for MIG/Flux Core)
Follow these steps to install the welding wire:
- Open the wire feed compartment.
- Place the wire spool onto the spindle, ensuring it rotates freely.
- Thread the wire through the wire feeding wheel and wire pressing wheel.
- Close the wire pressing wheel to secure the wire.
- Feed the wire into the welding gun liner.
- Use the 'Inching wire feeding key' on the control panel to feed the wire through the gun until it emerges from the contact tip.
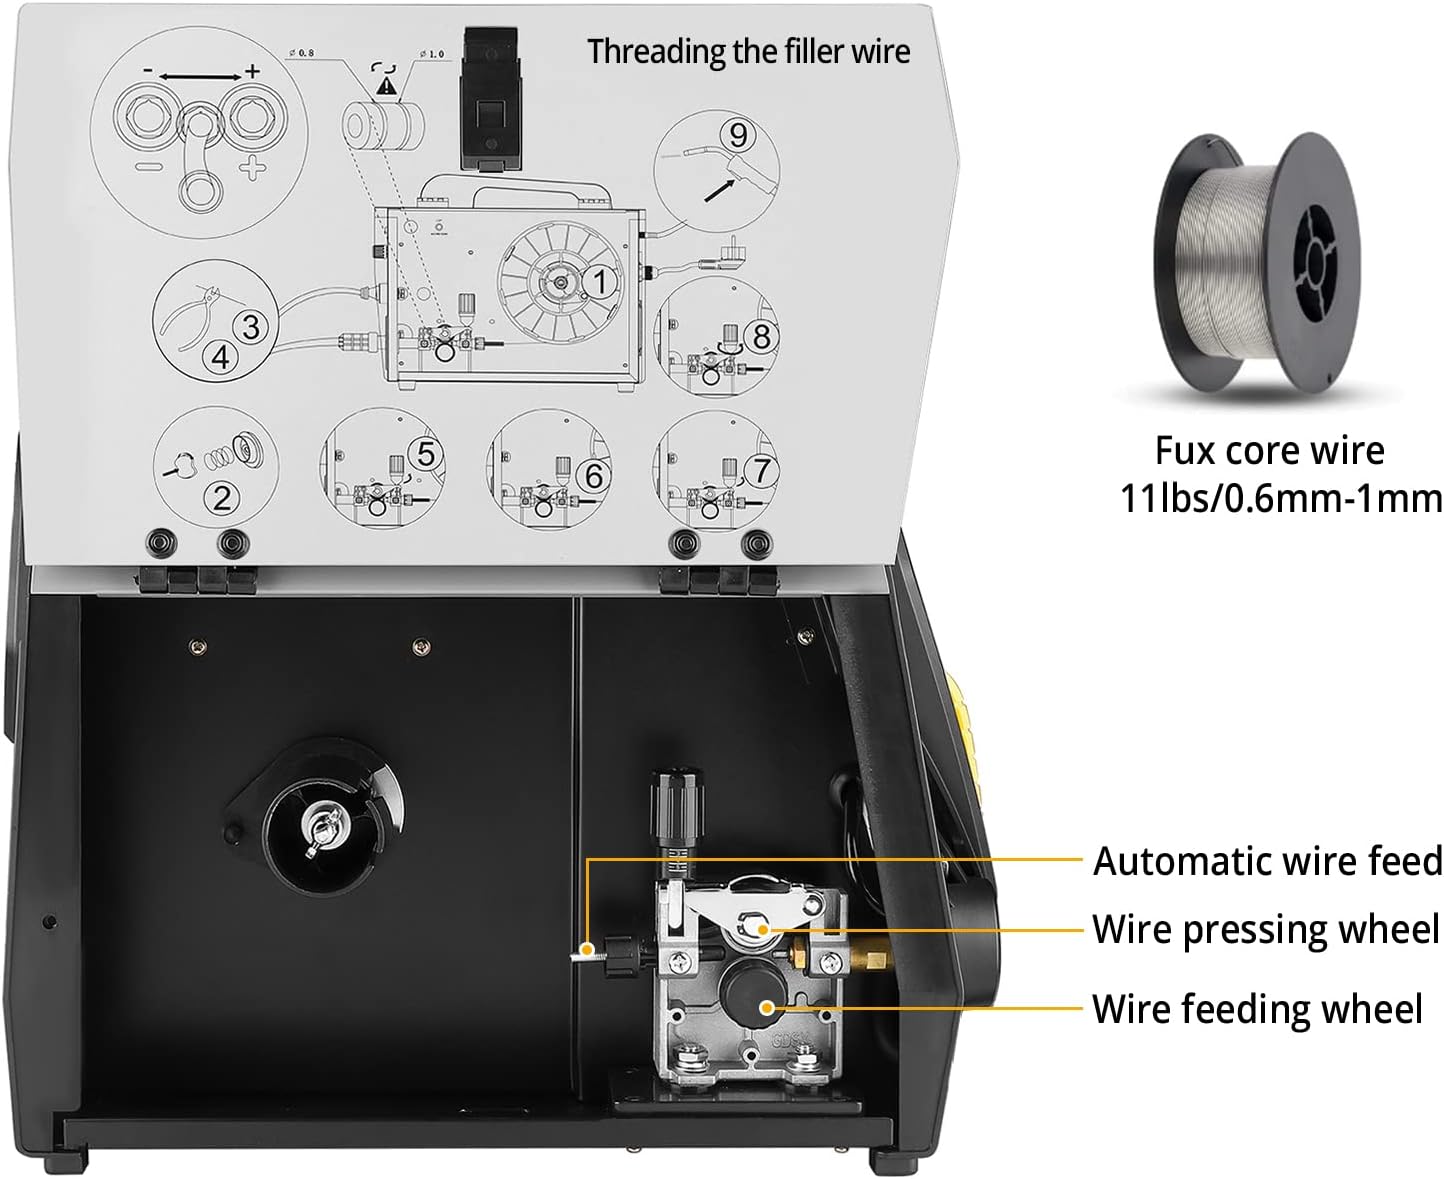
Figure 4.2: Threading the Filler Wire.
5. Operating Instructions
5.1 Control Panel Functions
The digital control panel allows for precise adjustment of welding parameters. Refer to the diagram and table below for an overview of the panel functions:
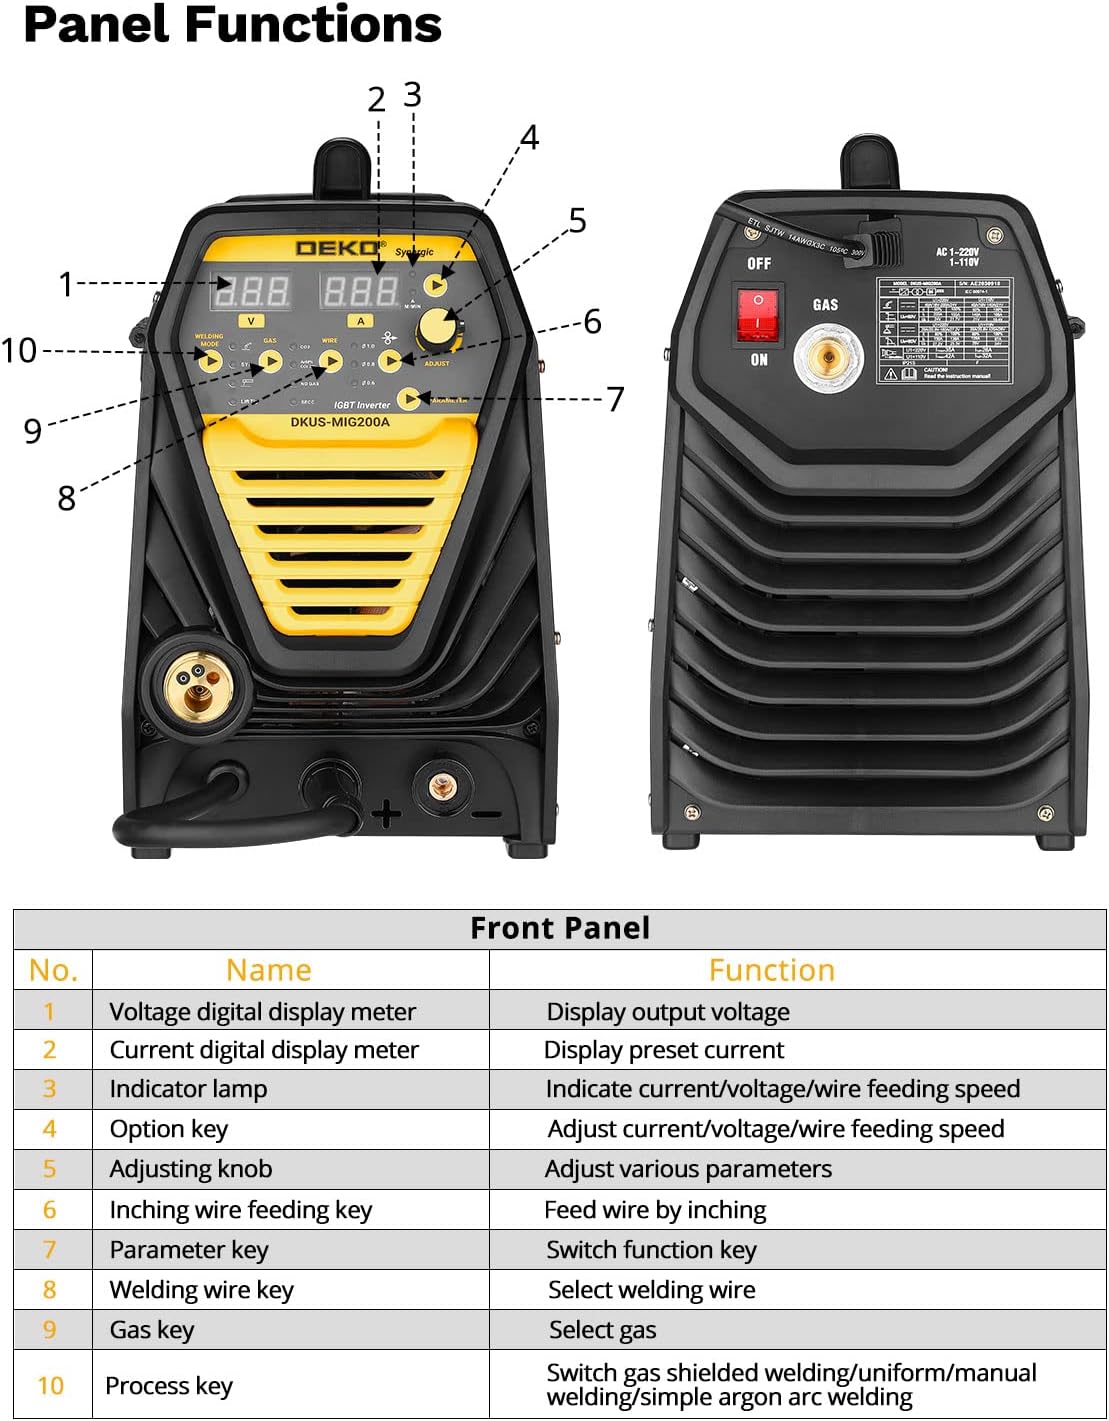
Figure 5.1: Front Panel Layout and Functions.
| No. | Name | Function |
|---|---|---|
| 1 | Voltage digital display meter | Display output voltage |
| 2 | Current digital display meter | Display preset current |
| 3 | Indicator lamp | Indicate current/voltage/wire feeding speed |
| 4 | Option key | Adjust current/voltage/wire feeding speed |
| 5 | Adjusting knob | Adjust various parameters |
| 6 | Inching wire feeding key | Feed wire by inching |
| 7 | Parameter key | Switch function key |
| 8 | Welding wire key | Select welding wire |
| 9 | Gas key | Select gas |
| 10 | Process key | Switch gas shielded welding/uniform/manual welding/simple argon arc welding |
5.2 Selecting Welding Mode
Use the Process key (10) to cycle through the available welding modes (Gas MIG, Flux Core MIG, MMA, Lift TIG). The selected mode will be indicated on the digital display.
5.3 Adjusting Parameters
Once a welding mode is selected, use the Option key (4) and Adjusting knob (5) to set the desired welding parameters:
- Voltage: Adjust for arc length and bead profile.
- Current (Amperage): Controls the heat input and penetration.
- Wire Feeding Speed: Synchronized with voltage for optimal MIG welding.
The digital displays (1 and 2) will show the current voltage and preset current values.
5.4 Welding Process
After setting up the machine and parameters:
- Ensure proper grounding of the workpiece.
- Position yourself safely with appropriate PPE.
- Initiate the arc according to the selected welding process (e.g., trigger for MIG, striking for MMA).
- Maintain a consistent travel speed and arc length for a quality weld.

Figure 5.2: Welding in Action (MMA, Flux MIG, Gas MIG).
6. Maintenance
Regular maintenance ensures the longevity and optimal performance of your welder.
- Cleaning: Periodically clean the exterior of the machine with a dry cloth. Use compressed air to clear dust from internal components, ensuring the machine is unplugged.
- Wire Feed System: Inspect the wire feeding wheel and liner for wear or blockages. Clean or replace as necessary to ensure smooth wire feeding.
- Cables and Connections: Regularly check all welding cables, power cords, and connections for damage, fraying, or loose fittings. Repair or replace any damaged parts.
- Contact Tip and Nozzle: For MIG welding, regularly clean or replace the contact tip and nozzle to prevent spatter buildup and ensure good electrical contact.
7. Troubleshooting
This section provides solutions to common issues you might encounter.
| Problem | Possible Cause | Solution |
|---|---|---|
| Welder does not power on | No power supply; Power switch off; Faulty power cord | Check power outlet; Turn on power switch; Inspect and replace power cord if damaged |
| No arc or weak arc | Poor ground connection; Incorrect settings; Damaged electrode/wire; Overheating protection active | Ensure good ground contact; Adjust current/voltage; Replace electrode/wire; Allow machine to cool down |
| Wire feeding issues (MIG) | Wire tangled; Clogged liner; Worn contact tip; Incorrect wire tension | Untangle wire; Clean/replace liner; Replace contact tip; Adjust wire tension on spool |
| Excessive spatter | Incorrect voltage/wire speed; Insufficient shielding gas (MIG); Dirty workpiece | Adjust parameters; Check gas flow/supply; Clean workpiece surface |
| Machine shuts down during operation | Overheating protection activated; Input voltage fluctuation | Allow machine to cool; Check power supply stability |
8. Specifications
Technical specifications for the DEKO Digital 200A MIG/MMA Welder:
| Attribute | Value |
|---|---|
| Manufacturer | DEKO |
| Part Number | 1 |
| Item Weight | 34.1 pounds |
| Product Dimensions | 5.91 x 5.91 x 5.91 inches |
| Size | 200A |
| Style | 200A |
| Material | Stainless Steel/Carbon Steel |
| Batteries Included? | No |
| Batteries Required? | No |
| Date First Available | May 25, 2022 |

Figure 8.1: Product Dimensions.
9. Warranty and Support
For warranty information and technical support, please refer to the warranty card included with your product or contact DEKOPRO customer service through their official channels. Keep your purchase receipt as proof of purchase.
Related Documents - 1
 |
Strata EZIMIG215C 200A MIG/MMA Welder Operating Instructions Comprehensive operating instructions for the Strata EZIMIG215C, a 200A MIG/MMA inverter welding machine. Covers installation, operation, troubleshooting, and maintenance for professional welding applications using IGBT technology. |
 |
Digital Inverter Gas-shielded Welding Machine User Manual Comprehensive user manual for the Digital Inverter Gas-shielded Welding Machine series (MIG-135A, MIG-140A, MIG-160A, MIG-165A, MIG-180A, MIG-200A, MIG-250A). Covers safety instructions, general description, circuit diagram, technical parameters, installation, operation procedures for MMA, gas shielded arc, and self shielded arc welding, maintenance, and troubleshooting. |
 |
Clarke MIG200 S-MULTI Inverter Welder: Operation & Maintenance Manual Comprehensive operation and maintenance instructions for the Clarke MIG200 S-MULTI synergic inverter welder. Covers setup, safety, operation for MIG, MMA, TIG welding, troubleshooting, and maintenance. |
 |
Simder SD-4050PRO 10-in-1 MIG Welder & Cutter Operator's Manual | IGBT Inverter Digital Multi-Process Machine Comprehensive operator's manual for the Simder SD-4050PRO, a 10-in-1 IGBT inverter digital multi-process MIG welder and cutter. Covers safety, specifications, installation, operation, maintenance, and troubleshooting for various welding and cutting processes. |
 |
Sealey TIGACDC200: 200A AC/DC Pulse Inverter Welder User Manual Comprehensive user manual for the Sealey TIGACDC200 200A AC/DC Pulse Inverter Welder. Learn about safety, specifications, operation, and maintenance for TIG and MMA welding applications. |
 |
Sealey INVMIG200 Inverter MIG TIG MMA Welder 200A User Manual and Safety Instructions Comprehensive instructions and safety guidelines for the Sealey INVMIG200 Inverter MIG, TIG, and MMA Welder 200A, covering setup, operation, maintenance, and specifications. |
Ask a question about this manual
Ask about setup, troubleshooting, compatibility, parts, safety, or missing instructions. Manuals+ will review the question and use this page’s manual context to help answer it.