1. Introduction
This manual provides detailed instructions for the Riworal 4 Channel Audio Mixer. This device is designed for various audio applications, including recording, livestreaming, karaoke, and music playback. It features 4 input channels, 88 DSP effects, a USB audio interface, Bluetooth connectivity, and 48V phantom power. Please read this manual thoroughly to ensure proper setup and operation of your audio mixer.

Image 1.1: Top-down view of the Riworal 4 Channel Audio Mixer, showcasing its compact design and control layout.
2. Product Overview: Controls and Features
Familiarize yourself with the various controls and connection points on your Riworal audio mixer. Understanding each component is crucial for effective operation.
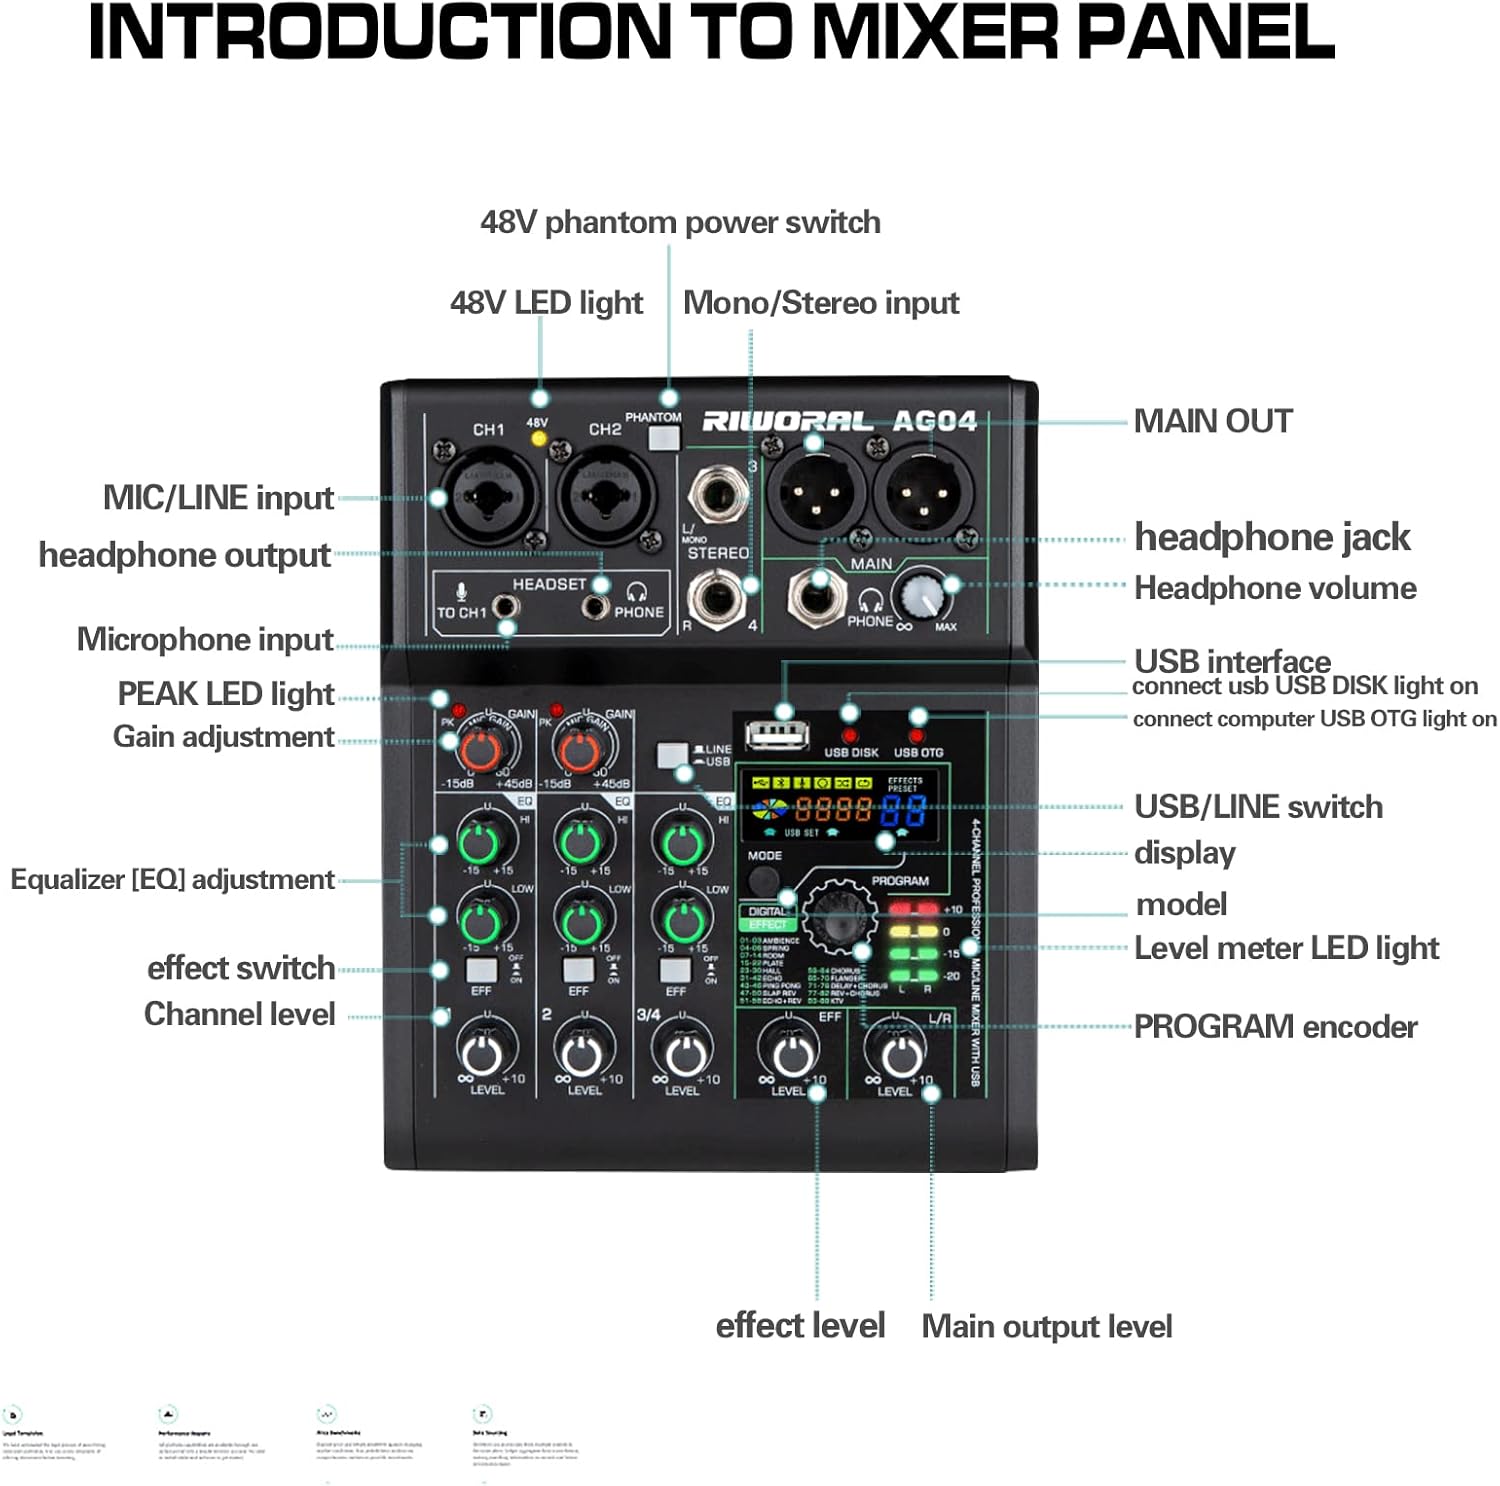
Image 2.1: Detailed diagram of the mixer's front panel, indicating the location and function of each control and input/output.
- CH1/CH2 Inputs: Mono channels with Mic/Line inputs (XLR/TRS combo jacks) and 2-band EQ.
- 48V Phantom Power Switch: Activates +48V power for condenser microphones. An LED light indicates activation.
- Headset Input: Connects a headset with a microphone. The microphone function synchronizes with Channel 1.
- Stereo Input (L/MONO, R): Can function as a stereo input for channels 3/4 or as a mono input for channel 3.
- MAIN OUT: XLR outputs for connecting to active speakers or other main output devices.
- Headphone Jack & Volume: 3.5mm headphone output with dedicated volume control.
- Gain Adjustment: Controls the input sensitivity for each channel.
- EQ Adjustment: 2-band equalizer (High and Low) for tone shaping on each channel.
- Effect Switch (EFX): Activates the digital effects send for each channel.
- Channel Level: Adjusts the output level for individual channels.
- USB Interface: Connects to U disk for MP3 playback/recording, or to PC/smartphone for recording/livestreaming.
- USB/LINE Switch: Selects input source between USB and line input.
- Digital Effect Display & Program Encoder: Shows the selected DSP effect and allows selection via the PROGRAM knob.
- Level Meter LED Light: Visual indicator for output signal levels.
- Effect Level: Adjusts the overall level of the digital effects.
- Main Output Level (L/R): Controls the overall volume of the main stereo output.
3. Setup and Connections
Proper connection of your audio sources and output devices is essential for optimal performance.
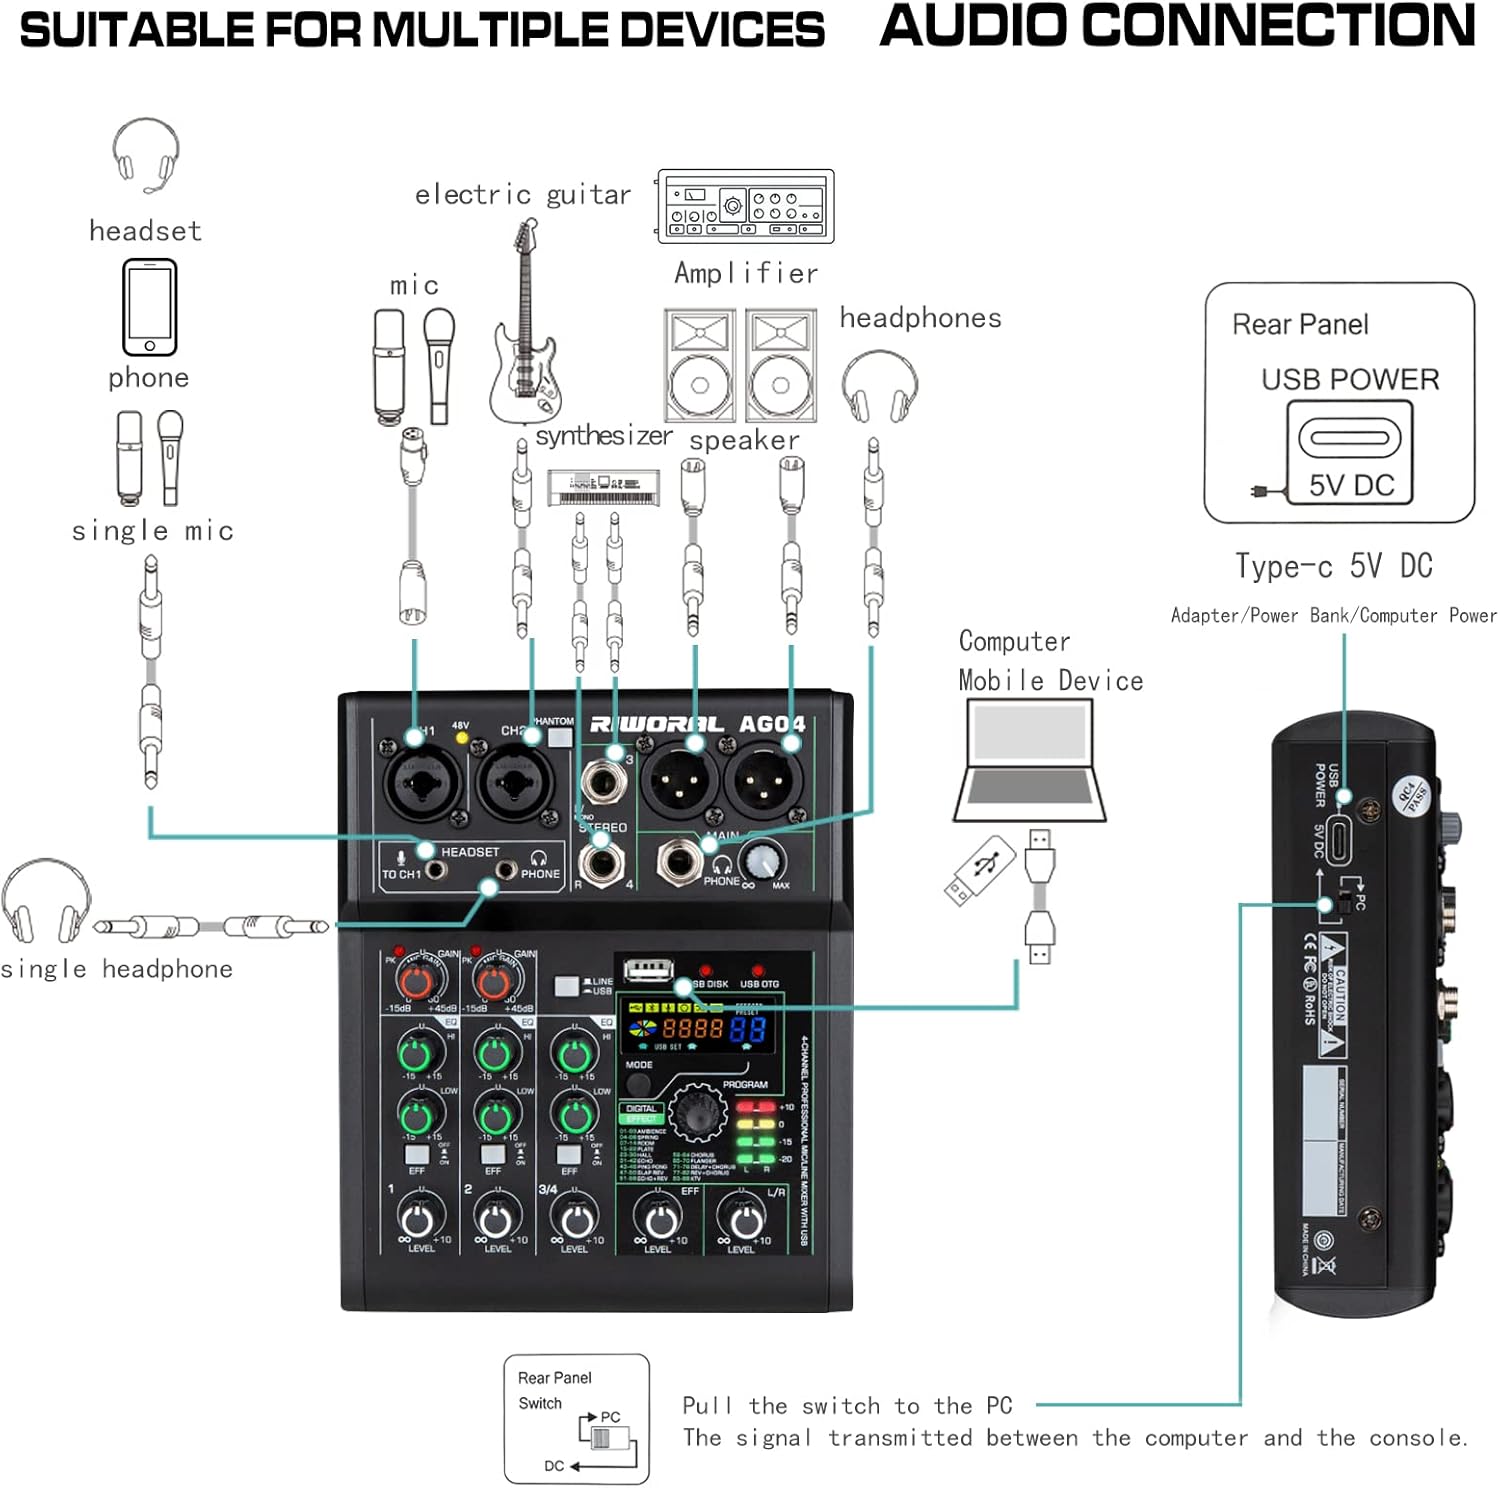
Image 3.1: Visual guide for connecting microphones, instruments, headphones, and output devices to the mixer.
3.1 Power Connection
Connect the provided USB Type-C cable to the 5V DC input on the rear panel of the mixer. Connect the other end to a USB power adapter (included) or a compatible USB power source. The mixer operates on 5 Volts DC.

Image 3.2: Illustration of connecting the USB Type-C power cable to the mixer.
3.2 Input Connections
- Microphones: Connect XLR microphones to CH1 or CH2 combo jacks. For condenser microphones, press the +48V Phantom Power switch.
- Line-Level Devices: Connect instruments or other line-level devices using 1/4-inch TRS cables to CH1 or CH2.
- Stereo Devices: Use the L/MONO and R inputs for stereo sources on channels 3/4.
- Headset: Plug a headset with a microphone into the dedicated HEADSET jack. The headset microphone will be routed to Channel 1.
- Guitar (Hi-Z): If using a guitar on Channel 1, press the Hi-Z switch (if available on your model) for proper impedance matching.
3.3 Output Connections
- Main Output: Connect active speakers or a power amplifier to the MAIN XLR outputs.
- Headphones: Connect monitoring headphones to the 3.5mm PHONE jack.
4. Operation
4.1 Channel Adjustment
- Gain: Adjust the GAIN knob for each channel to achieve an optimal input level without clipping (indicated by the PEAK LED).
- Equalization (EQ): Use the HIGH and LOW EQ knobs to adjust the treble and bass frequencies for each channel.
- Level: Use the LEVEL knob for each channel to control its individual volume in the mix.
4.2 Main Output and Monitoring
- Main Output Level: Adjust the L/R LEVEL knob to control the overall volume sent to your main speakers.
- Headphone Volume: Use the PHONE volume knob to adjust the monitoring level for your headphones.
5. Connectivity Features
5.1 USB Interface
The USB port offers multiple functionalities:
- Power Supply: Powers the mixer via a USB connection.
- U Disk MP3 Playback: Insert a USB flash drive (U Disk) for direct MP3 music playback. The "USB DISK" light will illuminate.
- PC/Smartphone Connection: Connect to a computer or smartphone for recording, livestreaming, or music playback. The "USB OTG" light will illuminate. For smartphones, a USB to Lightning or Type-C adapter may be required.
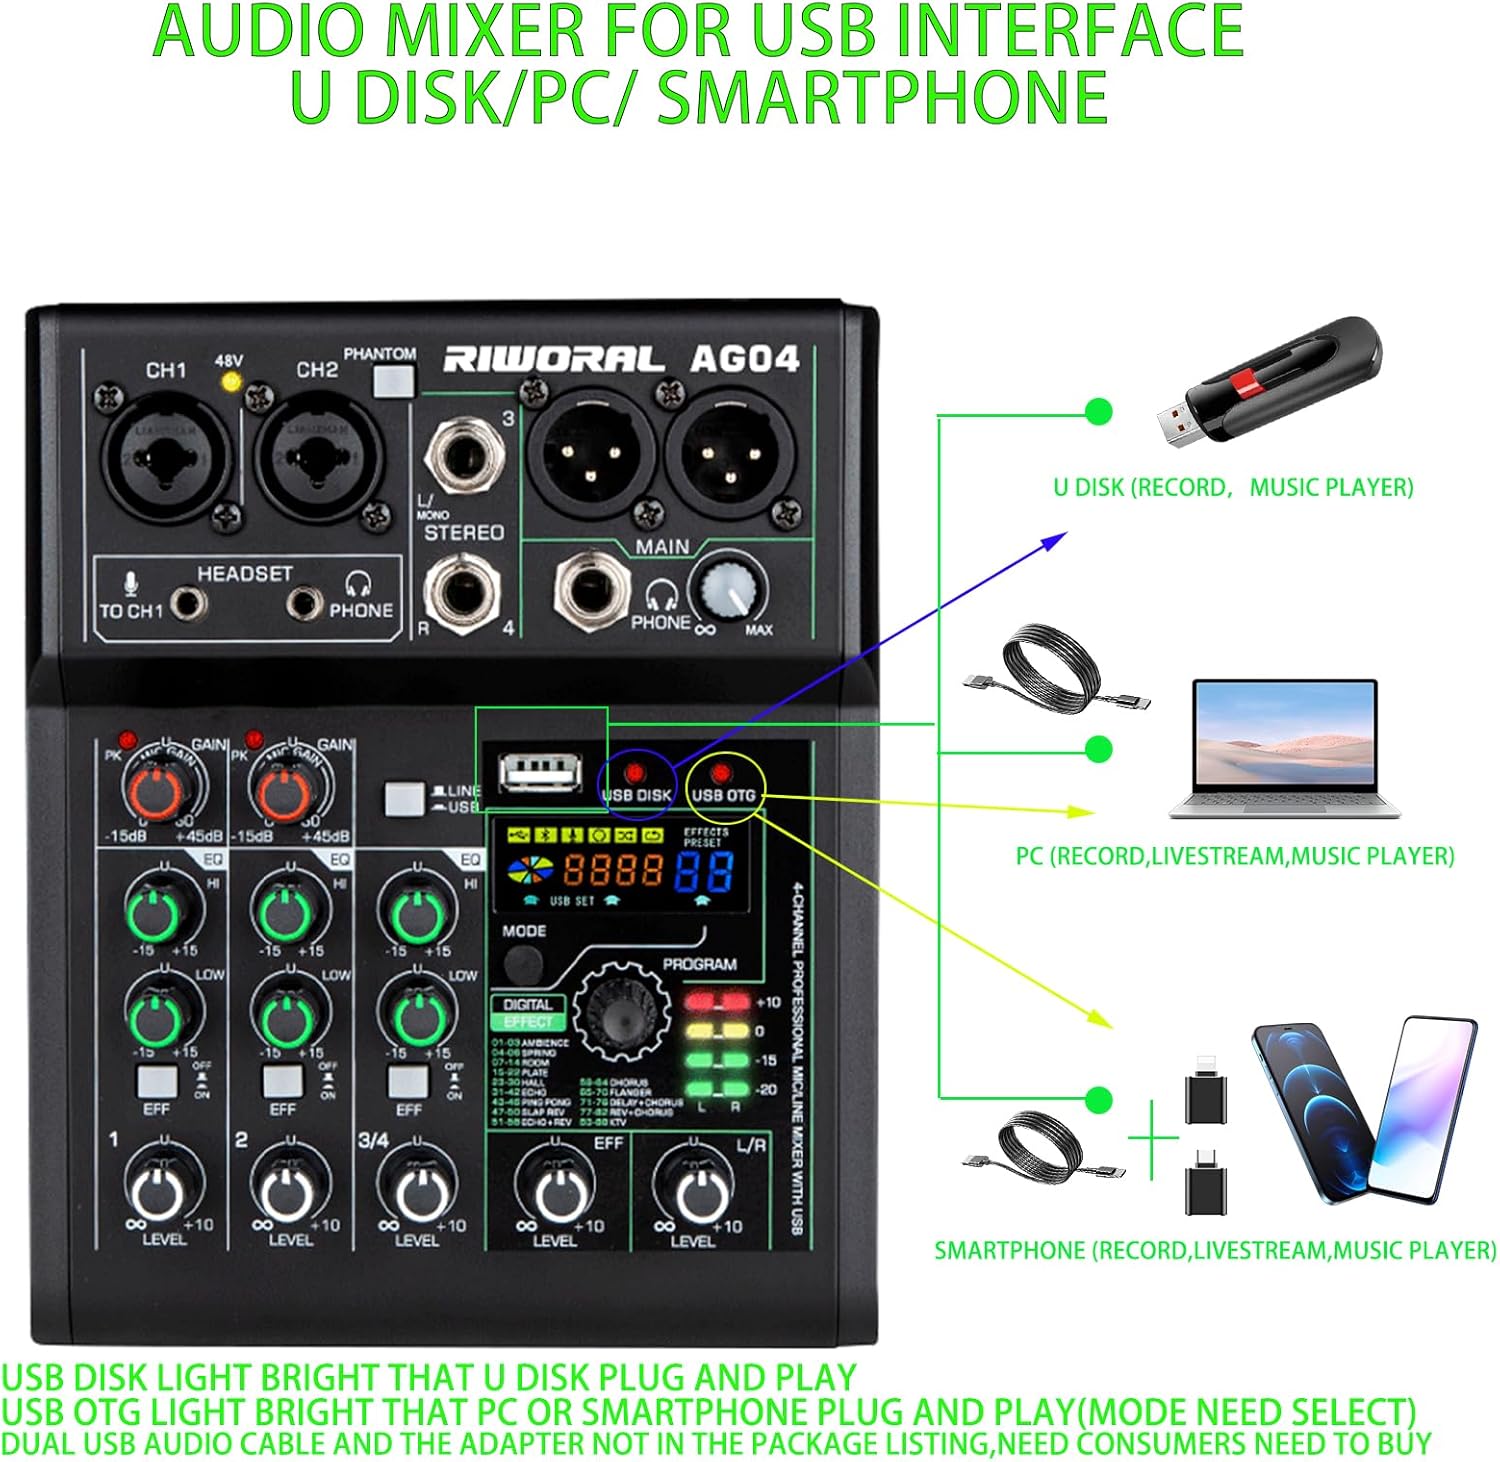
Image 5.1: Illustration of connecting various devices via the USB interface for different functions.

Image 5.2: The mixer functioning as a USB audio interface with a computer.
5.2 Bluetooth Connectivity
The mixer supports Bluetooth for wireless audio input from compatible devices.
- To activate Bluetooth, press the MODE button. The display will show "BLUE" when in Bluetooth mode.
- On your device (e.g., smartphone, tablet), search for and connect to the mixer's Bluetooth signal.
- The effective Bluetooth range is approximately 5 meters (16.4 feet).

Image 5.3: The mixer wirelessly connected to various Bluetooth-enabled devices for audio playback.
6. Digital Effects (DSP)
The mixer includes 88 built-in Digital Signal Processing (DSP) effects to enhance your audio.

Image 6.1: A comprehensive list of the 88 digital effects, categorized by type, available on the mixer.
- To select an effect, press the MODE button (right position) and rotate the PROGRAM knob to choose from effects 01-88. Press the PROGRAM knob to confirm your selection.
- Activate the EFX switch on individual channels to send their signal to the effects processor.
- Adjust the global effect level using the dedicated EFX LEVEL knob.
Available effects include Ambience, Spring, Room, Plate, Hall, Echo, Ping Pong, Slap Rev, Echo+Rev, Chorus, Flanger, Delay+Chorus, Rev+Chorus, and KTV.
7. Recording and Playback
The mixer supports recording to and playback from USB devices, computers, and smartphones.
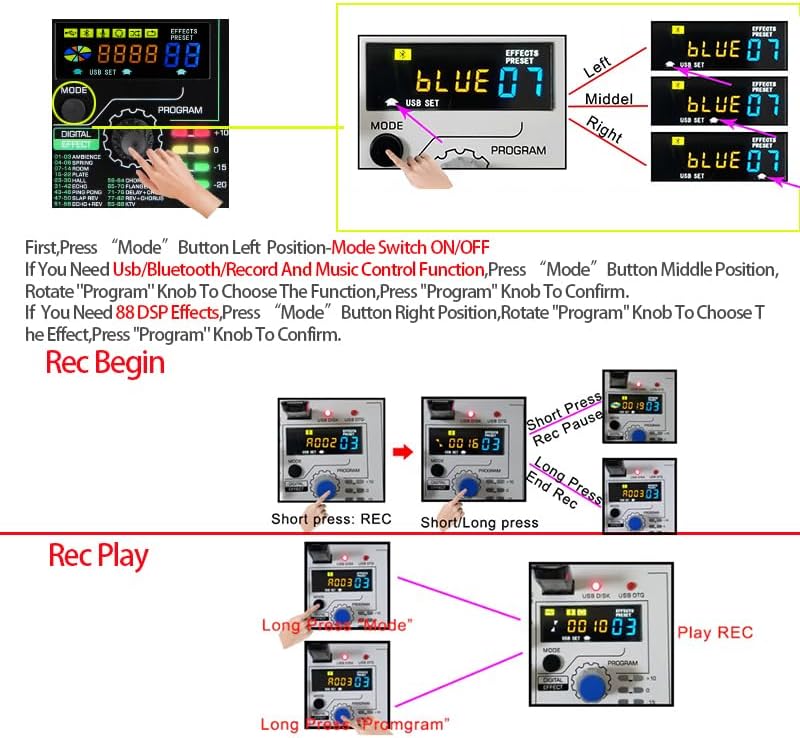
Image 7.1: Step-by-step guide for initiating and stopping recording, and playing back recorded audio using the mixer's USB functions.
7.1 Recording
- Via USB Disk: Insert a USB flash drive. Press the MODE button (middle position) to enter USB/Bluetooth/Record mode. Rotate the PROGRAM knob to select the recording function. Press the PROGRAM knob to confirm. Short press the REC button to start recording.
- Via PC/Smartphone: Connect the mixer to your computer or smartphone via USB. Ensure the "USB OTG" light is on. Use appropriate recording software on your device.
7.2 Playback
- From USB Disk: In USB/Bluetooth/Record mode, rotate the PROGRAM knob to select playback. Press the PROGRAM knob to confirm. Use short/long presses of the REC button for pause/play and track navigation.
- From PC/Smartphone: Play audio directly from your connected computer or smartphone.
8. Troubleshooting
- No Sound Output:
- Check all cable connections (inputs, outputs, power).
- Ensure all channel LEVEL knobs and the main L/R LEVEL knob are turned up.
- Verify that input sources are active and sending a signal.
- If using phantom power, ensure the +48V switch is engaged for condenser microphones.
- Distorted Sound:
- Reduce the GAIN knob for the affected channel to prevent clipping (PEAK LED should not illuminate constantly).
- Check if the input source itself is distorted.
- Bluetooth Connection Issues:
- Ensure the mixer is in Bluetooth mode (press MODE button until "BLUE" appears).
- Check that your device's Bluetooth is enabled and within the 5-meter range.
- Disconnect and reconnect the Bluetooth device.
- USB Recording/Playback Not Working:
- Ensure the USB device (U disk, PC, smartphone) is properly connected and recognized (USB DISK or USB OTG light).
- Verify the correct mode is selected using the MODE button and PROGRAM knob for recording/playback.
- For PC/smartphone, check device settings and recording software.
9. Specifications
| Feature | Detail |
|---|---|
| Brand | Riworal |
| Model Number | 4 Channel Audio Interface |
| Number of Channels | 4 |
| Item Weight | 2.57 pounds (1.17 Kilograms) |
| Product Dimensions | 9.45 x 8.86 x 3.35 inches |
| Material Type | Metal (Steel body) |
| Power Source | Corded Electric (USB Type-C DC 5V) |
| Connectivity Technology | Bluetooth, USB |
| Hardware Interface | 1/4-inch Audio, 3.5mm Audio, Headphone, USB |
| Compatible Devices | Laptop, Computer, Power amplifier, effector, recording equipment, Smartphone, Tablet, XLR Condenser Microphone, Musical Instrument |
| Operating System | Mac OS, Windows 7/8/10/11/XP, iOS, Android |
10. Package Contents
The Riworal 4 Channel Audio Mixer package includes the following items:
- Riworal 4 Channel Audio Mixer (x1)
- USB Charge Cable (x1)
- USB Adapter Plug (x1)

Image 10.1: The Riworal 4 Channel Audio Mixer and its included accessories: USB cable, power adapter, and user manual.