1. Product Overview
This document provides instructions for the Veterger replacement blender blade and gasket assembly, designed for compatibility with specific Hamilton Beach blender models. This component is essential for proper blender operation, ensuring efficient blending and preventing leaks.
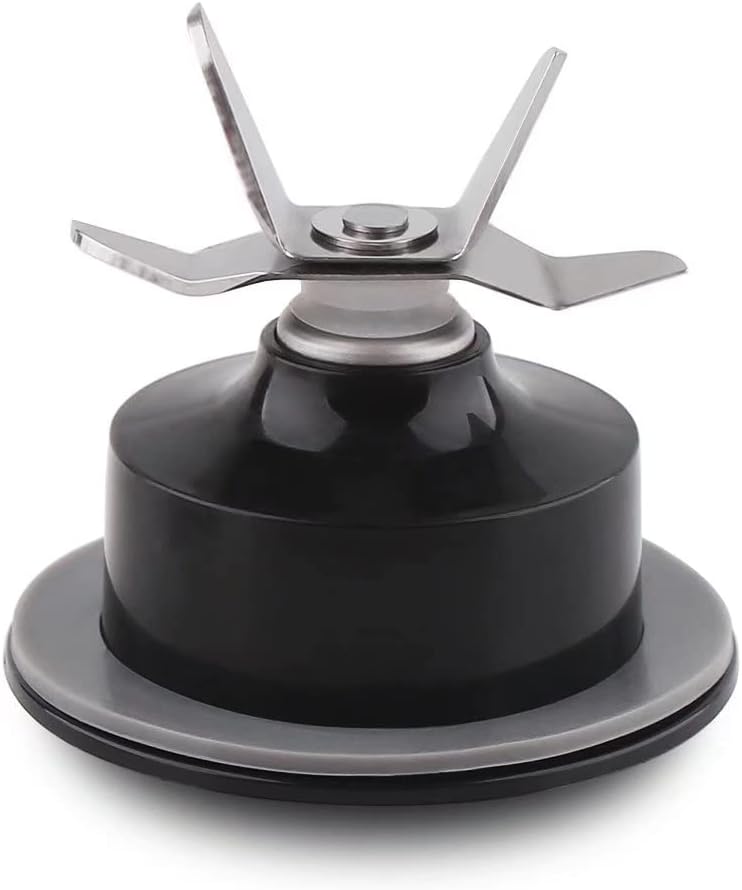
Image 1.1: The Veterger replacement blender blade with gasket assembly.
2. Specifications
- Part Number: 990048201
- Package Dimensions: 3.19 x 2.91 x 2.83 inches
- Item Weight: 2.82 ounces
- Components: 1 blade assembly with integrated gasket

Image 2.1: Side view of the blade assembly showing approximate dimensions.
3. Compatibility
This replacement blade and gasket assembly is compatible with a wide range of Hamilton Beach blenders. Please verify your blender model number against the list below to ensure proper fit and function.
Compatible Hamilton Beach Blender Models:
- 901, 908, 909, 910, 918, 919
- 57199, 57199R, 50163, 52282WV, 52282R
- HBB-800, HBB908 series, HBB909 (Series A)
- 219, No.254, 400, 544, 554-1, 562-3, 600WP, 600-2, 600-3, 606-1, 608, 610-6, 610-7, 610 AL, 610WP, 612-3, 616-1, 620-2, 632-1, 654, 662-3, 669G, 722w
- 56206, 50323, 50246, 50235, 53205, 54220, 54221, 56207, 58146, 58147, 58148, 58148A, 58149, 58161, 52277, 52282WV, 52282, 52282R, 58142, 58142R, 50266, 56205, 54227, 56222, 56221, 53206
4. Installation Instructions (Setup)
Before beginning installation, ensure the blender is unplugged from the power outlet to prevent accidental operation and injury. Handle the blade with care as it is sharp.
- Disassemble Blender Jar: If your blender jar is assembled, carefully unscrew the existing blade assembly or base from the bottom of the blender jar. Remove any old gaskets or seals.
- Clean Jar Base: Thoroughly clean the bottom rim of the blender jar where the new blade assembly will attach. Ensure no food particles or residue remain.
- Position New Blade: Place the new Veterger blade assembly, with its integrated gasket, onto the bottom opening of the blender jar. Ensure it sits flush and centered.
- Secure Assembly: Depending on your blender model, either twist the blade assembly clockwise until it is securely tightened, or attach the blender jar base over the blade assembly and tighten it firmly. The gasket should create a tight seal to prevent leaks.
- Test for Leaks: Before blending food, fill the blender jar with a small amount of water and attach it to the blender base. Run the blender briefly on a low setting and check for any leaks around the blade assembly. If leaks occur, re-tighten the assembly.

Image 4.1: Top view of the blade, illustrating the cutting edges.

Image 4.2: Bottom view of the blade assembly, showing the drive gear for connection to the blender motor.
5. Usage (Operating)
Once the replacement blade assembly is securely installed and tested for leaks, your blender is ready for use. Always ensure the blender jar is properly seated on the motor base before operating. Do not overfill the blender jar. For optimal performance and safety, follow the operating instructions provided with your specific Hamilton Beach blender model.
6. Maintenance
Regular cleaning and maintenance will extend the life of your replacement blade and gasket.
- Cleaning: After each use, disassemble the blade from the blender jar. Wash the blade assembly and jar with warm, soapy water. Use a brush to carefully clean around the blades. Rinse thoroughly.
- Drying: Allow all components to air dry completely before reassembling or storing.
- Inspection: Periodically inspect the blade for any signs of wear, dullness, or damage. Check the gasket for cracks or deformation, which could lead to leaks. Replace the blade assembly if significant wear or damage is observed.
7. Troubleshooting
If you encounter issues after installing the replacement blade, consider the following:
- Leaking: Ensure the blade assembly is tightened securely to the blender jar. Check if the gasket is properly seated and not damaged. If the gasket is damaged, the entire blade assembly may need replacement.
- Poor Blending Performance: Verify that the blade is installed correctly and that there are no obstructions. Ensure the blender jar is not overfilled. If the blade appears dull or damaged, it may require replacement.
- Unusual Noise: Discontinue use immediately. Check for any foreign objects in the blender jar or if the blade assembly is loose. Ensure the blender jar is correctly seated on the motor base.
8. Warranty and Support
For any questions regarding the Veterger replacement blender blade and gasket, or for support with installation or troubleshooting beyond this manual, please contact the seller or manufacturer directly through your purchase platform. Keep your purchase receipt for warranty purposes, if applicable.