The ROP Shop 100664_49
Instruction Manual
The ROP Shop Power Trim Tilt Motor
For 2011-2015 Yamaha 70 HP F70LA Outboard Marine Engines
1. Introduction
This manual provides essential information for the proper installation, operation, and maintenance of your new The ROP Shop Power Trim Tilt Motor. Designed for compatibility with 2011-2015 Yamaha 70 HP F70LA Outboard Marine Engines, this motor is a critical component for adjusting the trim and tilt of your outboard, ensuring optimal performance and control on the water. Please read this manual thoroughly before installation and use to ensure safe and efficient operation.
2. Safety Information
Always prioritize safety when working with marine equipment. Failure to follow these instructions could result in serious injury or damage to the product or vessel.
- Disconnect the battery before performing any installation or maintenance to prevent accidental motor activation.
- Wear appropriate personal protective equipment (PPE), including safety glasses and gloves.
- Ensure the boat is securely docked or trailered and the engine is off before beginning work.
- If you are unsure about any part of the installation or repair process, consult a qualified marine technician.
- Keep all tools and parts organized to prevent loss or damage.
3. Product Overview and Contents
The ROP Shop Power Trim Tilt Motor is designed as a direct replacement for specified Yamaha outboard engines. It features a 2-wire connection with ring terminal ends and a 3-bolt mount type.
Package Contents:
- (1) Trim Tilt Motor Assembly
- (1) O-ring
- (6) Washers

Figure 3.1: Complete Trim Tilt Motor Kit, including the motor, wiring, O-ring, and washers.

Figure 3.2: Close-up view of the included O-ring and six washers, essential for proper sealing and mounting.
4. Specifications
| Attribute | Detail |
|---|---|
| Brand | The ROP Shop |
| Model Number | 100664_49 |
| Connection Type | 2-Wire with Ring Terminal Ends |
| Mount Type | 3-Bolt |
| Material | Metal |
| Color | Black |
| Item Weight | 3.1 Pounds (approx. 1.4 kg) |
| Product Dimensions | 13 x 5 x 4.5 inches (approx. 33 x 12.7 x 11.4 cm) |
| Recommended Use | For Salt Water |
| Engine Type | Gasoline Engine |
| Operation Mode | Electric |

Figure 4.1: Side profile of the motor showing approximate dimensions of 5 13/16 inches in length and 3 13/16 inches in height.

Figure 4.2: Bottom view of the motor illustrating the 3-bolt mounting pattern with approximate distances between bolt holes: 2 15/16 inches, 2 7/16 inches, and 2 5/8 inches.
5. Installation Instructions
This section outlines the general steps for replacing a power trim tilt motor. Specific procedures may vary slightly depending on your exact Yamaha outboard model. Always refer to your engine's service manual for detailed instructions.
Tools and Materials Required:
- Basic hand tools (wrenches, sockets, screwdrivers)
- Battery terminal wrench
- Marine grease or anti-corrosion compound
- Clean rags
- New O-ring and washers (included)
Installation Steps:
- Preparation:
- Ensure the boat is on a stable surface (trailer or dry dock).
- Disconnect the negative (-) terminal from the boat's battery to prevent electrical hazards.
- If possible, support the outboard motor in the full UP position using a transom saver or similar support.
- Access the Trim Tilt Unit:
- Locate the trim tilt unit on your outboard motor. This may require removing covers or other components.
- Disconnect Old Motor:
- Carefully disconnect the two electrical wires (blue and green) from the old trim tilt motor. Note their connections.
- Remove the mounting bolts (typically three) that secure the old motor to the trim tilt unit.
- Gently pull the old motor away from the unit. Be prepared for some hydraulic fluid to leak.
- Clean and Inspect:
- Clean the mounting surface on the trim tilt unit thoroughly, removing any old gasket material or debris.
- Inspect the hydraulic pump shaft and seals for any damage.
- Install New Motor:
- Apply a thin layer of marine grease or anti-corrosion compound to the new O-ring and carefully seat it into the groove on the new motor.
- Align the shaft of the new motor with the pump on the trim tilt unit and gently push the motor into place. Ensure the O-ring is not pinched.
- Secure the new motor with the three mounting bolts, using the provided washers. Tighten bolts evenly and to the manufacturer's specified torque (refer to your engine's service manual).
- Connect the two electrical wires (blue and green) to their corresponding terminals. Ensure a secure connection using the ring terminal ends.
- Test and Reassemble:
- Reconnect the negative (-) battery terminal.
- Test the trim and tilt function using the control switch. Operate the motor through its full range of motion several times.
- Check for any leaks around the motor's mounting area.
- Reinstall any covers or components that were removed during the process.

Figure 5.1: The two-wire connection (blue and green) with pre-installed ring terminal ends for easy and secure attachment.
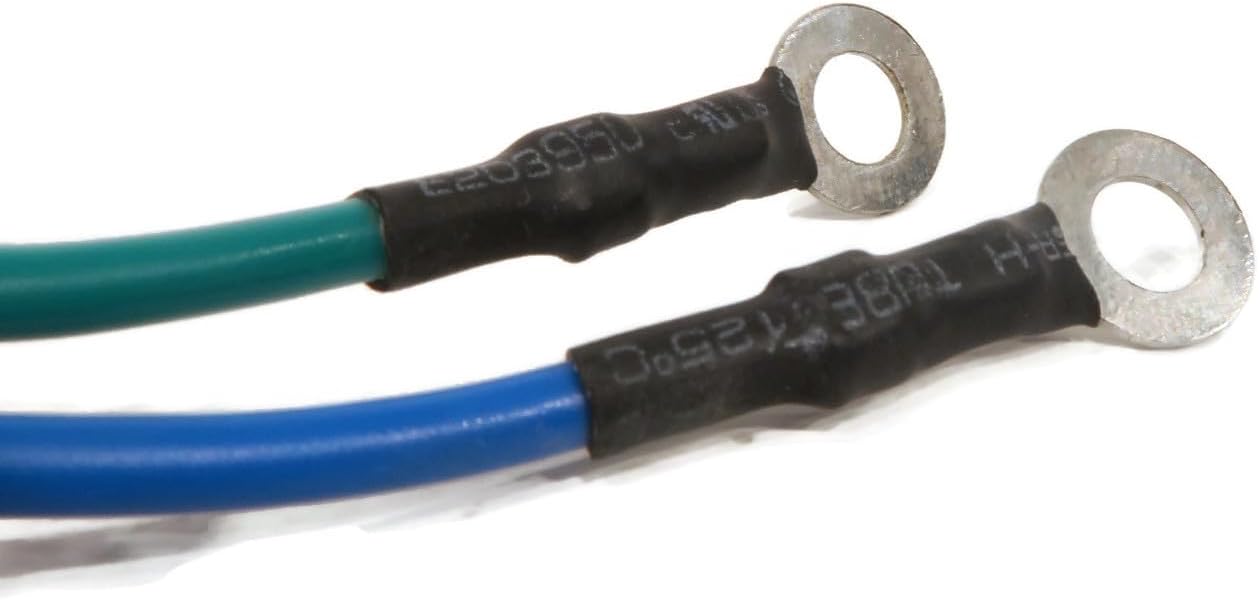
Figure 5.2: The motor shaft, which connects to the hydraulic pump. Ensure it is clean and free of debris before installation.
6. Operating the Trim Tilt System
The ROP Shop Power Trim Tilt Motor is an integral part of your outboard's trim and tilt system. Its operation is controlled by the boat's existing trim/tilt switch, typically located on the throttle control or dashboard.
- Trim Function: Used to adjust the angle of the outboard motor relative to the transom while underway. This optimizes boat performance, fuel efficiency, and ride comfort.
- Trimming down (motor closer to transom) can help the boat plane faster and reduce porpoising.
- Trimming up (motor further from transom) can increase top speed and reduce steering torque in calm water.
- Tilt Function: Used to raise the outboard motor completely out of the water when docked, trailered, or navigating shallow areas. This protects the propeller and lower unit from damage.
Always refer to your Yamaha outboard engine's owner's manual for specific recommendations on trim and tilt usage for various operating conditions.
7. Maintenance
Regular maintenance ensures the longevity and reliable performance of your trim tilt motor and the entire system.
- Regular Inspection: Periodically inspect the motor and wiring for signs of corrosion, loose connections, or physical damage.
- Cleanliness: Keep the area around the trim tilt unit clean and free of salt buildup, dirt, and debris. Rinse with fresh water after each use in saltwater environments.
- Corrosion Protection: Apply a marine-grade anti-corrosion spray to electrical connections and exposed metal parts annually, especially in saltwater environments.
- Hydraulic Fluid Level: While this motor is an electrical component, it drives a hydraulic pump. Regularly check the hydraulic fluid level in your outboard's trim tilt reservoir and top off as needed with the recommended fluid type (refer to your engine manual).
- Wiring Integrity: Ensure all wiring is securely fastened and protected from chafing or abrasion.
8. Troubleshooting
If you experience issues with your trim tilt system, consult the following table for common problems and their potential solutions. Always ensure safety precautions are followed before attempting any troubleshooting.
| Problem | Possible Cause | Solution |
|---|---|---|
| Motor does not operate or operates slowly. | Low battery voltage Corroded or loose electrical connections Blown fuse Faulty trim/tilt switch Low hydraulic fluid | Check battery charge and terminals. Clean and tighten all electrical connections. Inspect and replace fuse if necessary. Test switch continuity; replace if faulty. Check hydraulic fluid level and add if low. |
| Motor runs but outboard does not move or moves with difficulty. | Low hydraulic fluid Air in hydraulic system Damaged hydraulic lines or seals Mechanical obstruction | Check and top off hydraulic fluid. Bleed the hydraulic system (refer to engine manual). Inspect for leaks; repair or replace damaged components. Check for debris or obstructions around the trim unit. |
| Motor makes grinding or unusual noises. | Internal motor issue Misalignment Worn gears (in pump, not motor itself) | Disconnect power and inspect motor for damage. If internal, replacement may be necessary. Ensure motor is properly seated and bolted. Consult a marine technician for hydraulic pump inspection. |
| Motor operates in one direction only. | Faulty trim/tilt switch Wiring issue (one wire disconnected/corroded) | Test and replace switch. Inspect wiring for breaks or corrosion on specific wires. |
If troubleshooting steps do not resolve the issue, it is recommended to seek assistance from a certified marine mechanic.
9. Warranty and Support
For information regarding warranty coverage or technical support for your The ROP Shop Power Trim Tilt Motor, please refer to the warranty documentation included with your purchase or visit The ROP Shop's official website. When contacting support, please have your product model number (100664_49) and purchase details readily available.
You can also visit The ROP Shop store on Amazon for more products and information: The ROP Shop Amazon Store.