SPREADTRON B0B1M7ZJSL
SPREADTRON Wireless Interconnected Smoke Detector User Manual
Model: B0B1M7ZJSL (Simple Style)
Introduction
This user manual provides essential information for the installation, operation, and maintenance of your SPREADTRON Wireless Interconnected Smoke Detector. Please read this manual thoroughly before using the device to ensure proper function and safety.
The SPREADTRON smoke detector utilizes advanced photoelectric sensing technology and wireless interconnection to provide comprehensive fire protection for your home or property. When one alarm detects smoke, all interconnected alarms will sound, ensuring early warning throughout the premises.
Product Overview
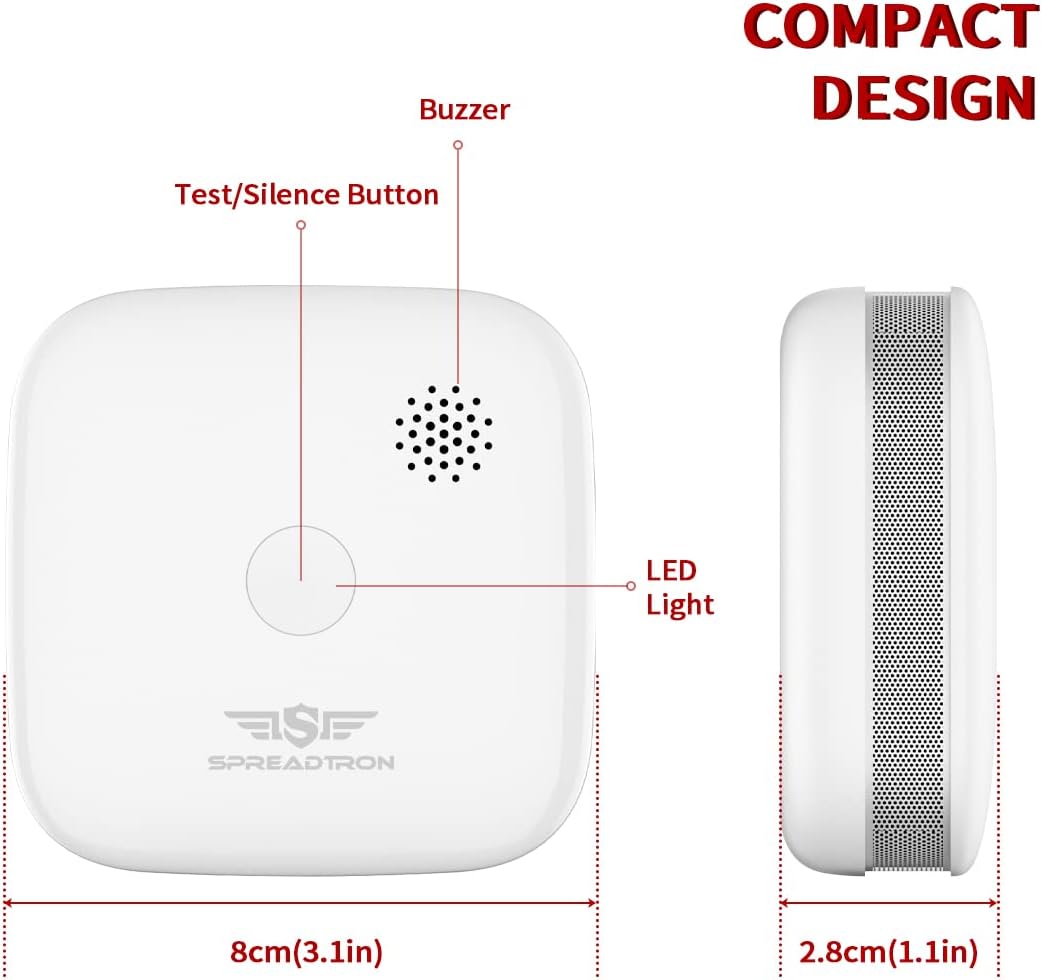
The SPREADTRON Wireless Interconnected Smoke Detector is designed for reliable smoke detection and early fire warning. Key components include:
- Photoelectric Sensor: Detects smoke particles.
- Buzzer: Emits a loud alarm sound (85 dB at 3 meters).
- Test/Silence Button: Used for testing the alarm and silencing false alarms.
- LED Indicator: Provides visual status of the device.
- 5-Year Replaceable Lithium Battery (CR123A): Provides long-lasting power.
- Flame-Retardant ABS Material: Ensures durability and safety.
- Professional Maze Design: Enhances quick smoke detection.
- Insect Net: Prevents false alarms due to insects.

Setup and Installation
1. Unpacking and Battery Activation
- Carefully remove the smoke detector from its packaging.
- Twist the back cover counter-clockwise to open the battery compartment.
- Remove the transparent insulating tab from the battery to activate it.
- Ensure the CR123A lithium battery is correctly inserted with the correct polarity.
- Close the back cover by twisting it clockwise until it clicks into place.
2. Interconnection (Pairing Multiple Units)
For comprehensive coverage, it is recommended to interconnect multiple SPREADTRON smoke detectors. Up to 48 detectors can be interconnected.
- Ensure all detectors have their batteries activated.
- On the first detector (master unit), press and hold the Test/Silence button for 3 seconds until the LED indicator flashes rapidly. This indicates pairing mode.
- Within 30 seconds, press the Test/Silence button on each subsequent detector (slave units) twice quickly. The LED on the slave unit will flash to confirm successful pairing.
- Repeat for all detectors you wish to interconnect.
- After pairing all units, press the Test/Silence button on any paired detector once. All interconnected detectors should sound an alarm, confirming successful interconnection.

3. Mounting Location
Install smoke detectors in all sleeping areas, outside each separate sleeping area, and on every level of the home, including the basement. For best performance, avoid installing in:
- Kitchens, bathrooms, or garages where cooking fumes, steam, or exhaust can cause false alarms.
- Near windows, doors, or vents where drafts could interfere with smoke reaching the detector.
- In extremely dusty, dirty, or insect-infested areas.

4. Mounting the Detector
The detector can be installed using either the provided 3M adhesive pad or screws.
- Adhesive Installation: Clean the mounting surface thoroughly. Peel off the protective film from the 3M adhesive pad on the back of the detector. Press the detector firmly onto the desired ceiling or wall location for at least 30 seconds.
- Screw Installation: Use the provided screws and anchors to secure the mounting bracket to the ceiling or wall. Align the detector with the mounting bracket and twist clockwise until it locks into place.
Operating Instructions
Normal Operation
During normal operation, the LED indicator will flash approximately once every 40 seconds, indicating that the detector is functioning correctly.
Testing the Alarm
It is recommended to test your smoke detector weekly to ensure proper operation.
- Press and hold the Test/Silence button on the detector.
- The alarm will sound a loud siren, and the LED indicator will flash rapidly.
- If interconnected, all paired detectors should also sound an alarm.
- Release the button to stop the alarm.

Silencing a False Alarm
If the alarm sounds due to non-emergency smoke (e.g., cooking fumes), you can temporarily silence it:
- Press the Test/Silence button once.
- The alarm will be silenced for approximately 10 minutes. The LED will continue to flash every 10 seconds during the silence period.
- After the silence period, the detector will return to normal operation. If smoke is still present, the alarm will sound again.
Maintenance
Cleaning Your Smoke Detector
Dust and debris can accumulate on the smoke detector and affect its performance. Clean your detector at least once a month:
- Gently vacuum the exterior of the detector using a soft brush attachment.
- Wipe the surface with a clean, damp cloth. Do not use cleaning solvents or chemicals.
Battery Replacement
The detector is equipped with a 5-year replaceable CR123A lithium battery. When the battery is low, the detector will chirp approximately once every 40 seconds, and the LED indicator will flash. Replace the battery immediately when this occurs.
- Twist the back cover counter-clockwise to open the battery compartment.
- Remove the old CR123A battery.
- Insert a new CR123A lithium battery, ensuring correct polarity.
- Close the back cover by twisting it clockwise until it clicks into place.
- Test the alarm after replacing the battery.
Troubleshooting
| Problem | Possible Cause | Solution |
|---|---|---|
| Alarm chirps every 40 seconds. | Low battery. | Replace the CR123A lithium battery. |
| Alarm sounds frequently without smoke. | Dust, insects, or high humidity. Incorrect placement (e.g., near kitchen). | Clean the detector. Relocate the detector away from sources of false alarms. |
| Alarm does not sound during test. | No battery, dead battery, or faulty unit. | Ensure battery is installed and activated. Replace battery. If problem persists, replace the unit. |
| Interconnection not working. | Units not properly paired or out of range. | Re-pair the units following the "Interconnection" instructions. Ensure units are within 820 feet (250 meters) outdoor range. |
Specifications
- Model: B0B1M7ZJSL
- Power Source: 1 x CR123A Lithium Battery (included, replaceable)
- Battery Life: Up to 5 years
- Alarm Sound Level: ≥85 dB at 3 meters
- Sensor Type: Photoelectric
- Interconnection: Wireless, up to 48 units
- Transmission Range: >820 feet (250 meters) in open air
- Operating Temperature: 0°C to 55°C (32°F to 131°F)
- Material: Flame-retardant ABS
- Dimensions: 8 x 8 x 2 cm (3.1 x 3.1 x 0.8 inches)
- Weight: 510 grams (for the pack, individual unit weight not specified)
- Certifications: TÜV, EN 14604, RED
Warranty and Support
SPREADTRON products are designed for reliability and performance. For any questions or support needs, please contact SPREADTRON customer service through the retailer or official website.
Please retain your purchase receipt for warranty purposes. Specific warranty terms and conditions may vary by region and retailer.
Ask a question about this manual
Ask about setup, troubleshooting, compatibility, parts, safety, or missing instructions. Manuals+ will review the question and use this page’s manual context to help answer it.