
Introduction
This manual provides essential information for the proper installation, operation, and maintenance of the Velvac 320186 4-Way Valve. Please read these instructions thoroughly before using the product to ensure safe and efficient performance. This valve is designed for specific applications requiring solenoid, air, and manual override control.
Safety Information
WARNING: Failure to follow these safety instructions could result in serious injury or property damage.
- Always disconnect power and air supply before installation, maintenance, or troubleshooting.
- Ensure all connections are secure and leak-free to prevent system failure.
- Use appropriate personal protective equipment (PPE) such as safety glasses and gloves.
- Do not exceed the maximum operating pressure specified for the valve.
- This product may contain chemicals known to the State of California to cause cancer and birth defects or other reproductive harm. Wash hands after handling.
Product Overview
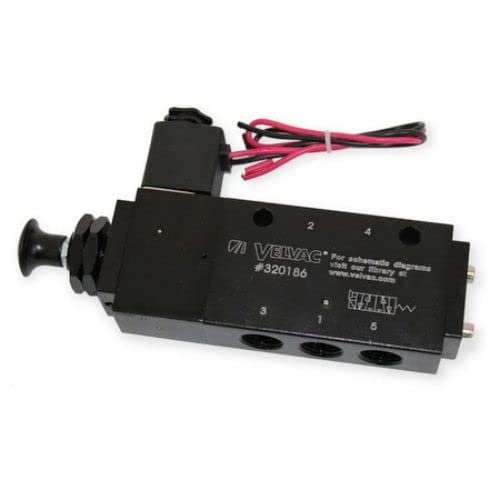
The Velvac 320186 is a versatile 4-way valve designed for controlling air flow in various pneumatic systems. It features solenoid, air, and manual override capabilities, offering flexible control options. Understanding its components is crucial for correct installation and operation.

Figure 1: Representative image of the Velvac 4-Way Valve. Actual product appearance may vary slightly.
Setup and Installation
- Mounting: Select a suitable location for mounting the valve, ensuring it is protected from excessive vibration, heat, and moisture. Use appropriate fasteners to secure the valve firmly.
- Air Line Connections: Identify the inlet, outlet, and exhaust ports on the valve. Connect air lines securely using appropriate fittings. Ensure all connections are tight to prevent air leaks. Refer to system diagrams for specific port assignments.
- Electrical Connections (for Solenoid Control): If using solenoid control, connect the electrical wiring to the solenoid terminals according to your system's wiring diagram. Ensure correct voltage and polarity.
- System Check: After installation, slowly pressurize the system and check for any air leaks using a soapy water solution. Rectify any leaks immediately.
Operating Instructions
The Velvac 320186 valve offers three modes of operation: Solenoid, Air, and Manual Override.
- Solenoid Control: This is the primary electrical control method. When the solenoid is energized, the valve shifts to its actuated position, directing air flow as designed. De-energizing the solenoid returns the valve to its normal position.
- Air Control: Some configurations may allow for pneumatic pilot control. An external air signal applied to a specific pilot port will shift the valve. Consult your system's design for air control port identification.
- Manual Override: For testing or emergency situations, the valve includes a manual override feature. This allows the valve to be actuated without electrical or pneumatic signals. Locate the manual override button or lever (if present) and activate it to shift the valve. Always return the manual override to its original position after use to restore automatic control.
Maintenance
Regular maintenance ensures the longevity and reliable operation of your Velvac 4-Way Valve.
- Routine Inspection: Periodically inspect the valve and all connections for signs of wear, damage, or air leaks. Check electrical connections for corrosion or loose wiring.
- Cleaning: Keep the exterior of the valve clean and free from dirt, dust, and debris. Do not use harsh chemicals that could damage the valve materials.
- Air Quality: Ensure that the air supply is clean and dry, free from contaminants and excessive moisture, which can degrade valve seals and internal components. Use appropriate air filters and dryers in your pneumatic system.
- Component Replacement: If any part of the valve appears damaged or worn, contact a qualified technician or supplier for replacement parts. Do not attempt unauthorized repairs.
Troubleshooting
Refer to the table below for common issues and their potential solutions.
| Problem | Possible Cause | Solution |
|---|---|---|
| Valve does not actuate | No power to solenoid; Low air pressure; Clogged air lines; Manual override engaged. | Check electrical connections and power supply; Verify air supply pressure; Inspect and clear air lines; Disengage manual override. |
| Air leaks from valve or connections | Loose fittings; Damaged seals; Incorrectly installed components. | Tighten all connections; Inspect and replace damaged seals; Reinstall components correctly. |
| Valve operates sluggishly | Contaminated air supply; Worn internal components. | Ensure clean and dry air supply; Consider professional inspection and repair/replacement. |
Specifications
| Attribute | Detail |
|---|---|
| Manufacturer | Crimp Supply (for Velvac) |
| Part Number | 27A15418 |
| Item Model Number | 320186 |
| Item Weight | 1.15 pounds |
| Product Dimensions | 10 x 11 x 2 inches |
| Item Package Quantity | 1 |
| Included Components | Valve unit |
Warranty Information
This Velvac product is typically covered by a manufacturer's warranty against defects in materials and workmanship. For specific warranty terms and conditions, please refer to the documentation provided with your purchase or contact the manufacturer directly. A 30-day return/replacement policy is generally offered by sellers for initial product issues.
Extended protection plans may be available for purchase separately, offering additional coverage beyond the standard warranty period.
Customer Support
For technical assistance, troubleshooting beyond this manual, or inquiries regarding parts and service, please contact your product supplier or the manufacturer, Velvac. When contacting support, please have your model number (320186) and part number (27A15418) readily available.