Introduction
This manual provides essential information for the installation, operation, and maintenance of your Ideal Standard ProSys Mechanical Wall Hung Toilet Frame and Cistern, model R015367. This system is designed for built-in installation into room-height plasterboard constructed walls, offering a robust and reliable solution for wall-hung toilet bowls.
The ProSys system incorporates advanced features such as EasyFix wall brackets for simplified installation, adjustable height legs with brakes for single-person setup, and a SmartValve technology for water efficiency. It is engineered for durability, quiet operation, and ease of maintenance.
Safety Information
Please read all instructions carefully before beginning installation or operation. Failure to follow these instructions may result in property damage, personal injury, or improper product function.
- Ensure all local plumbing and building codes are followed during installation.
- Turn off the main water supply before commencing any work on the plumbing system.
- Wear appropriate personal protective equipment (PPE) such as gloves and eye protection.
- If you are unsure about any part of the installation process, consult a qualified plumber or professional installer.
- The frame is tested to support up to 400kg for WC frames. Do not exceed this load capacity.
Package Contents
Verify that all components are present and undamaged before proceeding with installation.
- ProSys Mechanical Wall Hung Toilet Frame
- Integrated Cistern with SmartValve technology
- EasyFix Wall Brackets
- Adjustable Height Legs with Brakes
- Adjustable Outlet Bend
- Fastening materials and seals (as per standard kit)

Figure 1: Front view of the ProSys frame and cistern, showing the blue cistern unit and metal frame.

Figure 2: Side view of the ProSys frame and cistern, illustrating its slim profile.
Setup and Installation
The ProSys frame is designed for straightforward installation, even by a single person, thanks to its EasyFix wall brackets and adjustable height legs with brakes.
Preparation
- Ensure the installation area is prepared for a built-in system within a room-height plasterboard wall.
- Verify that the wall-hung toilet bowl to be used has connection dimensions in accordance with EN 33 2011 and a projection of up to 66cm.
- Confirm water supply and waste connections are accessible at the installation point.
Mounting the Frame
- Position the frame in the desired location within the wall cavity.
- Use the adjustable height legs to set the frame to the correct height. The integrated brakes allow for easy, one-person adjustment from 0-200mm.
- Secure the frame to the wall using the EasyFix wall brackets. These brackets facilitate quick and precise leveling.
- Connect the water supply to the cistern inlet valve.
- Connect the adjustable outlet bend to the waste pipe, ensuring a secure and leak-free connection. The adjustable bend allows for flexible waste pipe arrangements.

Figure 3: The ProSys frame installed within a wall, ready for finishing, with a wall-hung toilet bowl attached.
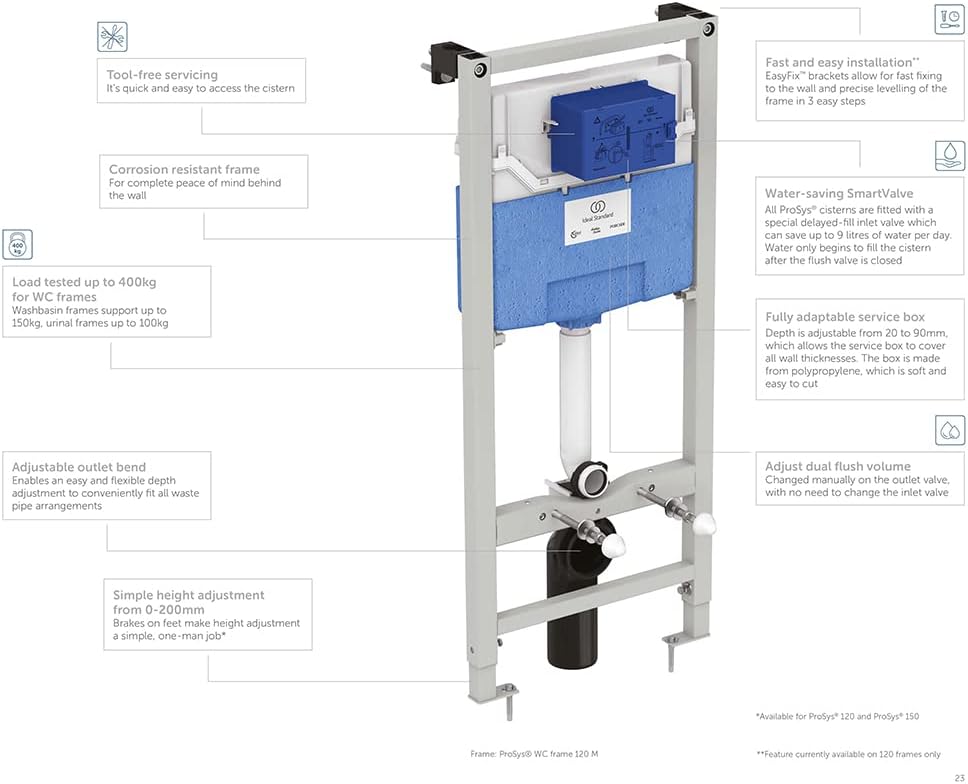
Figure 4: Detailed diagram highlighting key features such as EasyFix brackets, SmartValve technology, adjustable outlet bend, and simple height adjustment.

Figure 5: Technical drawing providing precise dimensions for installation planning.
Operating Instructions
The ProSys cistern features a mechanical front flush operation with a dual flush system, pre-set at 6/4 liters for water conservation.
Flushing
- To activate the full flush (6 liters), press the larger flush button on your chosen flush plate.
- To activate the reduced flush (4 liters), press the smaller flush button.
SmartValve Technology
The integrated SmartValve technology ensures efficient water usage by only allowing the cistern to refill after the flush cycle is complete. This prevents water wastage during flushing and contributes to water savings.
Maintenance
The ProSys system is designed for simple, tool-free maintenance, ensuring long-term reliability.
Accessing the Cistern
The cistern components are fully maintainable through a service tunnel positioned at the front or top of the tank. This allows for easy access to the internal mechanisms without requiring extensive demolition of the wall.
Routine Checks
- Periodically check for any visible leaks around the connections.
- Ensure the flush buttons operate smoothly and return to their original position.
- If water refilling seems slow or incomplete, the SmartValve or inlet valve may require inspection.
Cleaning
Clean external surfaces with a soft cloth and mild, non-abrasive cleaning agents. Avoid harsh chemicals that could damage finishes or internal components.
Troubleshooting
This section addresses common issues you might encounter with your ProSys toilet frame and cistern.
Cistern Not Filling
- Check water supply: Ensure the main water supply to the cistern is open.
- Inlet valve: The SmartValve or inlet valve might be obstructed or faulty. Access the cistern via the service tunnel and inspect the valve for debris or damage.
Continuous Water Flow into Toilet Bowl
- Outlet valve seal: The seal on the outlet valve (flush valve) may be dirty or damaged. Access the cistern and clean or replace the seal.
- Flush button mechanism: Ensure the flush buttons are not stuck in the depressed position.
Weak Flush
- Water level: Check if the cistern is filling to the correct level. Adjust the float mechanism if necessary.
- Outlet valve: Ensure the outlet valve opens fully during a flush.
If these troubleshooting steps do not resolve the issue, please contact Ideal Standard customer support or a qualified plumber.
Specifications
| Feature | Specification |
|---|---|
| Model Number | R015367 |
| Brand | Ideal Standard |
| Product Dimensions (L x W x H) | 4.72 x 19.69 x 45.28 inches (120mm x 500mm x 1150mm) |
| Item Weight | 26.8 pounds (12.2 Kilograms) |
| Material | Mixed Material |
| Installation Type | Wall Mounted, Recessed Mount |
| Flush Operation | Mechanical, Front Flush |
| Dual Flush Pre-set | 6/4 Liters |
| Cistern Technology | SmartValve (water-saving) |
| Load Capacity (WC Frame) | Up to 400kg |
| Height Adjustment | 0-200mm |
| Compatibility | Wall hung toilet bowls up to 66cm projection, EN 33 2011 compliant |
Warranty and Support
For specific warranty information regarding your Ideal Standard ProSys Mechanical Wall Hung Toilet Frame and Cistern, please refer to the documentation provided at the time of purchase or visit the official Ideal Standard website.
If you require technical assistance, spare parts, or have questions not covered in this manual, please contact Ideal Standard customer support through their official channels.


