1. Introduction
This manual provides essential information for the safe and efficient operation, setup, maintenance, and troubleshooting of your Jack A4f Straight Stitch Sewing Machine. Please read this manual thoroughly before operating the machine to ensure proper usage and to prevent damage or injury. Keep this manual for future reference.
2. Safety Instructions
Always observe the following safety precautions to prevent accidents and ensure the longevity of your machine.
- Electrical Safety: Ensure the machine is connected to a 220V power supply. Always unplug the machine from the power outlet before cleaning, lubricating, or performing any maintenance. Do not operate the machine with wet hands or in damp conditions.
- Moving Parts: Keep fingers, hair, and loose clothing away from the needle, handwheel, and other moving parts during operation.
- Needle Safety: Use only correct needles for your machine. Replace bent or dull needles immediately. Never pull fabric forcefully while sewing, as this can break the needle.
- Children and Pets: Keep the machine out of reach of children and pets. Do not allow them to operate the machine unsupervised.
- Ventilation: Ensure adequate ventilation around the motor to prevent overheating.
3. Setup and Assembly
3.1 Unpacking
Carefully remove the machine and all accessories from the packaging. Retain the packaging for future transport or storage. Inspect the machine for any visible damage incurred during shipping.
3.2 Machine Assembly
The Jack A4f is typically shipped with the head separate from the table and motor. Follow these general steps for assembly:
- Place the machine head onto the designated opening in the sewing table.
- Secure the machine head using the provided hinges and screws.
- Mount the motor underneath the table, aligning it with the drive belt pulley.
- Install the drive belt, ensuring it is taut but not overly tight.
- Assemble the thread stand and place it behind the machine.
- Connect the foot pedal and power cord to the motor unit.

Figure 3.2.1: Overview of the Jack A4f Straight Stitch Sewing Machine. This image shows the complete machine setup, including the machine head, sewing table, and thread stand with two thread spools.
3.3 Power Connection
Connect the machine's power cord to a grounded 220V electrical outlet. Ensure the power switch is in the "OFF" position before plugging in the machine.
4. Operating Instructions
4.1 Control Panel Overview
The Jack A4f features an intuitive control panel for various settings. Refer to the image below for key functions.
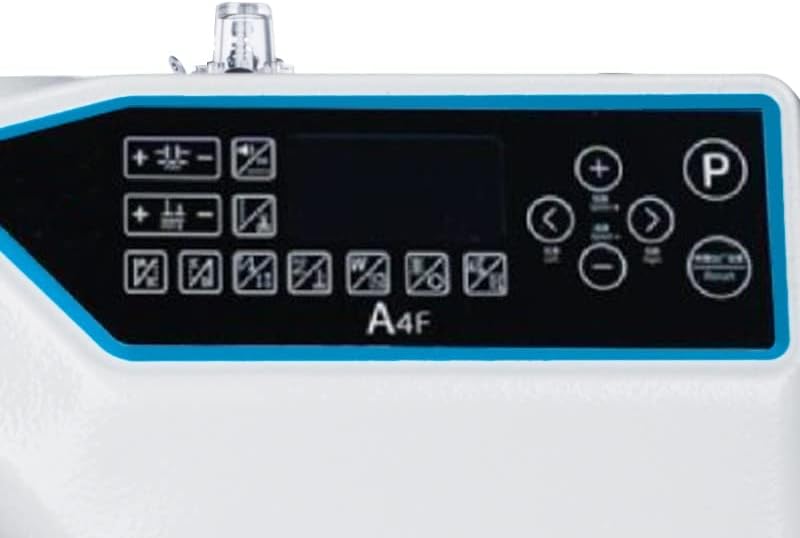
Figure 4.1.1: Close-up of the Jack A4f control panel. This panel includes buttons for stitch length adjustment (+/-), reverse stitch, speed control, and other programmable functions, along with a digital display.
- Stitch Length Adjustment: Use the '+' and '-' buttons to increase or decrease stitch length.
- Reverse Stitch: Press the reverse button for back-tacking at the beginning and end of seams.
- Speed Control: Adjust sewing speed using the dedicated speed buttons or dial.
- Needle Position: Buttons may be available to set the needle to stop in the up or down position.
- Programmable Functions: The panel may offer options for automatic thread trimming, bartacking, or other specialized functions. Consult the on-screen display for specific settings.
4.2 Threading the Machine
Proper threading is crucial for consistent stitch quality.
- Place a spool of thread on one of the thread stand pins.
- Guide the thread through the upper thread guides.
- Pass the thread through the tension discs.
- Thread the take-up lever.
- Guide the thread through the remaining guides down to the needle.
- Thread the needle from front to back.
4.3 Winding the Bobbin
The machine has a built-in bobbin winder.
- Place an empty bobbin onto the bobbin winder spindle.
- Guide the thread from the spool through the bobbin winding tension disc.
- Wrap the thread a few times around the bobbin.
- Push the bobbin winder spindle towards the handwheel to engage.
- Press the foot pedal lightly to start winding. Stop when the bobbin is full.
4.4 Inserting the Bobbin
The bobbin is inserted into the bobbin case located under the needle plate.
- Raise the needle to its highest position.
- Open the bobbin cover plate.
- Insert the bobbin into the bobbin case, ensuring the thread unwinds in the correct direction (usually counter-clockwise).
- Pull the thread through the tension spring of the bobbin case.
- Close the bobbin cover plate.
5. Maintenance
Regular maintenance ensures optimal performance and extends the life of your sewing machine. Always unplug the machine before performing any maintenance.
5.1 Cleaning
- Feed Dogs and Bobbin Area: Regularly remove the needle plate and clean out lint and dust from the feed dogs and bobbin case area using a small brush or vacuum cleaner.
- Tension Discs: Occasionally clean between the tension discs with a piece of thread or a thin cloth to remove lint buildup.
- Exterior: Wipe the exterior of the machine with a soft, damp cloth. Avoid harsh chemicals.
5.2 Lubrication
The Jack A4f is an industrial machine and may require regular oiling. Consult the machine's specific oiling points, usually indicated by red dots or specific instructions in a manufacturer's diagram. Use only high-quality sewing machine oil.
- Apply a few drops of oil to the hook race area.
- Apply oil to other designated moving parts as per the manufacturer's guidelines.
5.3 Needle Replacement
Replace the needle regularly (after 8-10 hours of sewing or when it becomes dull/bent) to ensure optimal stitch quality and prevent fabric damage.
- Loosen the needle clamp screw.
- Remove the old needle.
- Insert the new needle with the flat side facing the back of the machine, pushing it up as far as it will go.
- Tighten the needle clamp screw securely.
6. Troubleshooting
This section addresses common issues you might encounter. For problems not listed here, please contact customer support.
| Problem | Possible Cause | Solution |
|---|---|---|
| Skipped Stitches | Incorrect needle, bent needle, improper threading, wrong needle size for fabric. | Replace needle, re-thread machine, use correct needle type/size. |
| Thread Breakage | Incorrect tension, poor quality thread, burrs on needle plate, improper threading, dull needle. | Adjust tension, use quality thread, check for burrs, re-thread, replace needle. |
| Machine Not Starting | Power cord unplugged, power switch off, motor issue. | Check power connection, ensure switch is ON. If problem persists, contact support. |
| Uneven Stitches | Incorrect tension, worn feed dogs, inconsistent fabric feeding. | Adjust tension, ensure even fabric feeding, inspect feed dogs. |
7. Specifications
| Feature | Detail |
|---|---|
| Model | Jack A4f |
| Type | Straight Stitch Industrial Sewing Machine |
| Brand | Jack (Generic) |
| Power Source | Electric with cord, 220V |
| Color | White |
| Product Dimensions (L x W x H) | 120 cm x 40 cm x 75 cm (approximate) |
| Product Weight | 135 kg |
| Package Dimensions (L x W x H) | 120 cm x 60 cm x 60 cm |
8. Warranty and Support
For warranty information, please refer to the documentation provided at the time of purchase or contact your retailer. For technical support, spare parts, or service inquiries, please contact the authorized Jack service center or your product supplier.
Note: Unauthorized repairs or modifications may void your warranty.


