1. Introduction
This manual provides detailed instructions for the safe and efficient operation of your DROK 60V 0-8A 480W Adjustable DC Power Supply. This buck converter is designed to convert AC input voltage (110V or 220V) to a wide range of adjustable DC output voltage from 0-60V and current from 0-8A. It is suitable for various applications including powering devices from 3V to 60V, such as those used in RVs, cars, laptops, computers, laboratories, and CCTV systems.
Please read this manual thoroughly before use to ensure proper setup and to prevent damage to the unit or connected devices.
2. Safety Information
- Always ensure the power supply is disconnected from the AC mains before making any wiring connections or adjustments to the input voltage switch.
- Verify the input voltage switch setting (110V/220V) matches your local power supply to avoid severe damage to the unit.
- Do not exceed the maximum output current of 8A. Ensure connected devices operate within this limit.
- This unit features Over Load Protection, Over Voltage Protection, and Short Circuit Protection. However, proper handling and wiring are essential for safe operation.
- Ensure adequate ventilation around the power supply during operation to prevent overheating.
3. Product Features
- Adjustable Output: Wide adjustable DC output voltage range from 0-60V and current from 0-8A.
- Dual Display: Equipped with an LED screen that clearly displays output voltage and output current.
- Efficient Cooling: Features a heat sink and a smart cooling fan that automatically activates during high power operation to maintain safe temperatures.
- Protection Mechanisms: Includes Over Load Protection, Over Voltage Protection, and Short Circuit Protection.
- Versatile Application: Suitable for various devices requiring 3V, 5V, 6V, 9V, 12V, 24V, 36V, 48V, or 60V power.
4. Setup
4.1. Input Voltage Selection
Before connecting the power supply to the AC mains, it is critical to set the input voltage switch to match your local power supply (110V or 220V). The unit is typically shipped with the switch set to 220V by default.

Image: Close-up view of the input voltage selector switch. Ensure this switch is correctly set to either 110V or 220V before powering on the unit.
Locate the small red switch on the side of the power supply. Use a small screwdriver or a similar tool to slide the switch to the appropriate voltage setting (110V or 220V).
4.2. Wiring Connections
Connect the AC input wires to the terminal block labeled 'L' (Live), 'N' (Neutral), and '⚧' (Ground). For DC output, connect your device to the '+V' (Positive) and '-V' (Negative) terminals. Ensure all connections are secure.

Image: The terminal block for AC input (L, N, Ground) and DC output (+V, -V). The adjustable voltage and current potentiometers are also visible.
4.3. Physical Installation
Place the power supply in a location with good airflow. The integrated heat sink and cooling fan require unobstructed ventilation to operate effectively and prevent overheating, especially during high-power usage.

Image: The smart cooling fan and ventilation grilles on the top of the power supply, designed to dissipate heat.
5. Operation
5.1. Adjusting Output Voltage and Current
Once the power supply is connected and powered on, you can adjust the output voltage and current using the two potentiometers located on the front panel. The left potentiometer controls the voltage, and the right potentiometer controls the current.
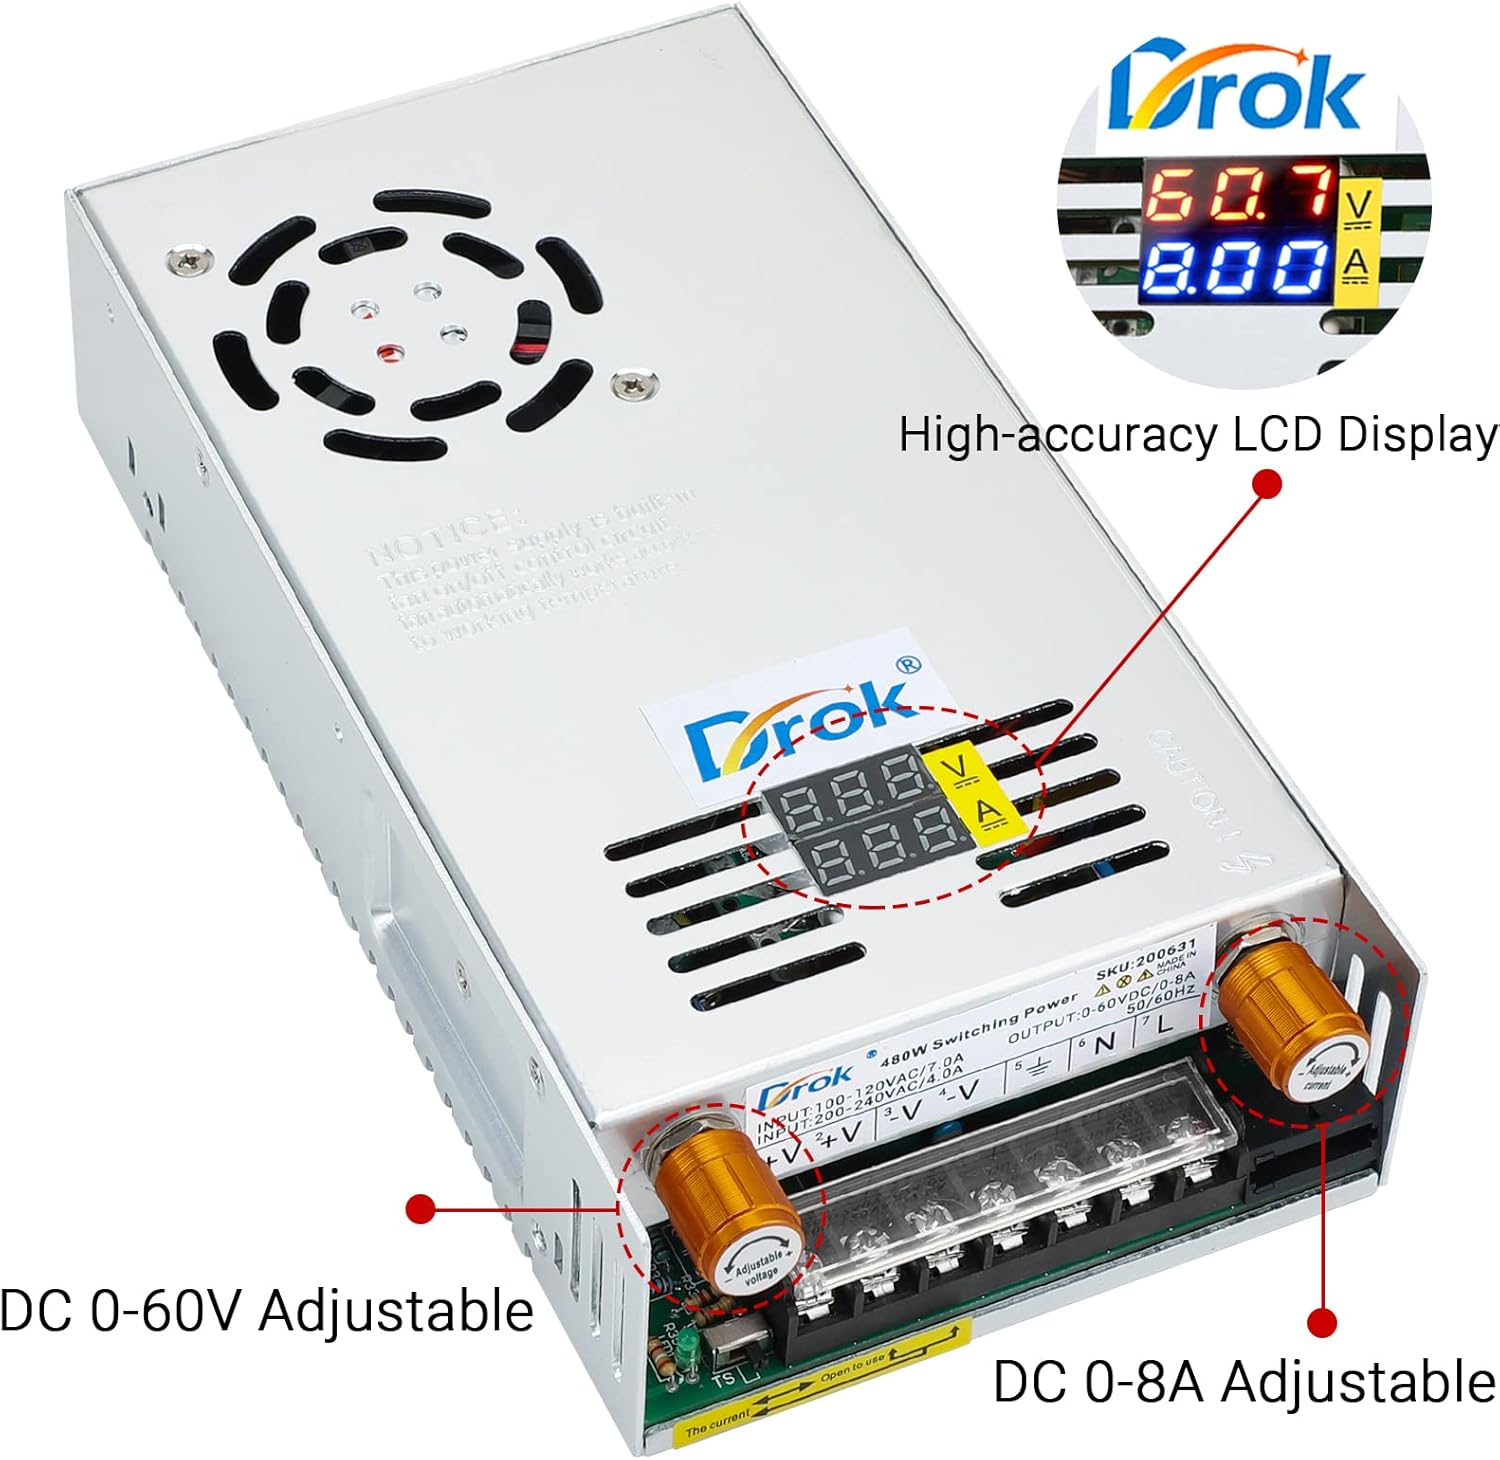
Image: The high-accuracy LCD display shows the current output voltage and current. The two golden knobs allow for precise adjustment of DC voltage (0-60V) and DC current (0-8A).
Rotate the voltage potentiometer to set the desired output voltage. The precision is 0.1V. Rotate the current potentiometer to set the maximum output current. The maximum current should not exceed 8A. The LED display will show the real-time output voltage and current.
The cooling fan will automatically activate when the internal temperature rises due to high power output, ensuring stable operation.
6. Maintenance
- Keep the power supply clean and free from dust. Use a soft, dry cloth for cleaning.
- Ensure all ventilation openings are clear and not obstructed.
- Regularly check all wiring connections for tightness and signs of wear or damage.
- Store the unit in a dry, cool environment when not in use.
7. Troubleshooting
- No Power/Display: Check the AC input connection and ensure the input voltage switch (110V/220V) is correctly set. Verify the AC power source is active.
- No Output Voltage/Current: Ensure the output terminals are correctly connected to your device. Check if the voltage and current potentiometers are adjusted to non-zero values. The unit's protection features (Over Load, Over Voltage, Short Circuit) may have activated; disconnect the load and restart the unit.
- Fan Not Running: The cooling fan activates automatically when the internal temperature reaches a certain threshold. If the unit is operating at low power, the fan may not run. If the unit is hot and the fan is not running, check for obstructions in the fan grille.
- Unstable Output: Ensure the load is within the specified voltage and current limits. Check for loose connections.
8. Specifications
| Feature | Specification |
|---|---|
| Input Voltage | AC 110V/220V (selectable) |
| Output Voltage | DC 0-60V (Adjustable) |
| Output Current | DC 0-8A (Adjustable) |
| Rated Power | 480W |
| Voltage Precision | 0.1V |
| Display Type | LED Digital Display (Voltage & Current) |
| Cooling | Heat Sink & Smart Cooling Fan |
| Protection | Over Load, Over Voltage, Short Circuit |
| Product Dimensions | 8.46 x 1.97 x 1.97 inches (214 x 49.5 x 49.5 mm) |
| Item Weight | 1.94 pounds |
| Manufacturer | DROK |
9. Warranty and Support
This DROK power supply comes with a 1-year warranty guarantee from the date of purchase, covering manufacturing defects. Please retain your proof of purchase for warranty claims.
For technical support, troubleshooting assistance, or warranty inquiries, please visit the official DROK store or contact customer service through the platform where the product was purchased.
DROK Store: Visit DROK Store on Amazon


