Apdoe B0B1818MSP
Apdoe Egg Incubator User Manual
Model: B0B1818MSP
Introduction
Thank you for choosing the Apdoe Egg Incubator. This automatic digital egg incubator is designed to provide an optimal environment for hatching various types of poultry eggs, including chicken, duck, goose, quail, and more. It features automatic egg turning, precise temperature and humidity control, and a built-in egg candler to monitor embryo development.
This manual provides detailed instructions for the safe and effective use of your incubator. Please read it thoroughly before operation and keep it for future reference.
Important Safety Information
WARNING: To reduce the risk of fire, electric shock, or injury, always follow these basic safety precautions:
- Read all instructions before using the appliance.
- Do not immerse the incubator or its power cord in water or other liquids.
- Always unplug the incubator from the power outlet when not in use, before cleaning, or before adding water.
- Keep the incubator away from direct sunlight, drafts, and extreme temperature fluctuations.
- Ensure the power supply voltage matches the requirements specified on the incubator label.
- Do not operate the incubator with a damaged cord or plug, or if it has been dropped or damaged in any manner.
- Supervise children closely if they are near the incubator. This is not a toy.
- Do not block ventilation openings.
- Use only manufacturer-recommended attachments.
Package Contents
Carefully unpack all components and check against the list below. If any items are missing or damaged, please contact customer support.

Image: Contents of the Apdoe Egg Incubator package. This includes the main incubator unit, a power cord, a rotating shaft, a spray bottle, a water bottle, and the user manual. The image also highlights the built-in egg candler and the overall dimensions of the unit.
- Apdoe Egg Incubator Unit (with transparent lid, control panel, and egg tray)
- Power Cord
- Rotating Shaft (for automatic egg turning)
- Spray Bottle
- Water Bottle (for adding water to humidity channels)
- User Manual
- Styrofoam (for insulation, especially in low-temperature environments)
Setup
Follow these steps to set up your Apdoe Egg Incubator for the first time:
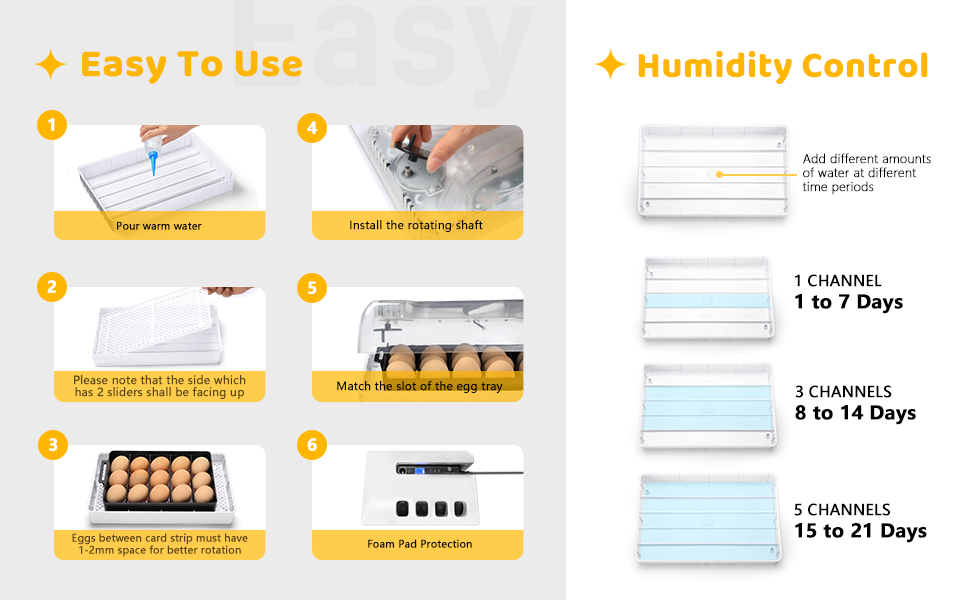
Image: Visual guide for setting up the incubator. It shows pouring warm water, placing the hatching tray, installing the rotating shaft, matching the egg tray slot, and connecting power.
- Prepare the Base: Place the hatching tray (the white grid base) into the bottom of the incubator. Ensure the side with 2 sliders is facing up.
- Add Water for Humidity: Using the provided water bottle, pour warm water into the designated water channels in the base. Refer to the "Humidity Control" section for guidance on how much water to add based on the incubation stage.
- Install Rotating Shaft: Carefully install the rotating shaft into its designated slot on the top lid.
- Place Egg Tray: Position the movable egg tray (black tray) onto the hatching tray, ensuring its slot aligns with the rotating shaft.
- Load Eggs: Place your fertilized eggs into the egg tray. Ensure there is 1-2mm space between eggs for proper rotation.
- Close Lid: Securely close the transparent lid.
- Connect Power: Plug the power cord into the incubator and then into a suitable electrical outlet. The digital display will light up.
- Insulation (Optional): If operating in a low-temperature environment, place the provided styrofoam insulation around the incubator for stable temperature maintenance.
Operation
Temperature and Humidity Control

Image: Exploded view of the incubator showing the transparent lid, control panel with LED display and function keys, egg rotator, movable egg tray, hatching tray, and water channels.
The incubator features a digital LED display for monitoring temperature and humidity. Use the function keys on the control panel to adjust settings if necessary. The incubator is pre-set with optimal temperatures for chicken eggs.
Humidity is controlled by adding water to the channels in the base. The amount of water needed varies depending on the stage of incubation:
- 1 to 7 Days: Use 1 channel.
- 8 to 14 Days: Use 3 channels.
- 15 to 21 Days: Use 5 channels.

Image: Close-up of the incubator base showing the multiple water channels for humidity control, with arrows indicating humidity ventilation.
Regularly check the water levels and refill as needed to maintain the desired humidity. Use the provided spray bottle to mist eggs if additional humidity is required, especially during lockdown.
Automatic Egg Turning
The incubator is equipped with an automatic egg turning mechanism that rotates the eggs every 2 hours. This ensures even heat distribution and prevents the embryo from sticking to the shell, which is crucial for successful hatching.

Image: Diagram illustrating the automatic egg turning feature. It shows the shaft wheel turning and pushing the egg turner sliding mechanism, resulting in a 360-degree rotation of the eggs.
The automatic turning function should be active throughout most of the incubation period. For the last 3 days before hatching (known as "lockdown"), the egg turning function should be disabled, and the eggs should remain still. Remove the egg tray during lockdown and place eggs directly on the hatching grid.
Built-in Egg Candler
The incubator includes a built-in LED egg candler, allowing you to monitor the embryo's development without needing to purchase additional equipment. Simply press the "LED" button on the control panel to activate the candler and observe the egg's interior.

Image: The incubator with the built-in LED egg candler illuminated, showing the light passing through an egg to reveal the embryo's development stages.
Candling is typically performed on day 7 and day 14 of incubation to check for fertility and viability. Remove any infertile or non-developing eggs to prevent contamination.
Incubation Parameters for Various Poultry
The following table provides general guidelines for incubation parameters. These may vary slightly based on specific breeds and environmental conditions.

Image: A table detailing incubation parameters for various poultry types including Chicken, Duck, Goose, Pigeon, and Quail, showing number of days, temperature, and humidity for both incubation and hatching periods.
| Poultry | Number of Days | Incubation Period (±0.5°C) | Hatching Period (±0.5°C) | ||
|---|---|---|---|---|---|
| Temperature (°C) | Humidity (%) | Temperature (°C) | Humidity (%) | ||
| Chicken | 21 | 38 | 55-70 | 37.5 | 65-85 |
| Duck | 28 | 37.8 | 60-75 | 37.3 | 65-85 |
| Goose | 30 | 37.6 | 65-80 | 37.1 | 65-85 |
| Pigeon | 18 | 38.5 | 55-70 | 37.8 | 65-85 |
| Quail | 17 | 37.8 | 56-57 | 37.8 | 65-85 |
Note: The hatching period typically refers to the last 3 days of incubation where humidity is increased and eggs are no longer turned.
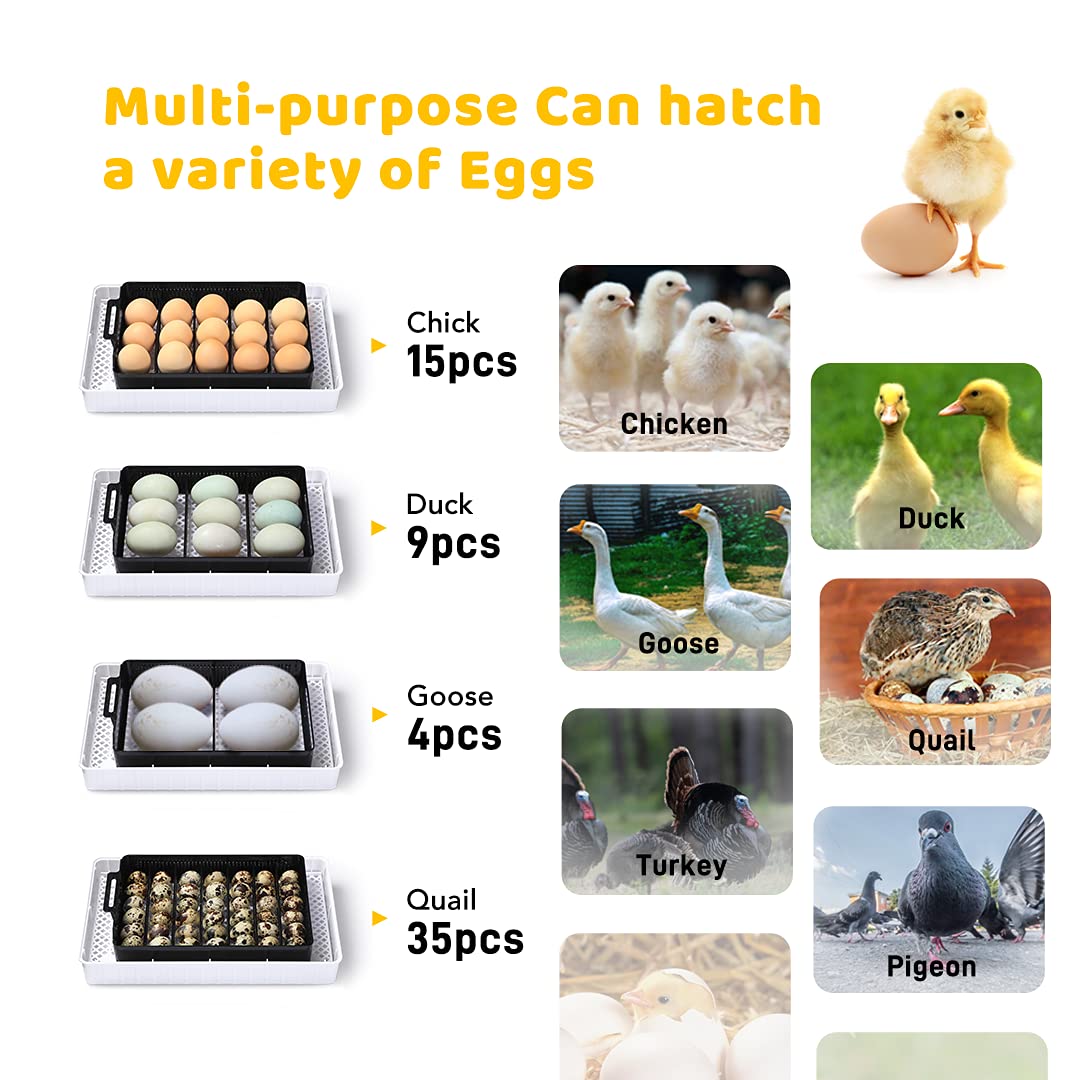
Image: Visual representation of the incubator's capacity for various egg types: 15 chicken eggs, 9 duck eggs, 4 goose eggs, and 35 quail eggs.
Maintenance
Proper maintenance ensures the longevity and optimal performance of your incubator.
- Cleaning: After each hatch, unplug the incubator and allow it to cool. Disassemble the egg tray and hatching grid. Clean all parts with a mild disinfectant solution and a soft cloth. Rinse thoroughly and allow to air dry completely before reassembly or storage. Do not immerse the main unit (top lid with electronics) in water. Wipe it clean with a damp cloth.
- Storage: Store the incubator in a clean, dry, and dust-free environment when not in use. Keep it away from direct sunlight and extreme temperatures.
- Regular Checks: Periodically check the power cord for any signs of damage. Ensure the rotating shaft moves freely.
Troubleshooting
If you encounter any issues with your incubator, refer to the following common problems and solutions:
| Problem | Possible Cause | Solution |
|---|---|---|
| Incubator not powering on | Power cord not connected; power outlet issue; damaged cord. | Ensure power cord is securely plugged in. Test the outlet with another appliance. Inspect the cord for damage; if damaged, discontinue use and contact support. |
| Temperature fluctuations | Room temperature too unstable; lid not sealed properly; ventilation issues. | Place incubator in a room with stable ambient temperature. Ensure the lid is securely closed. Check that ventilation openings are not blocked. Use styrofoam insulation if needed. |
| Eggs not turning automatically | Rotating shaft not installed correctly; motor issue; egg tray not aligned. | Verify the rotating shaft is properly seated. Ensure the egg tray is correctly aligned with the shaft. If the issue persists, contact customer support. |
| Humidity too low/high | Insufficient/excessive water in channels; room humidity. | Adjust the amount of water in the channels according to the incubation stage. Use the spray bottle for quick humidity boosts. Ensure the room humidity is not excessively high or low. |
| Poor hatch rate | Incorrect temperature/humidity; infertile eggs; poor egg quality; improper candling/turning. | Review and adjust temperature/humidity settings based on the incubation table. Ensure eggs are fertile and of good quality. Follow candling and turning instructions carefully. |
Specifications
Key technical specifications for the Apdoe Egg Incubator:
- Model: B0B1818MSP
- Product Dimensions: 12.6 x 8.27 x 4.72 inches
- Weight: 3.64 Pounds
- Manufacturer: Apdoe
- Egg Capacity: 12-15 Chicken Eggs, 35 Quail Eggs, 9 Duck Eggs, 4 Goose Eggs (approximate)
- Features: Automatic Egg Turner, Temperature & Humidity Control, Built-in Egg Candler, LED Display
Warranty and Support
For warranty information and customer support, please refer to the documentation included with your purchase or visit the official Apdoe website. If you have any questions or require assistance with your incubator, do not hesitate to contact Apdoe customer service.
You can often find support information on the brand's Amazon store page: Apdoe Store on Amazon
Ask a question about this manual
Ask about setup, troubleshooting, compatibility, parts, safety, or missing instructions. Manuals+ will review the question and use this page’s manual context to help answer it.