1. Introduction
This manual provides essential instructions for the safe operation, maintenance, and troubleshooting of your Champion Power Equipment 6875/5500-Watt Dual Fuel Portable Generator, Model 201085. Please read this manual thoroughly before operating the generator to ensure proper use and to prevent injury or damage.
This generator is designed to provide reliable power using either gasoline or propane, featuring a 389cc Champion engine and CO Shield technology for enhanced safety.

Image 1.1: The Champion Power Equipment 6875/5500-Watt Dual Fuel Portable Generator.
2. Safety Information
WARNING: Generators produce carbon monoxide, a colorless, odorless, poisonous gas. Using a generator indoors CAN KILL YOU IN MINUTES.
- Outdoor Use Only: Always operate the generator outdoors in a well-ventilated area, far away from windows, doors, and vents of occupied buildings. Direct exhaust away from people and buildings.
- CO Shield Technology: This generator is equipped with CO Shield technology, which monitors carbon monoxide (CO) accumulation. If unsafe elevated levels of CO gas are detected, the engine will automatically shut off. CO Shield is not a substitute for an indoor carbon monoxide alarm or for safe operation.
- Fuel Safety: Gasoline is highly flammable. Store fuel in approved containers in a well-ventilated area. Do not refuel a hot or running engine. Propane tanks must be secured and stored outdoors.
- Electrical Safety: Do not operate the generator in wet conditions. Ensure all electrical connections are secure and properly grounded. Use GFCI-protected outlets when available.
- Read All Warnings: Familiarize yourself with all safety decals on the generator and in this manual.
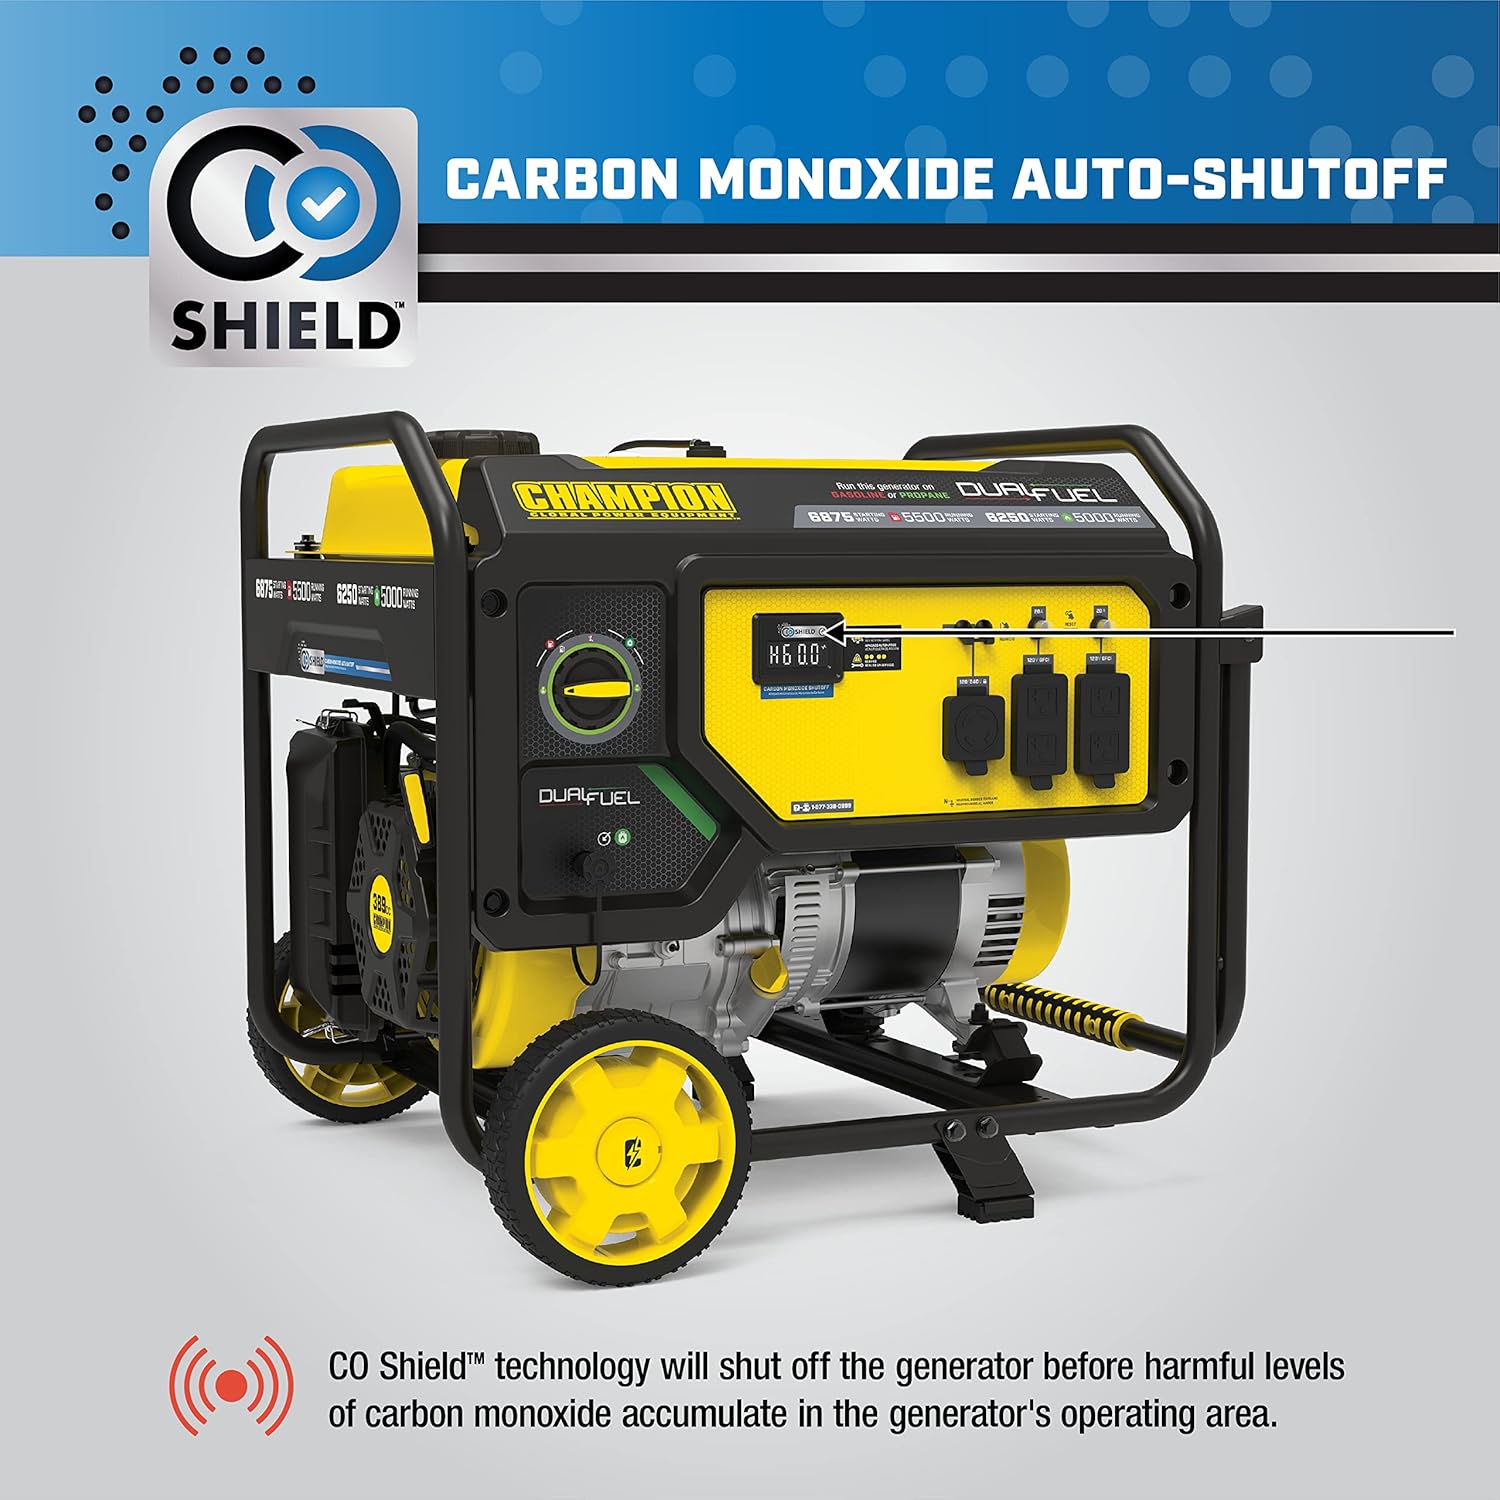
Image 2.1: The CO Shield feature provides automatic carbon monoxide auto-shutoff for safety.
3. Package Contents
Your Champion Power Equipment generator package includes the following items:
- Champion 6875/5500-Watt Dual Fuel Portable Generator
- Engine Oil (1.2 quarts of 10W-30)
- Propane (LPG) Hose with Regulator (6.5 feet)
- Wheel Kit (for assembly)
- Oil Funnel
- Spark Plug Wrench (not explicitly listed but typically included)
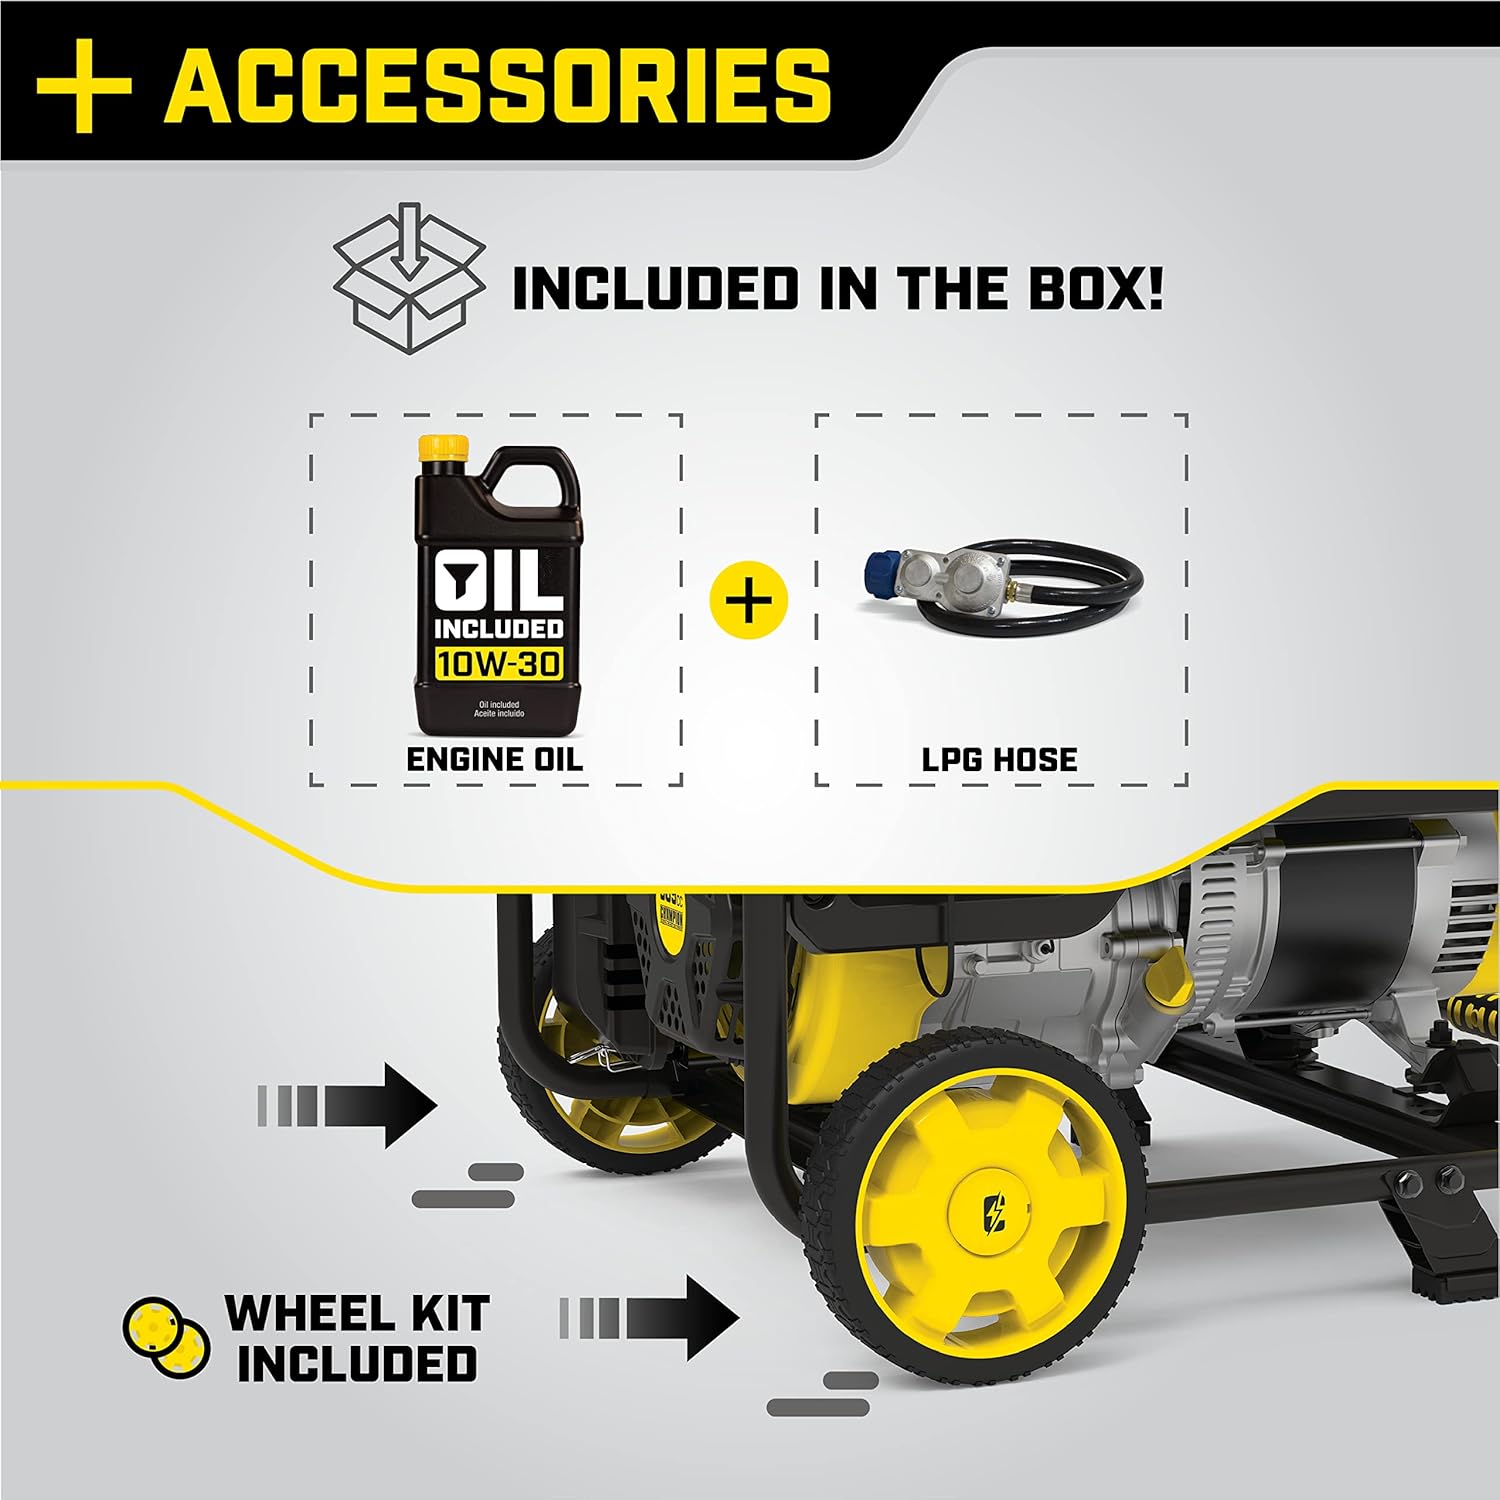
Image 3.1: Included accessories for your generator.
4. Setup
4.1 Assembly
- Attach Wheels: Securely attach the wheels to the generator frame using the provided hardware.
- Attach Support Legs: Install the support legs to ensure stability.
- Attach Handle: Assemble the handle for easy portability.
4.2 Add Engine Oil
The generator is shipped without engine oil. It is crucial to add the correct amount and type of oil before first use.
- Place the generator on a level surface.
- Remove the oil fill cap/dipstick.
- Using the included funnel, slowly pour the entire 1.2 quarts of 10W-30 engine oil into the crankcase.
- Reinstall the oil fill cap/dipstick and tighten securely.
4.3 Fueling Options
This generator operates on either gasoline or propane.
- Gasoline: Use unleaded gasoline with an octane rating of 87 or higher. Do not use E85 or mixed fuels. Fill the 7.7-gallon fuel tank carefully, avoiding overfilling.
- Propane (LPG): Connect the provided propane hose to a standard 20-pound (or larger) propane tank and to the generator's propane inlet. Ensure all connections are tight.

Image 4.1: Key features including dual fuel selection and power outlets.
5. Operating Instructions
5.1 Control Panel Overview

Image 5.1: The generator's control panel, showing the fuel select dial, Intelligauge display, CO Shield indicator, circuit breakers, and various outlets.
- Fuel Select Dial: Allows switching between gasoline and propane.
- Intelligauge: Displays voltage, frequency, and run-time hours.
- CO Shield Indicator: LED light indicates CO shutoff or fault.
- Outlets: Includes one 120/240V 30A locking outlet (L14-30R) and four 120V 20A GFCI protected household outlets (5-20R). All outlets have covers for protection.
- Circuit Breakers: Protect against overloads.
5.2 Starting the Generator
- Ensure the generator is on a level surface and all electrical loads are disconnected.
- Select Fuel: Turn the fuel select dial to either 'Gasoline' or 'Propane'.
- Choke: Move the choke lever to the 'Choke' position (if the engine is cold).
- Start: Pull the recoil start handle firmly and steadily until the engine starts.
- Choke (Warm-up): Once the engine starts, slowly move the choke lever to the 'Run' position.
- Allow the engine to run for a few minutes to warm up before connecting electrical loads.
5.3 Connecting Electrical Loads
Once the generator is running smoothly, you can connect your appliances or tools to the appropriate outlets. Do not exceed the generator's running wattage capacity (5500W on gasoline, 5000W on propane).

Image 5.2: The generator provides power for various applications, such as remote work sites.
6. Maintenance
Regular maintenance ensures the longevity and reliable performance of your generator.
6.1 Maintenance Schedule
- Before Each Use: Check engine oil level, inspect air filter, check fuel level, inspect for loose hardware.
- First 5 Hours: Change engine oil.
- Every 50 Hours or Annually: Change engine oil, clean air filter, inspect spark plug, inspect fuel filter.
- Every 100 Hours or Annually: Clean spark arrestor, inspect valve clearance (recommended by qualified technician).
6.2 Engine Oil Change
- Run the engine for a few minutes to warm the oil, then shut it off.
- Place a drain pan under the oil drain plug.
- Remove the oil drain plug and oil fill cap/dipstick to allow oil to drain completely.
- Reinstall the oil drain plug.
- Add 1.2 quarts of fresh 10W-30 engine oil.
- Reinstall the oil fill cap/dipstick.
6.3 Air Filter Cleaning
A dirty air filter can reduce engine performance and lifespan.
- Remove the air filter cover.
- Remove the foam filter element.
- Wash the foam element in warm, soapy water, then rinse thoroughly.
- Squeeze out excess water and allow to air dry completely.
- Lightly apply engine oil to the foam, then squeeze out excess oil.
- Reinstall the foam element and air filter cover.
6.4 Storage
For extended storage, prepare the generator as follows:
- Drain the gasoline from the fuel tank and carburetor, or add a fuel stabilizer.
- Disconnect the propane tank.
- Change the engine oil.
- Remove the spark plug and pour a small amount of engine oil into the cylinder. Pull the recoil cord a few times to distribute the oil, then reinstall the spark plug.
- Clean the exterior of the generator.
- Store in a clean, dry, well-ventilated area.
7. Troubleshooting
This section addresses common issues you might encounter with your generator.
| Problem | Possible Cause | Solution |
|---|---|---|
| Engine will not start | No fuel (gasoline or propane) Low engine oil Choke not set correctly Spark plug issue | Add fuel Add engine oil Adjust choke lever Inspect/clean/replace spark plug |
| No power output | Circuit breaker tripped Overload Faulty connection | Reset circuit breaker Reduce electrical load Check all connections |
| Engine stops unexpectedly | Low engine oil CO Shield activated Lack of fuel | Check/add engine oil Move generator to a better ventilated area, allow to cool, then restart Refuel |
| Engine runs rough | Dirty air filter Stale fuel Spark plug issue | Clean/replace air filter Drain and replace fuel Inspect/clean/replace spark plug |
8. Specifications
Detailed technical specifications for the Champion Power Equipment Model 201085 generator:
- Model: 201085
- Starting Watts (Gasoline): 6875 Watts
- Running Watts (Gasoline): 5500 Watts
- Starting Watts (Propane): 6250 Watts
- Running Watts (Propane): 5000 Watts
- Fuel Type: Gasoline, Propane (Dual Fuel)
- Engine Displacement: 389cc (4-Stroke)
- Fuel Tank Capacity: 7.7 Gallons
- Oil Capacity: 1.2 Quarts (10W-30)
- Outlets: 1x 120/240V 30A Locking (L14-30R), 4x 120V 20A GFCI (5-20R)
- Special Features: CO Shield, Volt Guard, Intelligauge
- Item Weight: 165 Pounds
- Product Dimensions: 28.3"L x 27.4"W x 25.6"H
- UPC: 817198024950

Image 8.1: Physical dimensions and weight of the generator.
9. Warranty and Support
Champion Power Equipment stands behind its products with comprehensive support.
9.1 Warranty Information
This generator comes with a 3-year limited warranty. This warranty covers defects in material and workmanship under normal use and maintenance. Please refer to the warranty card included with your product for full terms and conditions.

Image 9.1: The generator is backed by a 3-year limited warranty.
9.2 Technical Support
Champion Power Equipment offers FREE lifetime technical support from dedicated experts. For assistance, please contact Champion Support through their official website or customer service line. Have your model number (201085) and serial number ready when contacting support.
For additional resources and product registration, visit the Champion Power Equipment Store.


