1. Introduction
This manual provides comprehensive instructions for the installation, operation, and maintenance of your Dzxiaso Android Stereo. Please read this manual thoroughly before using the product to ensure proper functionality and to prevent damage. This unit is designed to enhance your driving experience with advanced features such as a 10.25-inch IPS touch screen, wireless CarPlay, wired Android Auto, and integrated navigation capabilities.
2. Safety Information
- Always ensure the vehicle's engine is off and the parking brake is engaged before beginning installation.
- Disconnect the vehicle's battery negative terminal before installation to prevent electrical shorts and damage.
- Professional installation is recommended for optimal performance and safety.
- Do not operate the device in a manner that distracts you from driving. Always prioritize road safety.
- Avoid exposing the unit to extreme temperatures, direct sunlight for prolonged periods, or excessive moisture.
3. Package Contents
Verify that all items listed below are included in your package:
- Dzxiaso Android Stereo Head Unit (10.25-inch IPS Touch Screen)
- Wiring Harness (Vehicle-specific)
- CANBUS Box
- GPS Antenna
- USB Cables (4-pin and 6-pin)
- RCA Cable Set
- Rear View Camera Cable
- Installation Frame (Vehicle-specific)

Figure 3.1: Included components for the Dzxiaso Android Stereo. This image displays the main head unit along with all necessary cables and accessories for installation, such as USB cables, GPS antenna, CANBUS module, RCA cables, rear view camera cable, and the main wiring harness.
4. Compatibility
This Dzxiaso Android Stereo is compatible with the following vehicle models and years:

Figure 4.1: Applicable Models & Years. This image displays a table detailing the specific GMC and Chevrolet models, along with their corresponding manufacturing years (e.g., GMC Sierra 1500, 2500, 3500, Yukon, Acadia, Chevrolet Silverado 1500, 2500, 3500, Avalanche, Express, Traverse, Impala, Tahoe) that are compatible with this Android stereo unit.
| Model | Years | Model | Years |
|---|---|---|---|
| FOR GMC SIERRA 1500 | 2007-2013 | FOR CHEVROLET SILVERADO 1500 | 2007-2013 |
| FOR GMC SIERRA 2500 | 2007-2014 | FOR CHEVROLET SILVERADO 2500 | 2007-2014 |
| FOR GMC SIERRA 3500 | 2007-2014 | FOR CHEVROLET SILVERADO 3500 | 2007-2014 |
| FOR GMC YUKON | 2007-2014 | FOR CHEVROLET AVALANCHE | 2007-2013 |
| FOR GMC ACADIA | 2007-2012 | FOR CHEVROLET EXPRESS | 2008-2014 |
| FOR CHEVROLET TRAVERSE | 2008-2012 | FOR CHEVROLET IMPALA | 2006-2013 |
| FOR BUICK ENCLAVE | 2008-2012 | FOR CHEVROLET TAHOE | 2007-2014 |
5. Installation Guide
This unit is designed as a complete plug-and-play kit. However, basic automotive knowledge and tools are required. If you are unsure, seek professional assistance.
5.1 Pre-Installation Steps
- Gather Tools: You will need a pry tool, screwdriver set, and potentially a socket wrench.
- Disconnect Battery: Locate your vehicle's battery and disconnect the negative (-) terminal to prevent electrical issues during installation.
- Remove Old Unit: Carefully use a pry tool to remove trim pieces surrounding your factory radio. Unscrew and remove the existing radio unit.
5.2 Connecting the New Unit
- Connect Wiring Harness: Connect the provided vehicle-specific wiring harness and CANBUS box to the new Android stereo and the vehicle's existing wiring. Ensure all connections are secure.
- Connect Peripherals: Connect the GPS antenna, USB cables, RCA cables, and rear view camera cable (if applicable) to the corresponding ports on the new unit. Route cables neatly to avoid interference.
- Test Connections: Before fully securing the unit, temporarily reconnect the vehicle battery and turn on the ignition to test basic functions (power, audio, touch screen).
5.3 Final Installation
- Mount New Unit: Carefully slide the new Android stereo into the dashboard opening, ensuring all wires are tucked away and not pinched. Secure it with screws.
- Reinstall Trim: Reattach any removed trim pieces, ensuring they snap securely into place.
- Reconnect Battery: Reconnect the negative (-) terminal of your vehicle's battery.

Figure 5.1: Before and After Installation. This image illustrates the transformation of the vehicle's dashboard, showing the factory radio setup on the top and the newly installed Dzxiaso Android Stereo on the bottom, displaying a rear view camera feed.
6. Initial Setup
6.1 First Power On
After installation, turn on your vehicle's ignition. The unit should power on automatically. Follow any on-screen prompts for initial language and time zone settings.
6.2 Wi-Fi Connection
- From the home screen, tap on the 'Settings' icon.
- Navigate to 'Network & Internet' or 'Wi-Fi'.
- Turn on Wi-Fi and select your desired network. Enter the password if prompted.
6.3 Bluetooth Pairing
- Go to 'Settings' and select 'Connected devices' or 'Bluetooth'.
- Ensure Bluetooth is enabled on both the stereo and your mobile device.
- Search for available devices on your mobile phone and select the stereo's name (e.g., 'CarBT'). Confirm the pairing code if prompted.
6.4 Steering Wheel Control Configuration
The unit retains factory steering wheel controls. If controls are not functioning correctly after installation, navigate to 'Settings' > 'Car Settings' > 'Steering Wheel Controls' and follow the on-screen instructions to map the buttons.
7. Operating Instructions
7.1 Home Screen Navigation
The home screen provides access to all applications and features. Swipe left or right to navigate between pages of apps. Tap an icon to launch an application.

Figure 7.1: Android Stereo Home Screen. This image displays the main user interface of the Android stereo, showing various application icons such as YouTube, Google Maps, Play Store, and Car Settings, along with media control buttons below the screen.
7.2 Wireless CarPlay / Wired Android Auto
This unit supports wireless Apple CarPlay and wired Android Auto for seamless smartphone integration.
- For Wireless CarPlay: Ensure Bluetooth and Wi-Fi are enabled on your iPhone. Pair your iPhone via Bluetooth to the stereo. Follow the prompts on your iPhone to enable CarPlay.
- For Wired Android Auto: Connect your Android phone to one of the stereo's USB ports using a high-quality USB cable. Follow the on-screen prompts on both your phone and the stereo to initiate Android Auto.

Figure 7.2: Wireless CarPlay Interface. This image demonstrates the Apple CarPlay interface displayed on the Android stereo's screen, showing common apps like Phone, Music, Messages, and Maps, with a hand interacting with the touch screen and an iPhone visible below.
7.3 GPS Navigation
The stereo has a built-in GPS module. You can use pre-installed navigation apps (e.g., Google Maps) or download others from the Play Store (requires Wi-Fi connection).
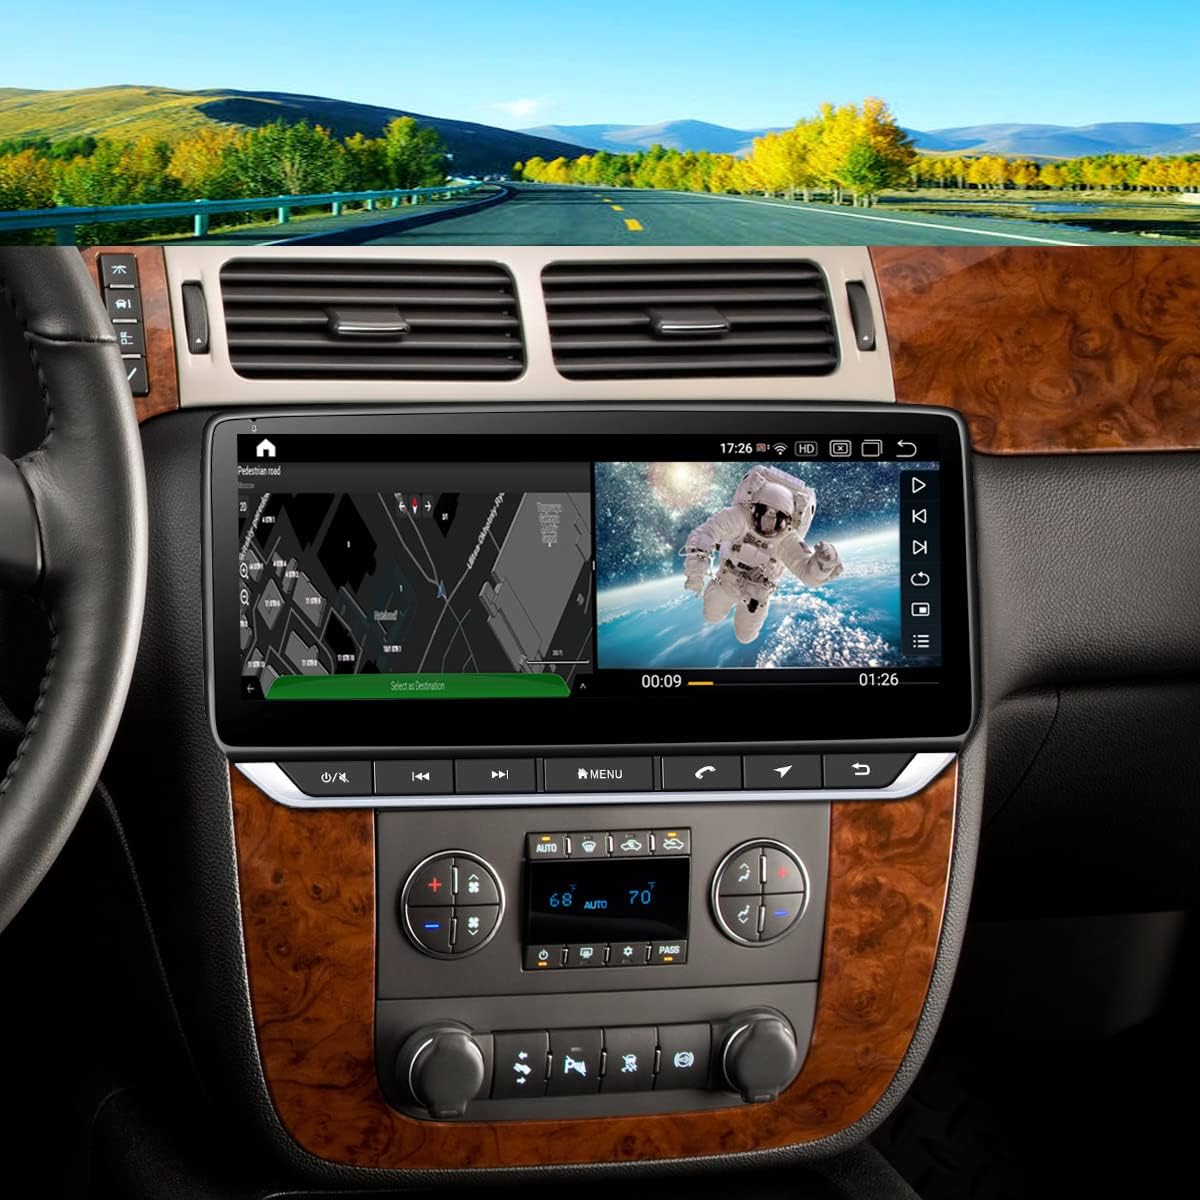
Figure 7.3: Navigation and Media Split Screen. This image shows the Android stereo's capability to display a split screen, with a navigation map on the left and a video playing on the right, illustrating multitasking functionality.
7.4 Media Playback
- USB: Connect a USB drive to one of the provided USB ports to play audio or video files.
- Bluetooth Audio: Stream music wirelessly from your paired smartphone.
- FM Radio: Access the FM Radio application to tune into local radio stations.
7.5 Rear View Camera
If a rear view camera is connected, the display will automatically switch to the camera feed when the vehicle is put into reverse gear.
8. Maintenance
- Screen Cleaning: Use a soft, lint-free cloth slightly dampened with water or a screen cleaner specifically designed for electronics. Do not use harsh chemicals or abrasive materials.
- Software Updates: Periodically check for software updates via the 'Settings' menu to ensure optimal performance and access to new features. A stable Wi-Fi connection is required for updates.
- General Care: Avoid placing heavy objects on the unit or exposing it to direct impact.
9. Troubleshooting
If you encounter issues, refer to the solutions below. If the problem persists, contact technical support.
- No Power:
Solution: Check all wiring connections, especially the power harness and battery connection. Ensure the vehicle's ignition is on. Check vehicle fuses. - No Sound:
Solution: Verify speaker connections. Check volume levels on the stereo and any connected devices. Ensure the audio source is correctly selected. - Touch Screen Unresponsive:
Solution: Perform a soft reset by pressing and holding the power button for 10-15 seconds. If unresponsive, disconnect the vehicle battery for a few minutes and reconnect. - CarPlay/Android Auto Connection Issues:
Solution: Ensure your phone's software is up to date. For wired connections, try a different USB cable. For wireless, ensure Bluetooth and Wi-Fi are enabled and paired correctly. Restart both the stereo and your phone. - GPS Signal Issues:
Solution: Ensure the GPS antenna is properly installed and has a clear line of sight to the sky (e.g., mounted on the dashboard). - Steering Wheel Controls Not Working:
Solution: Reconfigure the steering wheel controls in the unit's settings menu. Ensure the CANBUS box is correctly connected.
10. Specifications
- Model: B09ZYSFTNX
- Screen Size: 10.25 inches
- Display Type: IPS Touch Screen
- Operating System: Android
- RAM: 2GB
- ROM: 32GB
- Connectivity: USB, Wi-Fi, Bluetooth
- Special Features: Wireless Apple CarPlay, Wired Android Auto, Built-In Bluetooth, Lane Assist (via compatible apps), FM Radio, GPS Module, Dual USB Ports, 32-step Equalizer
- Audio Output Mode: Stereo
- Surround Sound Channel Configuration: 4.0
- Video Encoding Support: H.264, H.265/HEVC, MPEG-4
- Color: Black
- Package Dimensions: 41.78 x 33.6 x 13.69 cm
- Weight: 2.36 kg
11. Warranty and Support
Your Dzxiaso Android Stereo comes with a manufacturer's warranty. Please refer to the warranty card included in your package for specific terms and conditions.
For technical assistance, questions, or troubleshooting not covered in this manual, our technical support team is available 24/7. Please contact us via the details provided on your purchase platform or the manufacturer's website. We aim to respond as soon as possible to address your concerns.