1. Introduction
This manual provides essential information for the proper installation, operation, and maintenance of your Jemay AW106 Photoelectric Smoke Detector. This device is designed to detect smoke and alert occupants to potential fire hazards, contributing to home safety. Please read this manual thoroughly before installation and retain it for future reference.

Image 1.1: Front view of the Jemay AW106 Photoelectric Smoke Detector.
2. Important Safety Information
Adherence to these safety guidelines is crucial for the effective operation of your smoke detector and the safety of your household.
- Location: Install smoke detectors on every level of your home, inside each sleeping area, and in the hallway outside each sleeping area.
- Avoid Obstructions: Ensure the smoke detector is not obstructed by furniture, curtains, or other objects that could block smoke entry.
- Regular Testing: Test the smoke detector weekly to ensure it is functioning correctly. Refer to the 'Operation' section for testing instructions.
- Battery Maintenance: Replace the battery immediately when the low battery warning sounds.
- Do Not Paint: Never paint the smoke detector. Paint can clog the sensing chambers and prevent the alarm from operating correctly.
- False Alarms: Understand common causes of false alarms (e.g., cooking smoke, steam) and how to silence the alarm temporarily.
3. Package Contents
Verify that all items are present in the package:
- Jemay AW106 Photoelectric Smoke Detector Unit
- Mounting Bracket
- Screws (2)
- Anchor Plugs (2)
- 9V Replaceable Battery (may be pre-installed or separate)
- User Manual (this document)
4. Product Features
The Jemay AW106 Smoke Detector incorporates advanced features for reliable fire detection:
- Advanced Photoelectric Sensor: Detects slow-burning fires more effectively and reduces false alarms compared to traditional sensors. Responds within 1 second.
- Loud 85dB Alarm: Emits an alarm sound exceeding 85dB at 3 meters, designed to alert occupants effectively.
- LED Indicator: A red LED flashes alongside the audible alarm for visual indication.
- Test/Silence Button: Allows for easy testing of the alarm and temporary silencing of low battery warnings or false alarms.
- Low Battery Reminder: Provides a distinct chirp and LED flash when the 9V battery needs replacement. The silence function can mute this warning for 10 hours.
- Wide Coverage: Effective detection range of 215-430 square feet (20-40 square meters).
- Durable Construction: Made from upgraded Premium ABS Material, offering temperature resistance up to 212°F (100°C) and high durability.
- Replaceable 9V Battery: Powered by a standard 9V battery for easy replacement.

Image 4.1: Exploded view illustrating the internal components, including the photoelectric sensor and replaceable battery.

Image 4.2: Product dimensions and key feature icons.
5. Installation
The Jemay AW106 smoke detector offers flexible installation options.
5.1 Choosing a Location
- Install on the ceiling in the center of a room or hallway.
- If wall-mounted, the top of the alarm should be 4 to 12 inches (10 to 30 cm) from the ceiling.
- Avoid installing near windows, doors, or areas with high airflow, as this can affect smoke detection.
- Keep away from cooking appliances, bathrooms, and heating vents to minimize false alarms.
5.2 Mounting Instructions
The smoke detector can be installed using screws and anchor plugs, or with magnetic mounting for temporary or non-drilling applications.
- Prepare the Mounting Location: Select a suitable location on the ceiling or wall.
- Install Battery: If not already installed, open the battery compartment and insert the 9V battery, ensuring correct polarity. Close the compartment.
- Attach Mounting Bracket:
- For Screw Installation: Mark the positions for the two screw holes using the mounting bracket. Drill holes, insert anchor plugs, and then secure the mounting bracket with the provided screws.
- For Magnetic Installation (if applicable): Attach the adhesive magnetic plate to the desired surface, then attach the corresponding magnetic plate to the back of the smoke detector. Ensure a secure bond.
- Attach Smoke Detector: Align the smoke detector with the mounting bracket and twist clockwise until it locks securely into place.
- Test the Alarm: After installation, press the Test/Silence button for 5 seconds to confirm proper operation. The alarm should sound.

Image 5.1: Illustrates the process of installing the smoke detector.

Image 5.2: Installation options using either magnets or screws.
6. Operation
6.1 Normal Operation
During normal operation, the red LED indicator will flash approximately once every 40-60 seconds, indicating that the unit is powered and functioning correctly.
6.2 Testing the Alarm
It is recommended to test the smoke detector weekly.
- Press and hold the Test/Silence button located on the front of the detector for approximately 5 seconds.
- The alarm will sound a loud, pulsating horn, and the red LED will flash rapidly.
- Release the button. The alarm should stop.
- If the alarm does not sound, refer to the 'Troubleshooting' section.
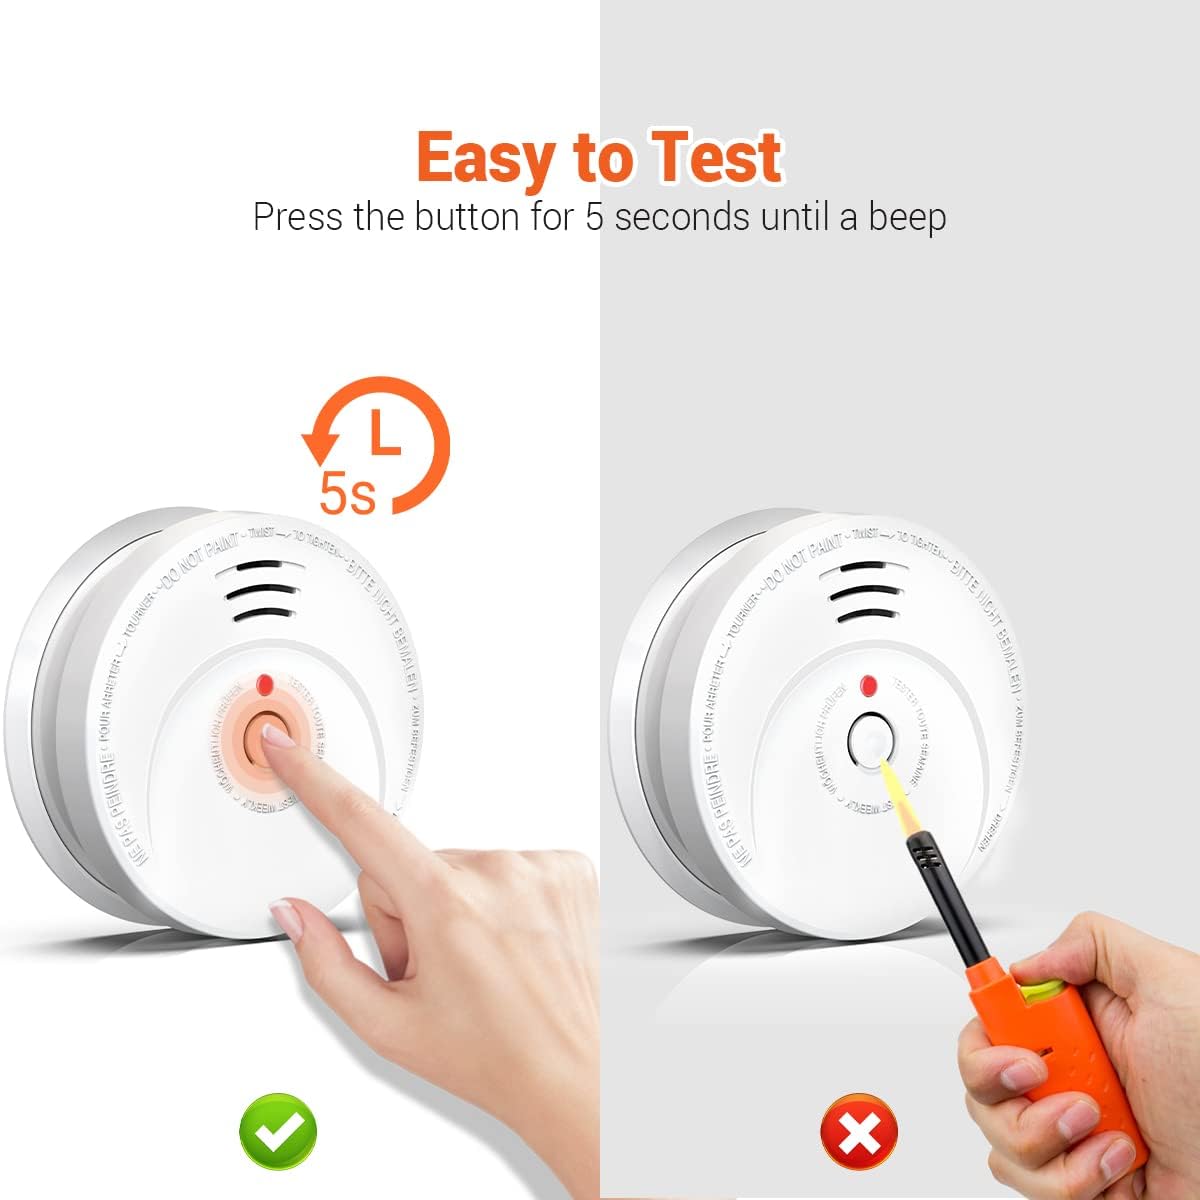
Image 6.1: Pressing the Test/Silence button to test the alarm.
6.3 Alarm Indication
When smoke is detected, the alarm will emit a loud, continuous siren (85dB) and the red LED will flash rapidly.
6.4 Silence Function
The silence function can be used to temporarily quiet the alarm in specific situations:
- False Alarm: If a non-emergency situation (e.g., cooking smoke) triggers the alarm, press the Test/Silence button to temporarily silence the alarm for approximately 10 minutes. The alarm will automatically reset after this period.
- Low Battery Warning: When the low battery warning (a chirp every 40-60 seconds) occurs, pressing the Test/Silence button will mute the chirp for approximately 10 hours. This allows you to replace the battery at a convenient time without constant chirping.
7. Maintenance
Proper maintenance ensures the longevity and reliability of your smoke detector.
7.1 Cleaning
Clean your smoke detector at least once a month to remove dust and debris that could interfere with its operation.
- Gently vacuum the exterior of the detector using a soft brush attachment.
- Do not use water, cleaning solutions, or solvents, as these can damage the unit.
7.2 Battery Replacement
The smoke detector uses a replaceable 9V battery. When the battery is low, the unit will chirp approximately once every 40-60 seconds, and the red LED will flash. Replace the battery immediately.
- Twist the smoke detector counter-clockwise to remove it from the mounting bracket.
- Open the battery compartment.
- Remove the old 9V battery and dispose of it properly.
- Insert a new 9V battery, ensuring correct polarity (+ to + and - to -).
- Close the battery compartment.
- Reattach the smoke detector to the mounting bracket by twisting clockwise until it locks.
- Test the alarm using the Test/Silence button to confirm proper function with the new battery.

Image 7.1: The Jemay AW106 smoke detector with its replaceable 9V battery.
8. Troubleshooting
If your smoke detector is not functioning as expected, refer to the following common issues and solutions:
| Problem | Possible Cause | Solution |
|---|---|---|
| Alarm does not sound during test. | Dead or improperly installed battery. Unit malfunction. | Replace battery. Ensure correct polarity. If problem persists, replace unit. |
| Unit chirps every 40-60 seconds. | Low battery warning. | Replace the 9V battery. Use the silence function for 10 hours if immediate replacement is not possible. |
| Frequent false alarms. | Detector too close to cooking fumes, steam, or high humidity. Dust accumulation. | Relocate the detector further from sources of false alarms. Clean the detector regularly. Use silence function for temporary relief. |
| Red LED not flashing during normal operation. | No power or unit malfunction. | Check battery installation. Replace battery. If problem persists, replace unit. |
9. Specifications
| Model Number | AW106 (GS528A) |
| Sensor Type | Photoelectric |
| Power Source | 9V Replaceable Battery |
| Alarm Loudness | >85dB (at 3 meters) |
| Operating Humidity | Up to 93% relative humidity |
| Upper Temperature Rating | 40°C (104°F) |
| Material | ABS |
| Item Weight | Approximately 6.6 ounces (187 grams) |
| Product Dimensions | 4.9 x 1.5 x 4.9 inches (12.4 x 3.8 x 12.4 cm) |
| Installation Method | Wall-Mounted / Ceiling-Mounted (Screws or Magnets) |
10. Warranty and Support
For warranty information or technical support, please contact Jemay customer service. Details can typically be found on the product packaging or the official Jemay website. Please retain your purchase receipt as proof of purchase.