1. Introduction
This manual provides essential information for the safe and effective operation, maintenance, and troubleshooting of your INGCO RH150038 Rotary Hammer 1050W. Please read these instructions carefully before using the tool and keep them for future reference.
The INGCO RH150038 is a powerful 1050W rotary hammer designed for heavy-duty drilling and chiseling tasks in concrete, metal, and wood. It features a robust motor, SDS-Plus chuck system, and multiple functions to enhance versatility and efficiency.

Figure 1.1: INGCO RH150038 Rotary Hammer with included accessories and carrying case.
2. General Safety Instructions
Always follow basic safety precautions to reduce the risk of fire, electric shock, and personal injury when operating power tools.
- Work Area Safety: Keep the work area clean and well-lit. Cluttered or dark areas invite accidents. Do not operate power tools in explosive atmospheres, such as in the presence of flammable liquids, gases, or dust.
- Electrical Safety: Power tool plugs must match the outlet. Never modify the plug. Avoid body contact with earthed or grounded surfaces. Do not expose power tools to rain or wet conditions.
- Personal Safety: Always wear eye protection. Use hearing protection when operating noisy tools. Dress properly; avoid loose clothing or jewelry. Secure long hair.
- Tool Use and Care: Do not force the power tool. Use the correct power tool for your application. Disconnect the plug from the power source before making any adjustments, changing accessories, or storing power tools.
- Kickback: Be aware of potential kickback, especially when drilling into hard materials or if the bit binds. Maintain a firm grip on the tool.
3. Product Components and Included Accessories
Familiarize yourself with the parts of your rotary hammer and the accessories provided.
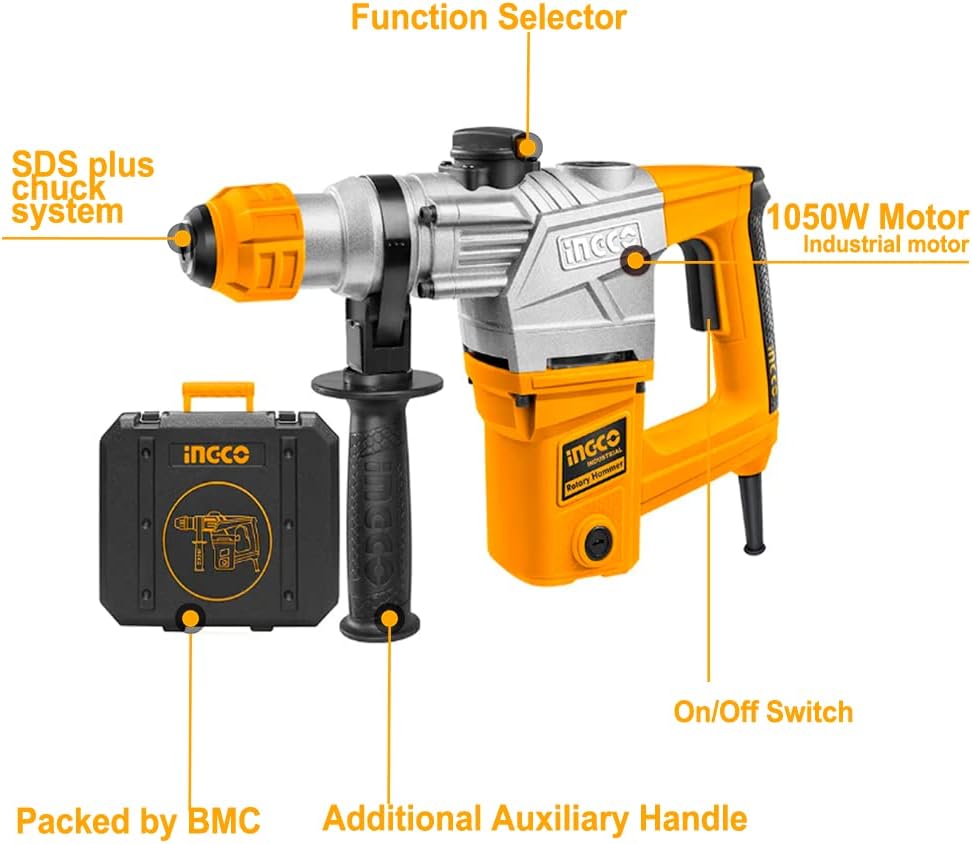
Figure 3.1: Key components of the INGCO RH150038 Rotary Hammer.
Key Components:
- SDS Plus Chuck System: For quick and secure bit changes.
- Function Selector: To switch between drilling, hammer drilling, and chiseling modes.
- 1050W Industrial Motor: Provides powerful performance.
- On/Off Switch: Controls power to the tool.
- Additional Auxiliary Handle: For improved control and stability.
- BMC Case: Blow Molded Case for storage and transport.

Figure 3.2: The rotary hammer with its full set of accessories, including a tube of grease, a wrench, spare carbon brushes, and various SDS-Plus drill bits and chisels.
Included Accessories:
- SDS-Plus Drill Bits (various sizes)
- SDS-Plus Chisels (flat and point)
- Auxiliary Handle
- Depth Gauge
- Grease Tube
- Wrench
- Spare Carbon Brushes
- BMC Carrying Case

Figure 3.3: A selection of the included SDS-Plus drill bits and chisels.
4. Setup
4.1 Attaching the Auxiliary Handle
- Loosen the auxiliary handle by twisting it counter-clockwise.
- Slide the handle onto the front barrel of the rotary hammer.
- Adjust the handle to a comfortable and secure position for your work.
- Tighten the handle by twisting it clockwise until it is firmly secured.
4.2 Inserting SDS-Plus Bits
The SDS-Plus chuck system allows for quick and efficient bit changes.
- Ensure the tool is unplugged from the power source.
- Pull back the chuck collar towards the tool body.
- Insert the SDS-Plus bit into the chuck, rotating it slightly until it clicks into place.
- Release the chuck collar. The bit should have a small amount of play (in-and-out movement) which is normal for SDS-Plus systems.
- To remove the bit, pull back the chuck collar and pull the bit out.

Figure 4.1: Demonstrating the quick loading and release of an SDS-Plus drill bit.
5. Operating Instructions
5.1 Selecting Operating Mode
The INGCO RH150038 offers three functions: Hammer Drilling, Drilling, and Chiseling. Use the function selector switch located on the top of the tool to choose the desired mode.
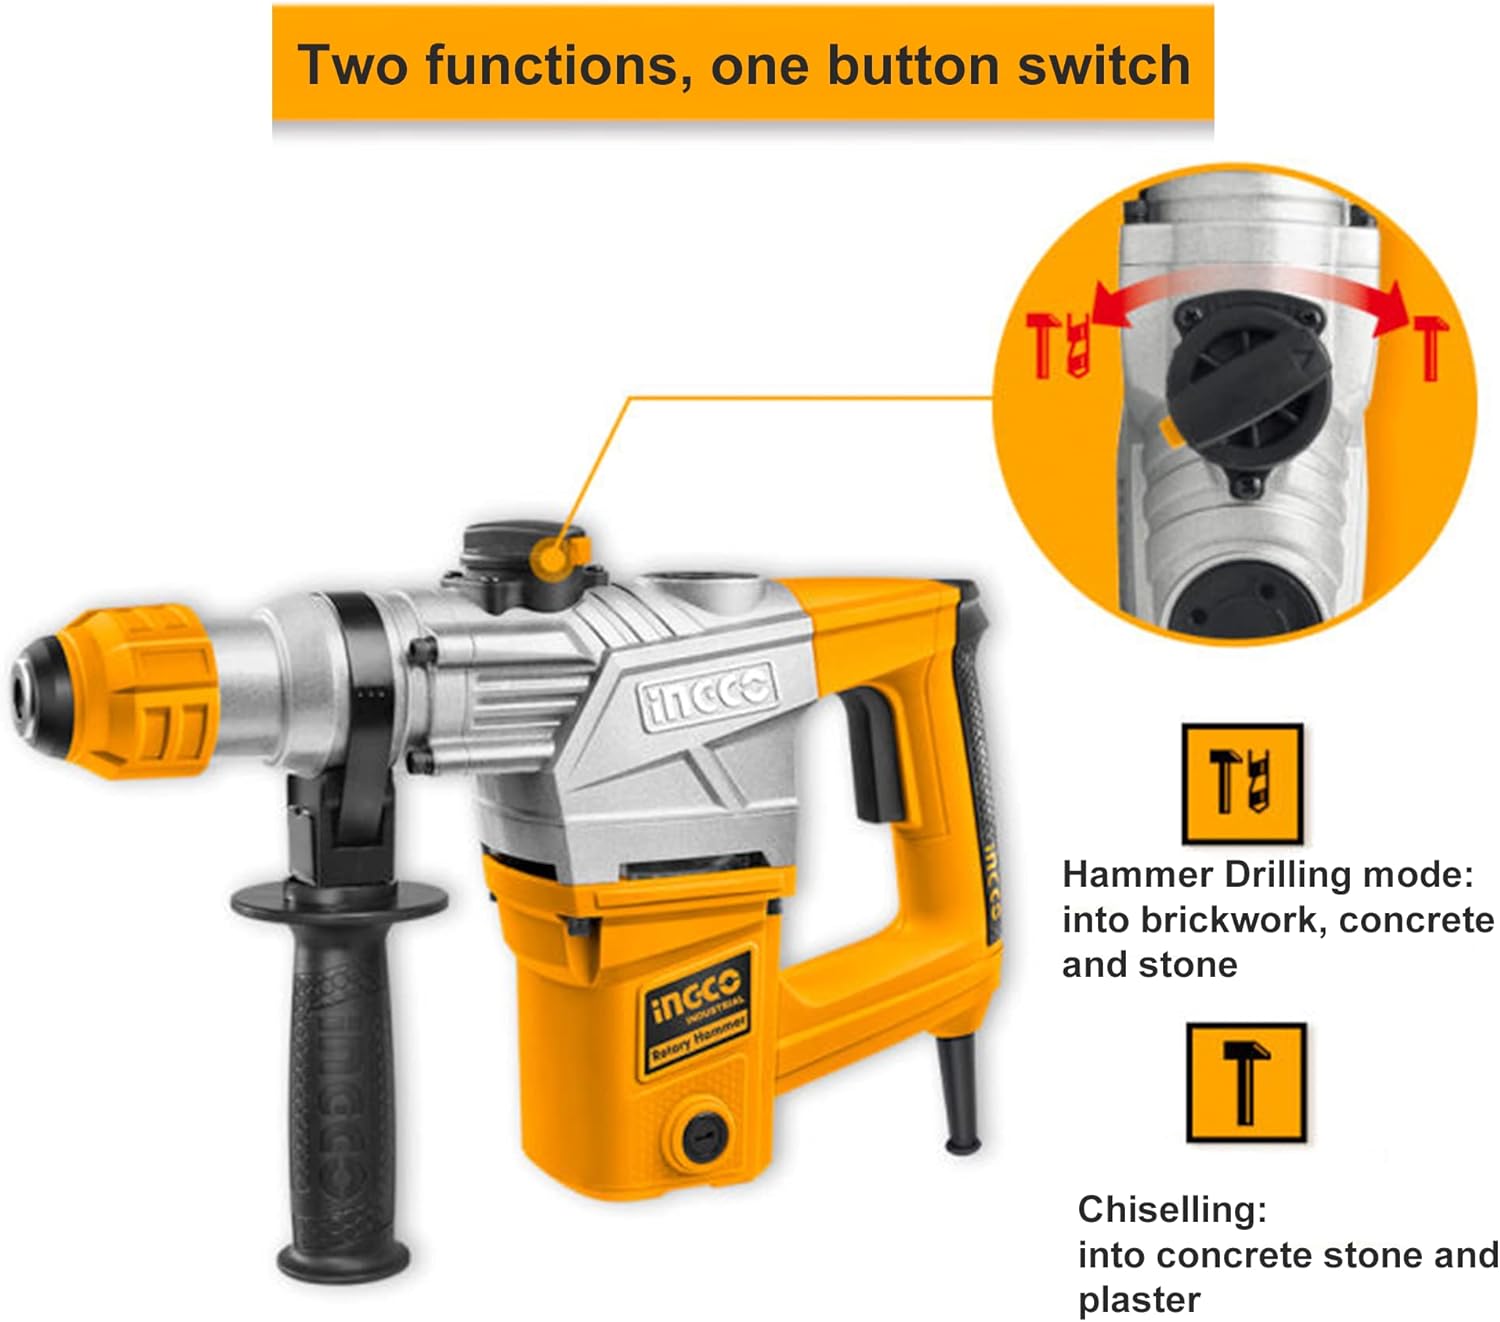
Figure 5.1: The function selector switch for Hammer Drilling and Chiseling modes.
- Hammer Drilling Mode: For drilling into brickwork, concrete, and stone. This mode combines rotation with hammering action.
- Drilling Mode: For drilling into wood, metal, and plastics without hammering action. (Note: This mode is typically represented by a drill bit icon, though not explicitly shown in the provided image, it's a standard 3-function feature).
- Chiseling Mode: For light demolition work, chipping, and channeling in concrete, stone, and plaster. This mode provides hammering action without rotation.
5.2 General Operation
- Ensure the correct bit is installed and the desired operating mode is selected.
- Plug the tool into a suitable power outlet (220V).
- Hold the tool firmly with both hands, using the main handle and the auxiliary handle.
- Position the bit on the workpiece.
- Press the On/Off switch to start the tool.
- Apply steady, even pressure. Do not force the tool; let the tool do the work.
- To stop the tool, release the On/Off switch.
5.3 Drilling Capacity
The INGCO 1050W rotary hammer drill offers the following maximum drilling capacities:
- Concrete: 28mm
- Steel: 13mm
- Wood: 40mm
6. Maintenance
Regular maintenance ensures the longevity and optimal performance of your rotary hammer.
- Cleaning: After each use, clean the tool with a dry cloth. Remove any dust or debris from ventilation openings. Do not use water or chemical cleaners.
- Lubrication: Periodically apply the provided grease to the SDS-Plus chuck and bit shanks to ensure smooth operation and reduce wear. Refer to Figure 3.2 for the grease tube.
- Carbon Brushes: The tool is equipped with replaceable carbon brushes. If the motor performance decreases or sparks become excessive, the carbon brushes may need replacement. Refer to Figure 3.2 for spare carbon brushes. Consult a qualified technician for replacement if you are unsure.
- Cord Inspection: Regularly inspect the power cord for damage. If damaged, have it repaired by a qualified service agent.
7. Troubleshooting
If you encounter issues with your rotary hammer, refer to the following common troubleshooting steps:
- Tool does not start:
- Check if the power cord is securely plugged into a working outlet.
- Verify the On/Off switch is fully engaged.
- Inspect the power cord for damage.
- Reduced power or excessive sparking:
- Carbon brushes may be worn. Replace them as described in the Maintenance section or consult a technician.
- Ensure the correct voltage (220V) is being supplied.
- Bit not rotating or hammering effectively:
- Check if the function selector is in the correct mode for the task.
- Ensure the SDS-Plus bit is correctly inserted and locked into the chuck.
- The bit may be dull or damaged; replace if necessary.
For issues not resolved by these steps, contact INGCO customer support or a qualified service center.
8. Specifications
Detailed technical specifications for the INGCO RH150038 Rotary Hammer 1050W.

Figure 8.1: Product dimensions of the INGCO RH150038 Rotary Hammer.
| Specification | Value |
|---|---|
| Model Number | 1050W |
| Power Source | Corded Electric |
| Voltage | 220 Volts |
| Maximum Power | 1050 Watts |
| Speed | 900 RPM |
| Item Weight | 1.07 Kilograms |
| Product Dimensions (L x W x H) | 30 x 30 x 20 cm |
| Material | Metal |
| Special Features | Reverse Rotation |
| Included Components | Adapter (likely referring to the chuck adapter or a general term for accessories) |
9. Warranty and Support
INGCO is committed to providing reliable tools. For warranty information, service, or technical support, please refer to the warranty card included with your product or visit the official INGCO website. Keep your purchase receipt as proof of purchase for any warranty claims.