1. Introduction
This manual provides instructions for the safe and efficient operation, maintenance, and care of your Cook's Aid Manual Pasta Maker Machine. Please read this manual thoroughly before first use and retain it for future reference.

Figure 1: Cook's Aid Manual Pasta Maker Machine. This image displays the complete pasta maker machine with its main body, hand crank, and table clamp.
2. Safety Instructions
- Always ensure the machine is securely clamped to a stable surface before use.
- Keep fingers and loose clothing away from the rollers and cutters during operation.
- Do not immerse the machine in water. Clean with a dry cloth or brush.
- Keep out of reach of children.
- Use only for its intended purpose of making pasta.
3. Package Contents
Verify that all components are present upon unpacking:
- Pasta Maker Machine Body
- Removable Hand Crank
- Base Fixed Clamp
4. Product Overview
The Cook's Aid Manual Pasta Maker Machine is constructed from food-grade 430 stainless steel and carbon steel with nickel plating. Key components include:
- Dough Rollers: For flattening pasta dough to desired thickness.
- Pasta Cutters: Integrated cutters for different pasta widths.
- Thickness Adjustment Knob: Controls the gap between rollers for 7 thickness settings.
- Removable Hand Crank: Operates the rollers and cutters.
- Table Clamp: Secures the machine to a countertop.
- Rubber Gasket Base: Provides stability and prevents slipping.

Figure 2: Key features of the pasta maker, including durable stainless steel construction, a rubber gasket base for stability, a stable table clamp, and an anti-skid removable crank handle.
5. Setup
- Unpack: Carefully remove all components from the packaging.
- Clean: Wipe down the machine with a dry cloth to remove any manufacturing residues. Do not wash with water.
- Attach Clamp: Insert the table clamp into the designated hole on the machine's base.
- Secure Machine: Place the pasta maker on a clean, stable countertop. Tighten the table clamp securely to ensure the machine does not move during operation. The clamp fits tables 0.4-1.6 inches (1-4 cm) thick.
- Insert Handle: Insert the removable hand crank into the roller drive shaft.
6. Operating Instructions
6.1. Dough Preparation
Prepare your pasta dough according to your preferred recipe. Ensure the dough is firm, elastic, and not too sticky. Dust lightly with flour if necessary.
6.2. Rolling Pasta Sheets
The machine offers 7 adjustable thickness settings, ranging from 0.5 mm to 3 mm, for consistent pasta sheets.
- Set Thickness: Pull out and rotate the adjustment knob on the side of the machine to select the widest setting (typically '7' or '1' depending on the indicator, referring to the thickest sheet).
- Initial Rolling: Flatten a small portion of dough by hand and feed it through the smooth rollers while turning the hand crank.
- Fold and Repeat: Fold the rolled dough in half or thirds, dust lightly with flour, and pass it through the rollers again at the same setting. Repeat this process several times until the dough is smooth and pliable.
- Gradual Thinning: Gradually adjust the thickness knob to a thinner setting (e.g., from '7' to '6', then '5', and so on). Pass the dough through the rollers once or twice at each setting until the desired thickness is achieved.

Figure 3: Illustration of the 7 adjustable thickness settings knob and examples of pasta types suitable for different thicknesses (e.g., thin noodles, spaghetti, lasagna, ravioli).
6.3. Cutting Pasta
Once your pasta sheet is rolled to the desired thickness, you can use the integrated cutters to create different pasta shapes.
- Select Cutter: The machine features two cutting widths: 1.5 mm (for spaghetti) and 6.6 mm (for fettuccine).
- Feed Dough: Carefully feed the pasta sheet into the desired cutter opening while turning the hand crank steadily.
- Collect Pasta: As the pasta emerges, collect it and place it on a floured surface or a pasta drying rack to prevent sticking.

Figure 4: Demonstrates the two adjustable cutting widths, showing how pasta sheets are transformed into 1.5 mm spaghetti and 6.6 mm fettuccine.
6.4. Making Various Pasta Types
This machine is suitable for making a variety of fresh pasta, including:
- Spaghetti (1.5 mm width)
- Fettuccine (6.6 mm width)
- Lasagna sheets (rolled to desired thickness)
- Dumpling skins (rolled to desired thickness)
- Ravioli or Tortellini (using rolled sheets)
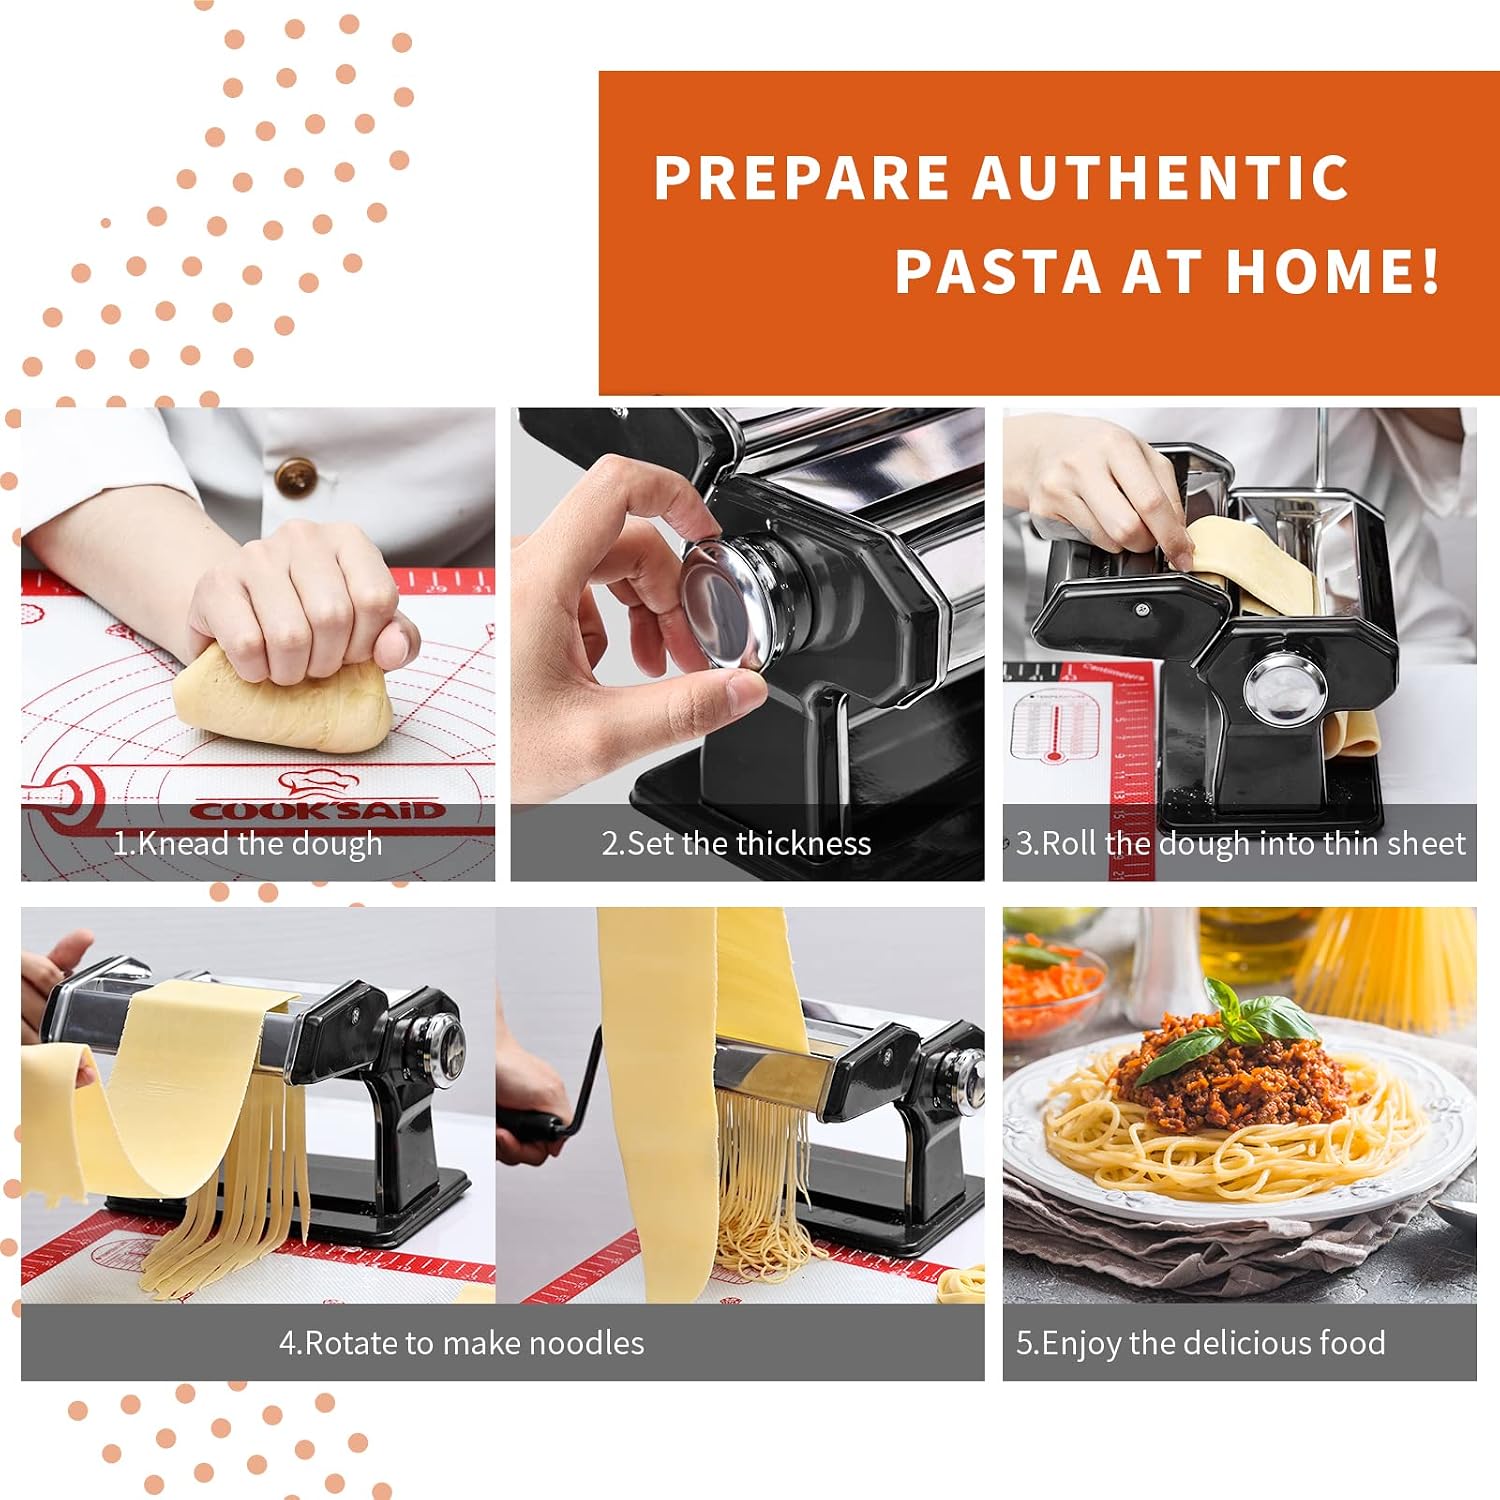
Figure 5: A visual guide illustrating the five steps to prepare pasta: 1. Knead the dough, 2. Set the thickness, 3. Roll the dough into a thin sheet, 4. Rotate the crank to make noodles, 5. Enjoy the finished dish.

Figure 6: A collage showcasing various homemade pasta types that can be created with the machine, including Linguine, Farfalle, Spaghetti, Fettuccine, Taglioni, and more.
7. Cleaning and Maintenance
Proper cleaning and maintenance will extend the life of your pasta maker.
- Do Not Wash: Never immerse the machine in water or wash it in a dishwasher. Water can damage the internal mechanisms and cause rust.
- Remove Residue: After each use, allow any dough residue to dry on the machine. Once dry, use a stiff brush or a wooden skewer to gently remove dried dough from the rollers and cutters.
- Wipe Clean: Wipe the exterior of the machine with a dry or slightly damp cloth.
- Storage: Store the machine in a dry place. The detachable design allows for easier storage.
8. Troubleshooting
- Dough Sticking to Rollers: Ensure your dough is firm enough and lightly floured. If the dough is too wet, add more flour. If it's too dry, add a tiny amount of water.
- Handle Slipping Off: Ensure the hand crank is fully inserted into the drive shaft. Apply firm, steady pressure when turning.
- Uneven Pasta Sheets: Ensure the dough is consistently kneaded and folded multiple times at the widest setting before gradually thinning.
- Difficulty Cutting Pasta: Ensure the pasta sheet is not too thick for the cutters and is adequately floured to prevent sticking.
9. Specifications
| Feature | Specification |
|---|---|
| Brand | Cook's Aid |
| Color | Black |
| Material | Stainless Steel (Body), Carbon Steel (Blade) |
| Operation Mode | Manual |
| Thickness Settings | 7 (0.5 to 3 mm) |
| Cutting Widths | 1.5 mm, 6.6 mm |
| Product Dimensions | 8.3 x 7.9 x 6.3 inches |
| Item Weight | 5.28 pounds |
| Dishwasher Safe | No |

Figure 7: Diagram illustrating the dimensions of the pasta maker machine: 8.3 inches in length, 7.9 inches in width, and 6.3 inches in height.
10. Warranty and Support
For any questions, concerns, or support needs regarding your Cook's Aid Manual Pasta Maker Machine, please contact the manufacturer directly. Refer to your purchase documentation for specific warranty details and contact information.