Ascher RJ-WR03
Ascher Bathroom Vanity Light Fixture Instruction Manual
Model: RJ-WR03 | Brand: Ascher
1. Introduction
Thank you for choosing the Ascher Bathroom Vanity Light Fixture. This manual provides detailed instructions for the safe installation, operation, and maintenance of your new lighting product. Please read this manual thoroughly before installation and retain it for future reference. This 3-light fixture features a sturdy metal body with clear glass shades, designed to complement various interior styles from modern to rustic, suitable for bathrooms, kitchens, living rooms, and hallways.
2. Safety Information
WARNING: To reduce the risk of fire, electric shock, or personal injury, always follow these safety precautions:
- Always turn off the main power at the circuit breaker or fuse box before beginning installation, maintenance, or bulb replacement.
- Consult a qualified electrician if you are unsure about the installation process.
- Ensure all electrical connections are made in accordance with local codes, ordinances, and the National Electric Code (NEC).
- Do not exceed the maximum wattage specified for the bulbs (Max 60W per bulb).
- Handle glass components with care to prevent breakage.
- Keep flammable materials away from the light fixture when in operation.
3. Package Contents
Please verify that all components are present and undamaged before proceeding with installation.
- Ascher Bathroom Vanity Light Fixture (1 unit)
- Mounting Hardware (screws, wire nuts, mounting plate)
- Clear Glass Shades (3 units)
Note: E26 base bulbs are NOT included and must be purchased separately.
4. Specifications
| Feature | Description |
|---|---|
| Brand | Ascher |
| Model Number | RJ-WR03 |
| Color | Black |
| Material | Glass, Metal |
| Product Dimensions | 16.93"L x 6.1"W x 11.02"H |
| Light Fixture Form | Sconce |
| Bulb Base | E26 |
| Number of Light Sources | 3 |
| Max Wattage per Bulb | 60 Watts |
| Voltage | 120 Volts (AC) |
| Special Feature | Dimmable (with compatible bulbs and dimmer switch) |
| Installation Type | Wall Mount |
5. Setup & Installation
Before starting, ensure the power is turned off at the circuit breaker. All mounting hardware is included for a straightforward installation.
- Prepare the Mounting Surface: Ensure the electrical box is securely mounted in the wall.
- Attach Mounting Plate: Secure the mounting plate to the electrical box using the provided screws.
- Make Electrical Connections: Connect the fixture's wires to the corresponding household wires (black to black, white to white, ground to ground) using the wire nuts. Ensure connections are secure.
- Mount the Fixture: Carefully align the fixture with the mounting plate and secure it with the decorative nuts or screws. The fixture can be mounted facing upward or downward based on your preference.
- Install Glass Shades: Gently attach each clear glass shade to the fixture.
- Insert Bulbs: Screw in the E26 base bulbs (not included) into each socket. Do not overtighten.
- Restore Power: Turn the power back on at the circuit breaker.
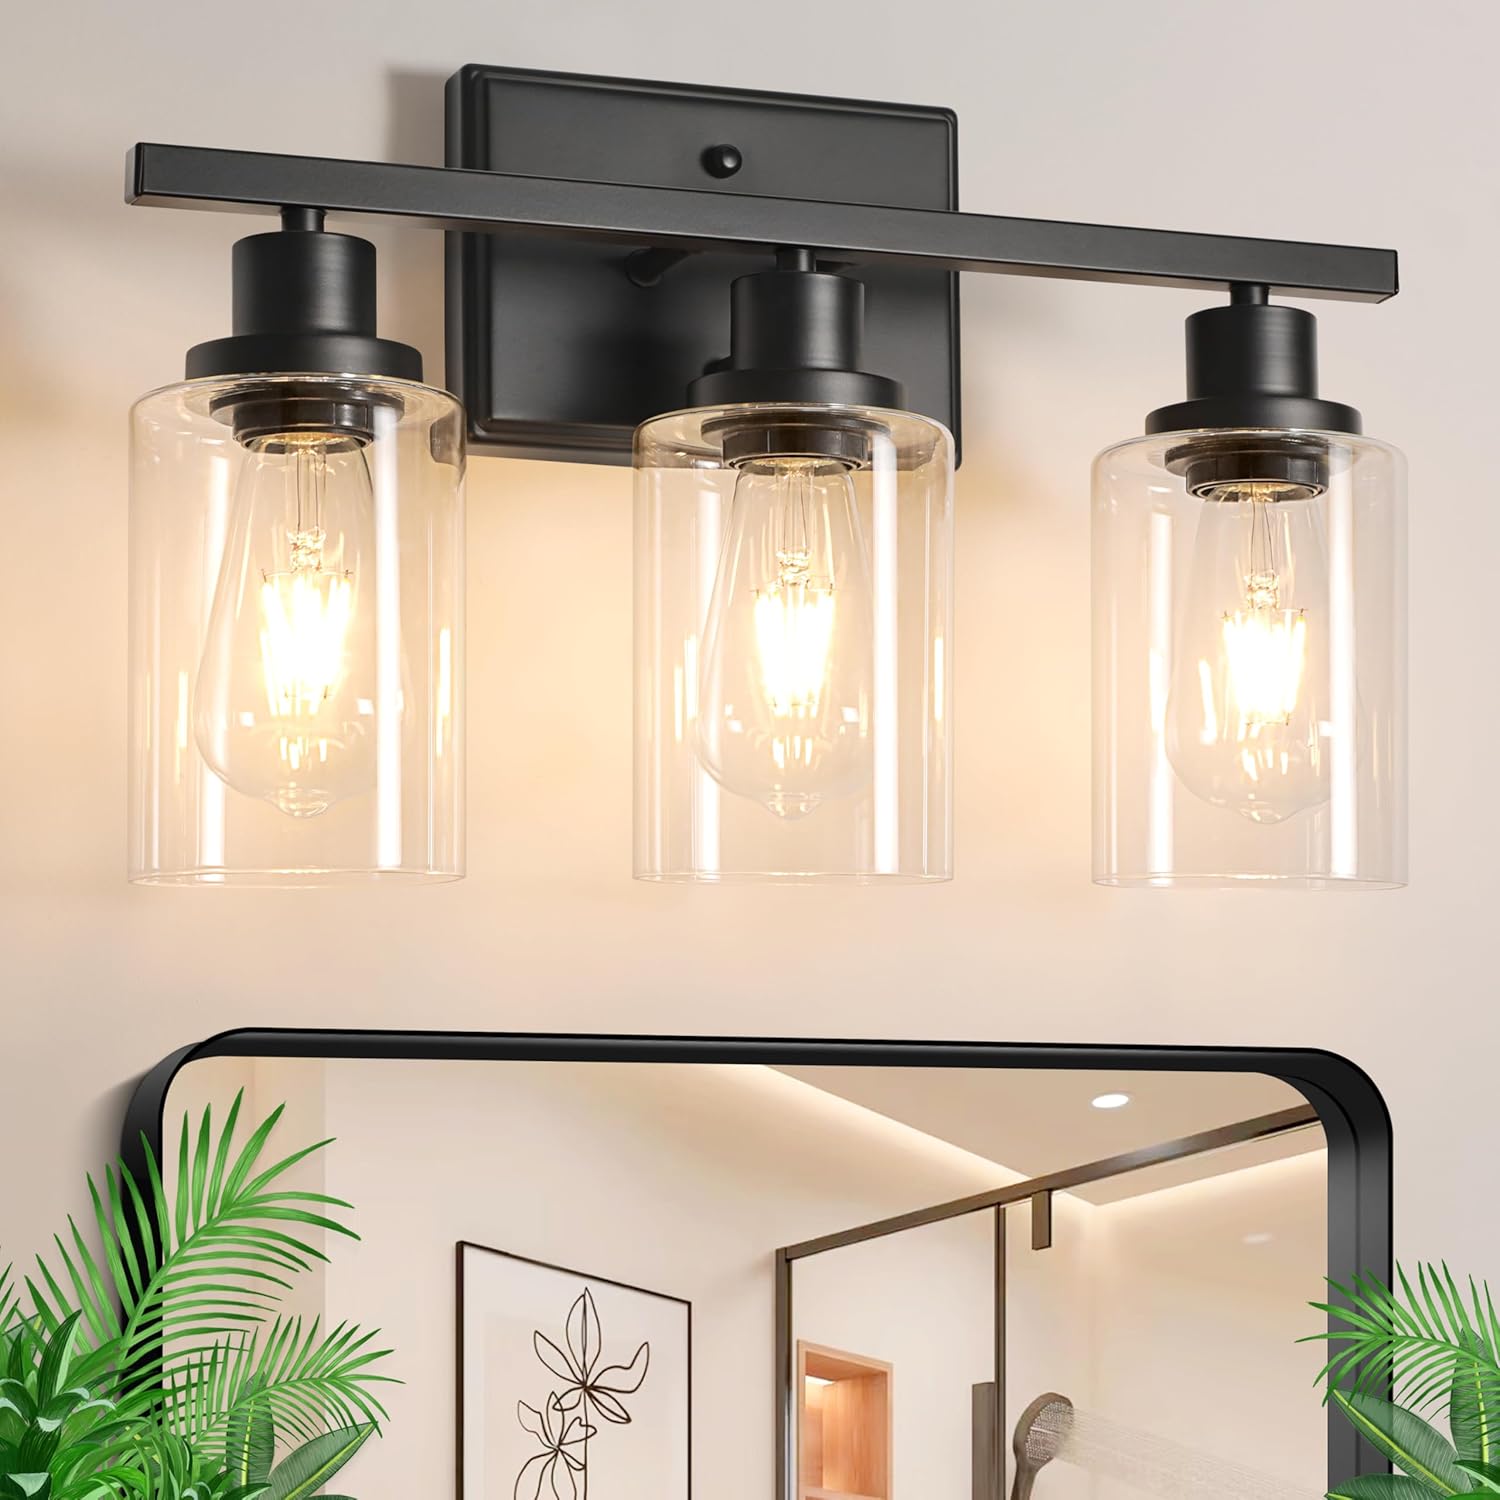
Figure 5.1: Front view of the Ascher 3-Light Bathroom Vanity Light Fixture.

Figure 5.2: The fixture can be installed with lights facing upward or downward.

Figure 5.3: Detailed dimensions and E26 bulb base compatibility.
6. Operating Instructions
Once installed and power is restored, the light fixture operates via your standard wall switch. If using dimmable bulbs and a compatible dimmer switch (not included), you can adjust the light intensity to your desired level.

Figure 6.1: Example of warm light versus cold light output, depending on bulb choice.
7. Maintenance
Regular maintenance will help preserve the appearance and functionality of your light fixture.
- Cleaning: Always turn off the power and allow the fixture to cool before cleaning. Wipe the metal parts with a soft, dry cloth. For glass shades, use a mild glass cleaner and a soft cloth. Avoid abrasive cleaners or solvents that may damage the finish.
- Bulb Replacement: Ensure power is off. Allow bulbs to cool completely before touching. Unscrew the old bulb and screw in a new E26 base bulb (Max 60W).
- Inspection: Periodically check all connections and mounting hardware to ensure they remain secure.
8. Troubleshooting
If you encounter issues with your light fixture, refer to the following common problems and solutions:
| Problem | Possible Cause | Solution |
|---|---|---|
| Light does not turn on | No power to fixture, loose wiring, faulty bulb, tripped circuit breaker. | Check circuit breaker, ensure all wiring connections are secure, replace bulb, test power at the outlet. |
| Light flickers | Loose bulb, incompatible dimmer switch/bulb, loose wiring. | Tighten bulb, ensure dimmer and bulb are compatible, check wiring connections. |
| Glass shade is loose | Shade not properly secured. | Gently tighten the retaining ring or screws holding the shade in place. |
If the problem persists after attempting these solutions, please contact Ascher customer support for further assistance.
9. Warranty and Support
Ascher products are manufactured with quality and durability in mind. For specific warranty information regarding your Ascher Bathroom Vanity Light Fixture (Model RJ-WR03), please refer to the warranty card included with your purchase or visit the official Ascher website. For technical support, replacement parts, or any other inquiries, please contact Ascher customer service directly.
Ascher Customer Service: Please refer to the contact information provided on the product packaging or the official Ascher brand store on Amazon.