1. Introduction
Thank you for choosing the PayLessHere 15-Inch Push Mower Reel Mower. This manual provides essential information for the safe assembly, operation, and maintenance of your new lawn mower. Please read this manual thoroughly before use and keep it for future reference. This manual applies to models with an adjustable cutting height from 12mm to 45mm.
2. Safety Information
Always prioritize safety when operating any lawn care equipment. Failure to follow these instructions may result in injury or damage to the product.
- Read the Manual: Understand all instructions and warnings before operating the mower.
- Personal Protective Equipment: Wear appropriate footwear, eye protection, and long pants.
- Clear the Area: Before mowing, remove all debris, rocks, toys, and other objects from the lawn that could be thrown by the blades.
- Keep Bystanders Away: Ensure children, pets, and other people are at a safe distance from the mowing area.
- Proper Operation: Push the mower at a steady, comfortable pace. Do not run with the mower.
- Slope Safety: Exercise extreme caution when mowing on slopes. Mow across the face of slopes, never up and down. Avoid excessively steep slopes.
- Blade Awareness: Never place hands or feet near the rotating blades. Always ensure the blades have stopped completely before performing any adjustments or maintenance.
- Maintenance: Perform regular maintenance as described in this manual to ensure safe and efficient operation.
3. Package Contents
Verify that all components are present and undamaged upon unpacking. If any parts are missing or damaged, contact customer support.
- Reel Mower Base Unit (with 5 steel blades)
- Upper Handle Assembly
- Lower Handle Assembly
- Grass Catcher
- Assembly Hardware (knobs, screws, bolts)
- User Manual
4. Assembly Instructions
Assembly is required before first use. Follow these steps carefully.
4.1 Attaching the Handle
- Connect the lower handle assembly to the mower base unit using the provided bolts and adjustable knobs. Ensure a secure fit.
- Attach the upper handle assembly to the lower handle assembly, aligning the holes and securing with the remaining bolts and knobs.
- Ensure all connections are tight and the handle is stable. The handle features a non-slip sponge design for comfortable grip.

Figure 4.1: Non-slip sponge handle design for comfortable use.
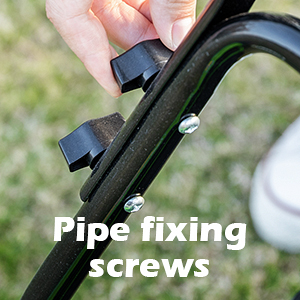
Figure 4.2: Pipe fixing screws for securing the handle sections.
4.2 Attaching the Grass Catcher
- Unfold the grass catcher.
- Hook the grass catcher onto the designated attachment points at the rear of the mower base unit. Ensure the straps or buckles are securely fastened.
- The grass catcher is designed for easy disassembly and removal for emptying.

Figure 4.3: Securely fasten the grass catcher sling.
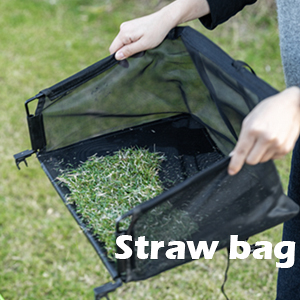
Figure 4.4: The grass catcher, ready for use or emptying.
5. Operating Instructions
Proper operation ensures an effective cut and extends the life of your mower.
5.1 Adjusting Cutting Height
The mower features an adjustable cutting height mechanism, allowing you to select a grass height between 12mm and 45mm.
- Ensure the mower is on a flat, stable surface and the blades are not rotating.
- Locate the gear adjustment levers near the wheels on each side of the mower base.
- Adjust both levers simultaneously to raise or lower the cutting deck to your desired height. Ensure both sides are set to the same height for an even cut.
- A higher setting is recommended for taller grass or for the first cut of the season.

Figure 5.1: Adjustable cutting height from 12mm to 45mm.

Figure 5.2: Key details including height adjustment mechanism.
5.2 Mowing Tips
- Best Time to Mow: Mow when the grass is dry. Wet grass can clog the blades and lead to an uneven cut.
- Overlap Passes: Overlap each mowing pass slightly to ensure complete coverage and avoid missed strips.
- Change Direction: Vary your mowing pattern each time to prevent matting and promote healthier grass growth.
- Avoid Overloading: If the grass is very tall, raise the cutting height for the first pass, then lower it for a second pass to achieve the desired length. This prevents jamming and excessive strain.
- Sharp Blades: Ensure blades are sharp for a clean cut. Dull blades tear grass, leading to an unhealthy lawn.

Figure 5.3: Demonstrating the clean cut of the manual lawn mower.
5.3 Using the Grass Catcher
The removable grass catcher collects clippings for a tidy lawn.
- Attach the grass catcher as described in Section 4.2.
- As you mow, grass clippings will be directed into the catcher.
- Periodically check the catcher and empty it when full to maintain optimal collection efficiency.
- To empty, detach the catcher and dispose of the clippings responsibly.

Figure 5.4: Detachable collection bag for easy emptying.
5.4 Product Demonstration Video
Watch this video for a visual guide on operating the PayLessHere 15-Inch Push Mower Reel Mower, including assembly and usage tips.
Video 5.1: A demonstration of the PayLessHere 15-Inch Push Mower Reel Mower in use, showing its features and operation.
6. Maintenance
Regular maintenance ensures the longevity and performance of your mower.
6.1 Blade Care
- The mower is equipped with 5 sharp alloy steel blades.
- Inspect blades regularly for sharpness and damage. Dull blades can tear grass, leading to an unhealthy lawn.
- If blades become dull, they can be sharpened by a professional or with a reel mower sharpening kit.
- Always wear heavy-duty gloves when handling or inspecting blades.

Figure 6.1: The manganese steel cutter head with 5 rotating blades.
6.2 Cleaning
- After each use, clean grass clippings and debris from the mower deck, blades, and wheels.
- Use a stiff brush or cloth. Avoid using a high-pressure washer directly on bearings or moving parts.
- Ensure the mower is completely dry before storage to prevent rust.
6.3 Storage
- Store the mower in a clean, dry area, away from direct sunlight and moisture.
- The compact design allows for easy storage.
7. Troubleshooting
Refer to this section for common issues and their solutions.
| Problem | Possible Cause | Solution |
|---|---|---|
| Mower is difficult to push | Grass is too tall or wet; cutting height is too low; dull blades. | Raise the cutting height; wait for grass to dry; sharpen blades. |
| Uneven cut | Cutting height not set evenly on both sides; dull blades; debris caught in blades. | Ensure both height adjustment levers are at the same setting; sharpen blades; clear any obstructions. |
| Grass catcher not collecting effectively | Catcher is full; catcher not properly attached. | Empty the grass catcher; re-attach the catcher securely. |
| Blade comes off or becomes loose | Impact with hard object; loose fasteners. | Inspect for damage; ensure all blade fasteners are tight. If damage is significant, contact customer support for replacement parts or service. |
8. Specifications
- Brand: PayLessHere
- Model Number: 15-Inch Lawn Mowers
- Power Source: Manual
- Material: Alloy Steel
- Color: Green
- Item Weight: Approximately 14 Pounds (6.35 kg)
- Cutting Width: 15 Inches (38.1 cm)
- Adjustable Cutting Height: 12mm to 45mm (0.47 Inches to 1.77 Inches)
- Product Dimensions: 20.48"D x 49.64"W x 23.25"H (52cm D x 126cm W x 59cm H)
- Assembly Required: Yes
- UPC: 195030070953

Figure 8.1: Commodity parameters and dimensions of the mower and grass catcher.

Figure 8.2: Overall dimensions of the assembled mower.
9. Warranty and Support
For warranty information, replacement parts, or technical support, please contact the retailer or manufacturer directly. Keep your purchase receipt as proof of purchase.