CKYSCHN A160
CKYSCHN WLtoys A160 J3 RC Plane Instruction Manual
Model: A160
1. Introduction
This manual provides essential information for the safe and effective operation of your CKYSCHN WLtoys A160 J3 RC Plane. Please read it thoroughly before assembly and flight to ensure proper usage and to maximize your enjoyment of this remote-controlled aircraft.

Image 1.1: The CKYSCHN WLtoys A160 J3 RC Plane and its included accessories.
2. Safety Precautions
Operating a remote-controlled aircraft requires caution. Failure to follow these safety guidelines may result in injury or damage to property.
- Always operate the RC plane in open areas, away from people, buildings, and obstacles.
- Do not fly near airports or restricted airspace.
- Ensure batteries are fully charged and securely installed before each flight.
- Never attempt to catch a flying plane.
- Keep fingers and loose clothing away from the propeller when the motor is active.
- Supervise children during operation. Recommended age for users is 14 years and up.
- Do not fly in strong winds or adverse weather conditions.
3. Package Contents
Verify that all items listed below are present in your package:

Image 3.1: Visual representation of the package contents.
- WLtoys A160 J3 RC Plane (1)
- Remote Controller (1)
- 7.4V 600mAh Lithium Polymer Battery (2)
- USB Charging Cable (2)
- Propeller (1)
- Screwdriver (1)
- Instruction Manual (1)
4. Setup and Assembly
Follow these steps to assemble your RC plane:

Image 4.1: Illustrated guide for plane assembly.
- Install the Horizontal Tail: Carefully slide the horizontal tail into its designated slot at the rear of the fuselage.
- Assemble the Wings and Connect Steering Gear: Attach the two wing halves together. Connect the steering gear (servos) wires from the wings to the main fuselage.
- Install the Wings: Secure the assembled wings to the fuselage, ensuring all connections are firm.
- Install the Landing Gear: Attach the landing gear assembly to the underside of the fuselage.
- Screw on the Screws: Use the provided screwdriver to secure all necessary screws, ensuring the plane is structurally sound.
- Install the Strut: Attach the wing struts from the fuselage to the wings for added support.
5. Operating Instructions
5.1 Battery Charging
The plane uses 7.4V 600mAh Lithium Polymer batteries. Use the provided USB charging cables to charge the batteries. Charging typically takes 30-60 minutes. Always disconnect the battery from the airplane when not in use.
5.2 Remote Control Overview
Familiarize yourself with the remote control layout:

Image 5.2: Remote control layout and functions (Mode 2).
- Antenna: For signal transmission.
- Press To 6G/3D Conversion: Button to switch between flight modes.
- Press Down On The Size Of The Rudder Conversion: Adjusts rudder sensitivity.
- Lift/Aileron Stick (Right Stick): Controls elevator (pitch) and ailerons (roll).
- Throttle/Direction Joystick (Left Stick): Controls throttle (power) and rudder (yaw).
- Throttle Trim: Fine-tunes throttle neutral position.
- Switch: Power switch for the remote.
- Fine Adjustment: General trim adjustments.
- Elevator Trim: Fine-tunes elevator neutral position.
- Aileron Trim: Fine-tunes aileron neutral position.
- LCD Monitor: Displays flight information and settings.
5.3 Frequency Binding
To establish communication between the remote control and the plane:

Image 5.3: Steps for frequency binding.
- Install the batteries needed for the plane and remote.
- Pull the throttle stick to the lowest position first.
- Turn on the remote switch. The remote's red light will be on. Push the throttle stick up until a "beep" is heard, completing frequency binding.
- Push the throttle stick up and down to unlock and start the motor, and the plane will be ready to take off.
5.4 Flight Modes (3D/6G)
The plane features two flight modes:

Image 5.4: Explanation of 3D and 6G flight modes.
- 6G Mode (Default): This mode provides stability and is suitable for beginners. The 6-axis gyroscope assists in maintaining level flight. In 6G mode, the plane can only fly level and cannot perform complex maneuvers like lifts, rolls, or loops.
- 3D Mode: This mode offers full control for advanced aerobatics. The operability is strong, allowing for various stunts.
How to Switch Modes: Each time you switch modes, first press the Conversion button on the remote, and then gently push the aileron stick to complete the switch.
5.5 Take-off Procedures
There are two methods for taking off:
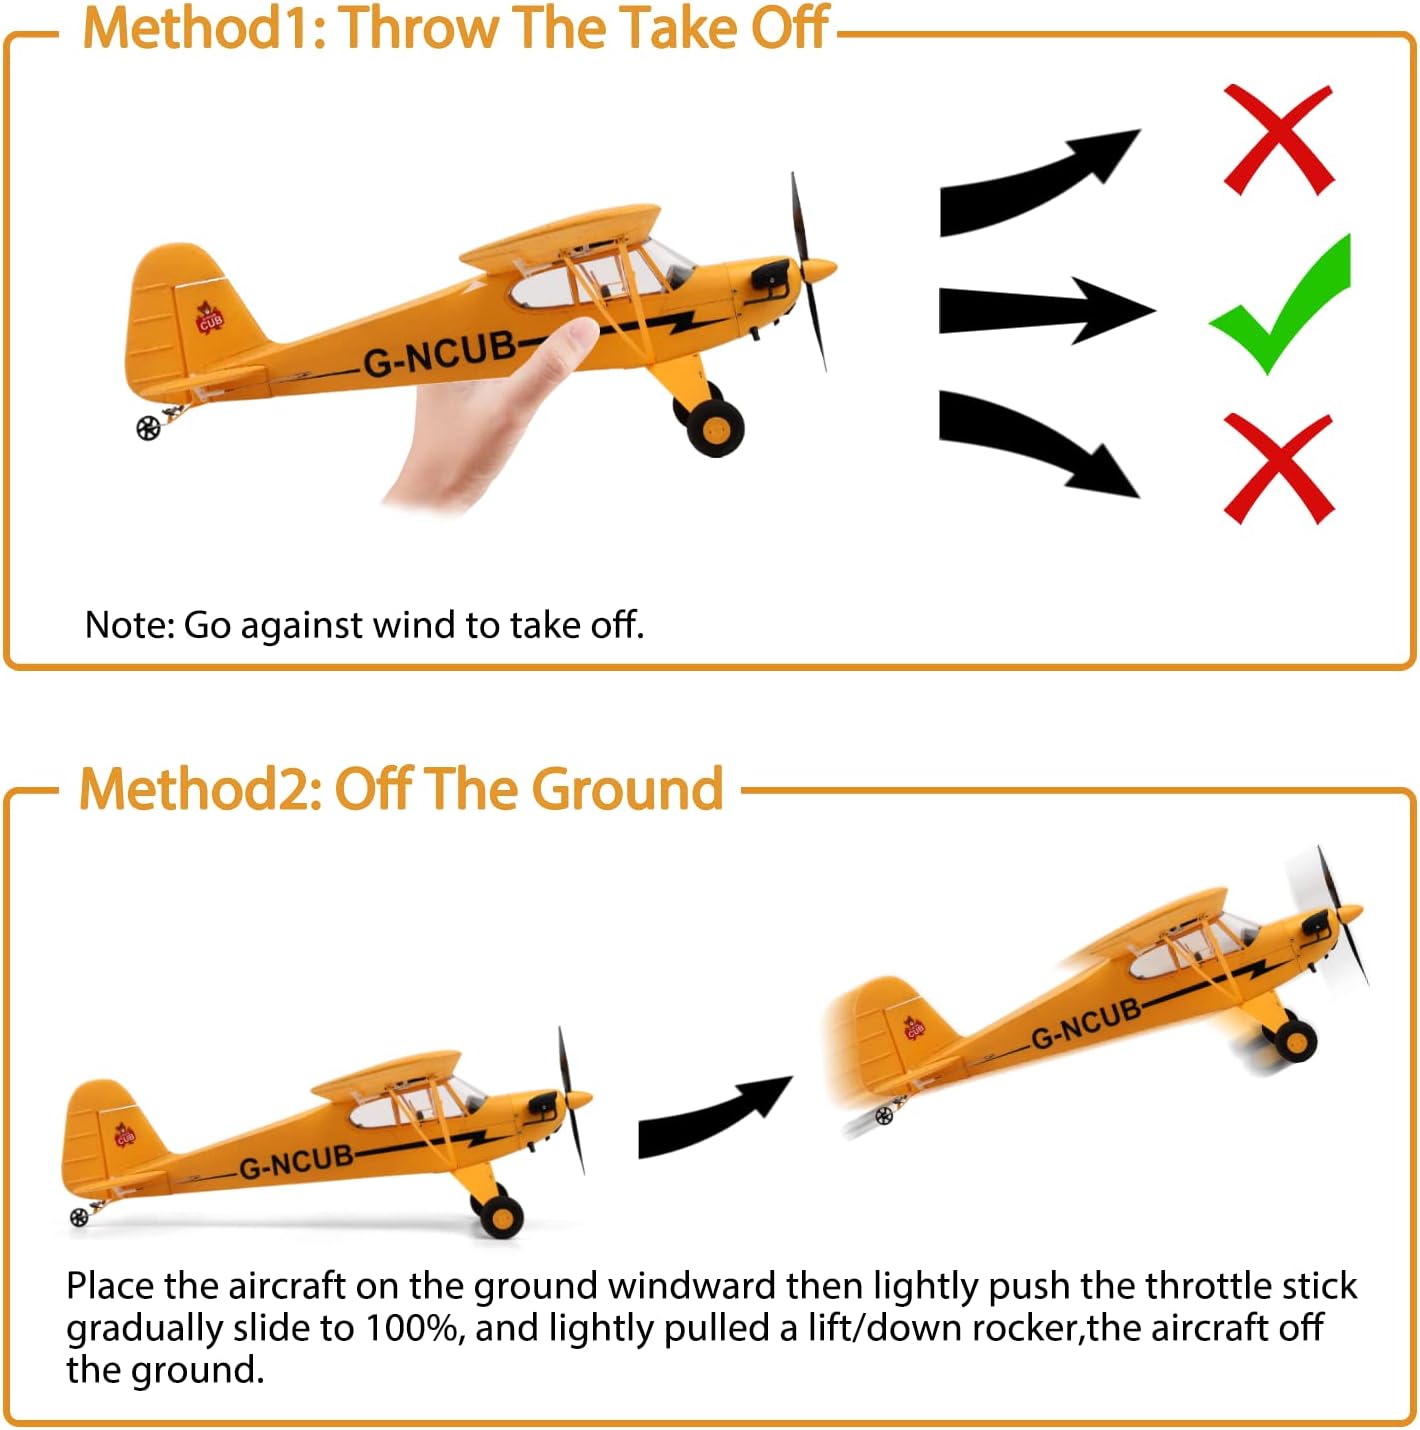
Image 5.5: Take-off methods for the RC plane.
- Method 1: Hand Throw Take-off: Hold the plane firmly and throw it gently forward against the wind while gradually increasing throttle.
- Method 2: Ground Take-off: Place the aircraft on the ground facing into the wind. Gradually push the throttle stick to 100% and lightly pull the elevator stick (lift/down rocker) to lift the aircraft off the ground.
5.6 Flight Controls
Use the remote control sticks to maneuver the plane:
- Throttle (Left Stick Up/Down): Controls motor speed and altitude.
- Rudder (Left Stick Left/Right): Controls yaw (nose left/right).
- Elevator (Right Stick Up/Down): Controls pitch (nose up/down).
- Ailerons (Right Stick Left/Right): Controls roll (wing tilt).
5.7 Landing
To land the plane, reduce throttle gradually and guide the plane into a gentle descent. Aim for a smooth, level approach. Once close to the ground, reduce throttle completely and allow the plane to glide to a stop. Avoid abrupt movements.
6. Maintenance
Regular maintenance ensures the longevity and performance of your RC plane:
- After each flight, inspect the plane for any damage to the fuselage, wings, propeller, and landing gear.
- Ensure all screws and connections are tight.
- Clean the plane with a soft, dry cloth. Avoid using harsh chemicals.
- Always disconnect the battery from the plane when storing it to prevent over-discharge and potential damage.
- Store the plane and batteries in a cool, dry place, away from direct sunlight and extreme temperatures.
7. Troubleshooting
Here are solutions to common issues you might encounter:
| Problem | Possible Cause | Solution |
|---|---|---|
| Plane does not respond to remote control. | Batteries low or not installed correctly; binding failed; remote out of range. | Check plane and remote batteries; re-perform frequency binding; ensure plane is within 200m range. |
| Plane struggles to take off or climb. | Insufficient throttle; strong headwind; damaged propeller; heavy battery. | Increase throttle gradually; wait for calmer conditions; replace propeller; ensure correct battery is used. |
| Plane flies erratically or drifts. | Control surfaces not trimmed; 6G mode engaged in windy conditions; damaged control surface. | Adjust trim settings on the remote; switch to 3D mode if experienced and conditions allow, or wait for calmer weather; inspect and repair control surfaces. |
| Motor does not start after binding. | Throttle stick not cycled after binding. | Push the throttle stick fully up and then fully down after successful binding to unlock the motor. |
8. Specifications
Key technical details of the CKYSCHN WLtoys A160 J3 RC Plane:

Image 8.1: Product dimensions and key specifications.
- Product Name: 5CH 3D6G System Airplane
- Product Size: Wingspan 650mm, Length 460mm (25.6 x 18.1 inches)
- Item Weight: 1.98 pounds (approximately 145g for the plane itself)
- Use Time: Approximately 8.5 minutes per battery
- Charging Time: 30-60 minutes
- Remote Control Mode: 2.4G
- Remote Control Distance: 200m (656ft)
- Driving Motor: 1406 Brushless Motor
- Batteries: 2 x 7.4V 600mAh Lithium Polymer (included)
- Manufacturer Recommended Age: 14 years and up
9. Warranty and Support
For any questions, technical assistance, or warranty inquiries regarding your CKYSCHN WLtoys A160 J3 RC Plane, please contact the seller or manufacturer directly through your purchase platform. Please refer to your purchase documentation for specific warranty terms and contact information.
Related Documents - A160
 |
Plane Maker App Manual - X-Plane Aircraft Design Software Comprehensive user manual for Plane Maker by Laminar Research, detailing how to design, model, and configure custom aircraft for the X-Plane flight simulator. Covers aircraft body, systems, appearance, and more. |
 |
Dynam DY8981 EMB-312 Tucano RC Airplane Installation Guide and Specifications Comprehensive installation guide and specifications for the Dynam DY8981 EMB-312 Tucano RC airplane, including parts list, assembly instructions, CG location, control surface adjustments, and safety warnings. |
 |
JUMPER JP4IN1 Multiprotocol Module Guide Comprehensive guide to the JUMPER JP4IN1 Multiprotocol Module, detailing its features, parameters, serial port and PPM mode operations, supported protocols, and firmware updates for RC enthusiasts. |
 |
E-flite 40-Amp Pro Switch-Mode BEC Brushless ESC (V2) Instruction Manual Comprehensive instruction manual for the E-flite 40-Amp Pro Switch-Mode BEC Brushless ESC (V2) (EFLA1040B), detailing features, specifications, programming menus, safety warnings, and troubleshooting. |
 |
SCI FI SKY QIDI-570 RC Airplane User Manual and Operation Guide Comprehensive user manual and operation guide for the SCI FI SKY QIDI-570 RC airplane, covering specifications, safety precautions, charging, assembly, flight modes, troubleshooting, and warnings. |
 |
X-Plane 9 for iPad and iPhone 4 Operation Manual Explore the skies with X-Plane 9 for iPad and iPhone 4, the ultimate mobile flight simulator. This comprehensive operation manual guides you through realistic flight controls, diverse aircraft, detailed regions, and advanced features. Experience the power of X-Plane, trusted by NASA and Boeing, on your mobile device. |
Ask a question about this manual
Ask about setup, troubleshooting, compatibility, parts, safety, or missing instructions. Manuals+ will review the question and use this page’s manual context to help answer it.