
Philips Walita EP1220/12
Philips Walita Series 1200 EP1220/12 Automatic Espresso Machine
User Manual
Introduction
Welcome to the user manual for your new Philips Walita Series 1200 EP1220/12 Automatic Espresso Machine. This manual provides essential information for the safe and efficient operation, maintenance, and troubleshooting of your appliance. Please read it thoroughly before first use and keep it for future reference.
Important Safety Information
Before using the appliance, carefully read this user manual and save it for future reference.
- Ensure the voltage indicated on the appliance corresponds to your local mains voltage before connecting.
- Do not immerse the appliance, main cord, or plug in water or any other liquid.
- Keep the appliance out of reach of children.
- Always unplug the appliance before cleaning and when not in use.
- Do not operate the appliance if the plug, the main cord, or the appliance itself is damaged.
- Only use original Philips Walita accessories and parts.
- This appliance is intended for household use only.
Product Overview
Familiarize yourself with the components of your Philips Walita Series 1200 espresso machine.
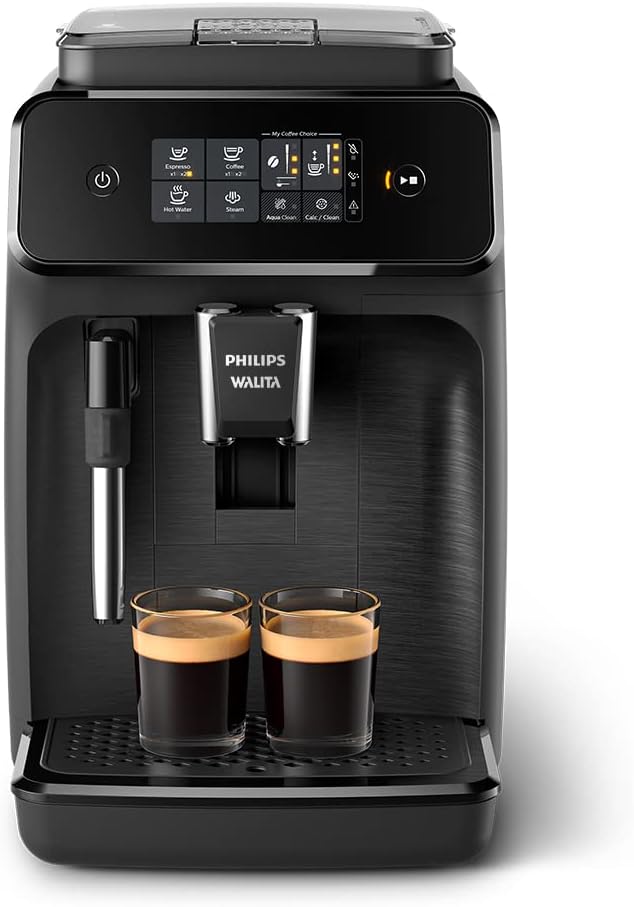
Figure 1: Front View. This image displays the front of the Philips Walita Series 1200 espresso machine, highlighting the control panel, coffee dispenser, and drip tray.

Figure 2: Side View. This image shows the side profile of the espresso machine, illustrating its compact design.

Figure 3: Back View. This image provides a view of the back of the machine, including the water tank.

Figure 4: Product Dimensions. This image illustrates the dimensions of the espresso machine, showing its height, width, and depth.
Main Components:
- Control Panel: Intuitive touch display for beverage selection and customization.
- Coffee Bean Hopper: Located at the top, for whole coffee beans.
- Pre-ground Coffee Compartment: For using pre-ground coffee.
- Water Tank: Removable tank for water supply.
- Coffee Dispenser: Adjustable spout for dispensing coffee.
- Classic Milk Frother (Steam Wand): For frothing milk.
- Drip Tray: Collects excess water and coffee drips.
- Coffee Grounds Container: Collects used coffee pucks.
- Brew Group: Internal component responsible for brewing coffee.
Setup and First Use
- Unpacking: Remove all packaging materials and place the machine on a stable, level surface.
- Rinsing: Before first use, rinse the water tank and brew group under running water.
- Water Hardness Test: Use the provided water hardness test strip to determine your water hardness level. Adjust the machine settings accordingly (refer to the full manual for detailed instructions).
- Fill Water Tank: Fill the water tank with fresh tap water up to the MAX indication.
- Fill Bean Hopper: Open the lid of the bean hopper and fill it with fresh coffee beans.
- Power On: Plug the appliance into a grounded wall socket and press the power button. The machine will perform an automatic rinsing cycle.

Figure 5: Filling the Bean Hopper. This image shows the process of adding whole coffee beans to the machine's bean hopper.
Operating Instructions
Making Coffee (Espresso or Coffee)
- Place one or two cups under the coffee dispenser.
- On the intuitive touch display, select your desired beverage (Espresso or Coffee).
- The machine will automatically grind the beans and brew your coffee.

Figure 6: Intuitive Touch Display. This image highlights the user-friendly touch display, allowing easy selection of beverages.

Figure 7: Coffee Dispensing. This image shows the machine actively dispensing freshly brewed espresso into two cups.
Customizing Your Coffee (My Coffee Choice)
The 'My Coffee Choice' feature allows you to adjust the aroma intensity and beverage quantity.
- Aroma Intensity: Select from 3 settings (mild, medium, strong) by tapping the aroma icon on the display.
- Beverage Quantity: Adjust the volume of your drink by tapping the cup icon on the display.

Figure 8: My Coffee Choice. This diagram illustrates how to adjust the aroma intensity and the volume of your coffee using the machine's display.
Adjusting Grind Settings
The machine features 12 grind settings for optimal flavor extraction.
- To adjust the grind setting, use the adjustment knob located inside the bean hopper.
- Turn the knob while the grinder is operating (e.g., during brewing) to prevent damage.
- A finer grind (smaller numbers) results in a stronger espresso, while a coarser grind (larger numbers) produces a lighter coffee.

Figure 9: Grind Granularity Adjustment. This image shows the dial for adjusting the coffee grind size, located within the bean hopper. The machine offers 12 levels of granularity.

Figure 10: 100% Ceramic Grinders. This image provides a close-up view of the durable ceramic grinders, designed for consistent performance.
Using Pre-ground Coffee
- Open the lid of the pre-ground coffee compartment.
- Add one scoop of pre-ground coffee. Do not add more than one scoop to avoid clogging.
- Select your desired beverage. The machine will automatically use the pre-ground coffee.

Figure 11: Adding Pre-ground Coffee. This image demonstrates how to add pre-ground coffee using the provided scoop into its designated compartment.
Using the Classic Milk Frother (Steam Wand)
The classic milk frother allows you to prepare creamy milk foam for cappuccinos and lattes.
- Fill a milk pitcher with cold milk.
- Submerge the steam wand into the milk.
- Select the 'Steam' function on the display.
- Move the pitcher up and down to create foam.
- Once desired foam is achieved, turn off the steam function.
- Clean the steam wand immediately after use.

Figure 12: Classic Milk Frother. This image shows the steam wand in action, frothing milk to create a creamy texture for milk-based coffee drinks.
Hot Water Function
The machine can also dispense hot water for tea or other hot beverages.
- Place a cup under the hot water spout (usually the steam wand).
- Select the 'Hot Water' function on the display.
- Press the start/stop button to begin and end dispensing.
Maintenance and Cleaning
Regular cleaning and maintenance ensure optimal performance and longevity of your espresso machine.
Daily Cleaning
- Drip Tray and Coffee Grounds Container: Empty and rinse daily. The machine will indicate when the grounds container needs emptying.
- Brew Group: Remove the brew group by pressing the 'PUSH' button and pulling it out. Rinse it thoroughly under running water. Allow it to air dry before reinserting.
- Steam Wand: Wipe the steam wand with a damp cloth immediately after each use to prevent milk residue from drying.

Figure 13: Removing the Brew Group. This image shows a hand carefully removing the brew group from the side of the machine for cleaning.
Descaling (Calc/Clean)
The machine will prompt you when descaling is required. Follow the on-screen instructions or refer to the full manual for the detailed descaling procedure using Philips Walita descaling solution.
AquaClean Filter
Using an AquaClean water filter reduces the need for descaling. Replace the filter when prompted by the machine.
Troubleshooting
If you encounter issues with your machine, consult the table below for common problems and solutions.
| Problem | Possible Cause | Solution |
|---|---|---|
| No coffee is dispensed. | Water tank empty, brew group clogged, coffee beans empty. | Fill water tank, clean brew group, fill bean hopper. |
| Coffee is too watery. | Grind setting too coarse, insufficient coffee quantity. | Adjust grind setting to finer, increase coffee aroma intensity. |
| Milk not frothing properly. | Steam wand clogged, milk not cold enough, incorrect milk type. | Clean steam wand, use cold fresh milk, try different milk types. |
| Machine displays a warning light. | Water tank empty, grounds container full, descaling needed. | Refer to the display icon for specific issue and follow instructions. |
For more detailed troubleshooting, please consult the complete user manual available on the Philips Walita support website.
Specifications
| Feature | Detail |
|---|---|
| Brand | Philips Walita |
| Model | EP1220/12 |
| Color | Black |
| Voltage | 220 Volts |
| Power Consumption | 1400W |
| Water Tank Capacity | 1.8 Liters |
| Grinder Type | 100% Ceramic |
| Grind Settings | 12 levels |
| Special Features | Milk Frother, Integrated Coffee Grinder, Touch Screen |
| Product Dimensions (L x W x H) | 37.1 x 24.6 x 43.3 cm |
| Weight | 7.5 kilograms |
Warranty and Support
Warranty Information
Your Philips Walita Series 1200 EP1220/12 Automatic Espresso Machine comes with a 2-year warranty against manufacturing defects, as per the terms and conditions specified by Philips Walita. Please retain your proof of purchase for warranty claims.
Customer Support
For further assistance, product registration, or to find authorized service centers, please visit the official Philips Walita website or contact their customer support.
Related documentsEP1220/12

Ask a question about this manual
Ask about setup, troubleshooting, compatibility, parts, safety, or missing instructions. Manuals+ will review the question and use this page’s manual context to help answer it.