1. Introduction
Thank you for choosing the TOLEBLID Electronic Flat Wall Safe. This manual provides essential information for the proper installation, operation, and maintenance of your new safe. Please read these instructions carefully before use and retain them for future reference. This safe is designed to secure valuables within a wall cavity, offering discreet storage.
2. Safety Information
- Always keep the emergency keys in a secure location outside the safe. If the keys are stored inside, you will be unable to open the safe if the batteries die or the code is forgotten.
- Ensure the safe is securely mounted to prevent unauthorized removal.
- Do not store flammable liquids or materials inside the safe.
- Keep the safe and its contents out of reach of children.
- Avoid exposing the safe to extreme temperatures or humidity.
3. Package Contents
Please check the package to ensure all items are present:
- TOLEBLID Electronic Flat Wall Safe Unit
- Emergency Keys (2)
- Mounting Hardware (Screws, Washers, Expansion Anchors)
- External Battery Box
- Instruction Manual
- Protective Mat
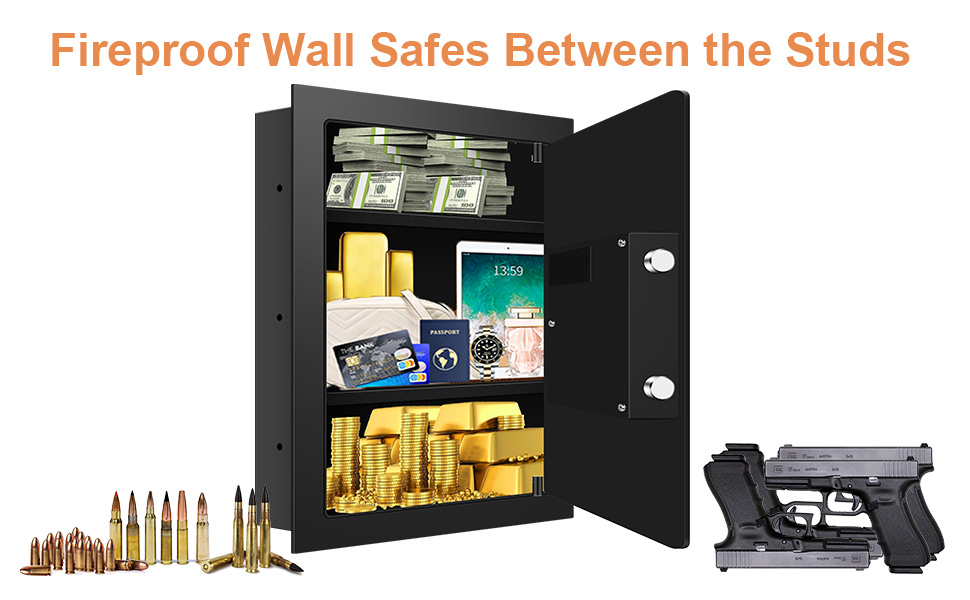
Figure 1: Product Dimensions and Included Accessories
4. Product Overview
The TOLEBLID Electronic Flat Wall Safe is designed for secure, concealed storage of your valuables. It features a robust alloy steel construction and multiple security mechanisms.
Key Features:
- Wall-Mounted Design: Specifically designed to fit between standard 16-inch on-center wall studs for discreet installation.
- Digital Keypad: Allows for programmable personal and master codes for quick access.
- Emergency Access: Includes emergency keys and an external battery box for access in case of forgotten codes or dead batteries.
- Secure Locking Mechanism: Equipped with 2 round live-locking bolts and pry-resistant concealed hinges.
- Interior Organization: Features a removable and adjustable shelf to accommodate various item sizes, along with a built-in LED light for visibility in low-light conditions.
- Anchoring Capability: Pre-drilled holes allow for secure bolting to the wall for enhanced security.

Figure 2: Interior Storage Capacity

Figure 3: Removable and Adjustable Shelf
5. Setup and Installation
The TOLEBLID wall safe is designed for installation between standard 16-inch on-center wall studs. A rough opening of approximately 15 inches wide by 21 inches high is typically required for proper recessing.
Installation Steps:
- Locate Studs: Use a stud finder to locate two adjacent wall studs that are 16 inches on center.
- Mark Opening: Carefully mark the desired location and size of the opening on the wall. Ensure the opening is level and plumb.
- Cut Opening: Using appropriate tools, cut the marked opening in the drywall or other wall material.
- Insert Safe: Carefully slide the safe into the wall opening. Ensure it fits snugly and is flush with the wall surface.
- Secure Safe: Use the provided mounting hardware (screws and expansion anchors) to secure the safe to the wall studs through the pre-drilled holes on the sides of the safe. Tighten all screws firmly.

Figure 4: Wall Mounted Installation Steps
6. Operating Instructions
Your TOLEBLID safe offers multiple ways to access its contents.
Initial Opening (First Use):
Upon receiving the safe, use one of the emergency keys to open the door for the first time. Insert the key into the keyhole, turn it, and then rotate the knob to open the safe door.
Installing Batteries:
Locate the battery compartment, typically on the inside of the safe door. Insert the required batteries (usually AA, not included) according to the polarity markings. Close the battery compartment.
Setting Your Personal Code:
With the safe door open:
- Press the red or green reset button located on the inside of the safe door (exact location may vary). The indicator light on the keypad should illuminate.
- Enter your desired personal code (typically 3-8 digits).
- Press the '#' or 'B' button to confirm. The indicator light should flash green, indicating successful code setting.
- Test the new code with the door open before closing it.
Opening the Safe with Your Code:
- Enter your personal code on the digital keypad.
- Press the '#' or 'B' button. The green indicator light will illuminate.
- Within 5 seconds, turn the knob clockwise to open the safe door.
Emergency Opening Methods:
There are two emergency methods to open the safe:
- Emergency Key: Insert the emergency key into the keyhole, turn it, and then rotate the knob to open. This method bypasses the electronic lock.
- External Battery Box: If the internal batteries are depleted, connect the external battery box (with fresh batteries) to the external power port on the keypad. Then, enter your personal code and turn the knob as usual.

Figure 5: Two Ways to Unlock
7. Maintenance
- Battery Replacement: Replace the batteries when the low battery indicator light illuminates or if the keypad becomes unresponsive. Always use new, high-quality batteries.
- Cleaning: Clean the exterior of the safe with a soft, damp cloth. Avoid abrasive cleaners or solvents that could damage the finish or keypad.
- Key Storage: Ensure emergency keys are stored in a safe, accessible location away from the safe itself.
8. Troubleshooting
- Safe will not open with code:
- Ensure batteries are not depleted. Use the external battery box or emergency key if necessary.
- Verify you are entering the correct code.
- Ensure the knob is turned within 5 seconds after entering the code.
- Keypad is unresponsive:
- Replace the batteries.
- If still unresponsive, use the emergency key to open the safe.
- Safe door does not close properly:
- Check for any obstructions preventing the door from closing fully.
- Ensure the locking bolts are retracted before attempting to close.
9. Specifications
| Feature | Specification |
|---|---|
| Brand | TOLEBLID |
| Model Number | Wall Safes |
| Product Dimensions (D x W x H) | 4"D x 13"W x 22"H |
| Lock Type | Electronic, Key |
| Material | Alloy Steel |
| Mounting Type | Wall Mount |
| Item Weight | 30.5 Pounds |
| Alarm | Anti-theft |
| Water Resistance Level | Not Water Resistant |
10. Warranty and Support
For warranty information or technical support, please refer to the contact details provided with your purchase documentation or visit the official TOLEBLID website. Please have your model number and purchase date available when contacting support.