Introduction
This manual provides essential information for the safe and effective use of the Generic 16ER AG60 Tungsten Carbide Threading Inserts. These inserts are designed for precision external threading operations on lathes, offering high strength and wear resistance for various materials.
Safety Information
Always prioritize safety when working with cutting tools. Adhere to the following guidelines:
- Always wear appropriate personal protective equipment (PPE), including safety glasses, gloves, and hearing protection, when handling and operating cutting tools.
- Ensure the threading insert is securely mounted in a compatible tool holder before operation.
- Handle inserts with care to prevent injury from sharp edges.
- Do not use damaged or excessively worn inserts, as this can lead to poor performance, workpiece damage, and potential hazards.
- Follow all safety guidelines provided by your lathe machine manufacturer and local safety regulations.
Product Overview
The 16ER AG60 threading inserts are precision-engineered cutting tools made from tungsten carbide, specifically designed for external threading applications. They feature an AG60 geometry, which is versatile for cutting a wide range of common thread profiles.
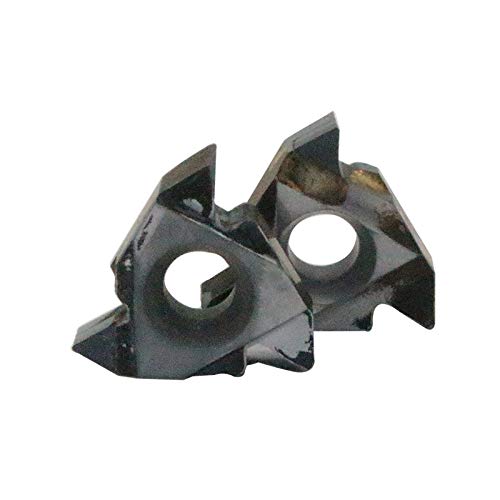
Image: A close-up view of the 16ER AG60 tungsten carbide threading insert, showing its triangular shape and central mounting hole. The cutting edges are visible, designed for external threading operations.
Setup and Installation
Proper installation is crucial for optimal performance and safety.
- Select the Correct Holder: Ensure you are using a compatible SER type threaded tool holder designed for 16ER series inserts.
- Clean the Holder Pocket: Before installation, thoroughly clean the insert pocket on the tool holder to remove any chips, debris, or coolant residue. A clean, flat seating surface is essential for proper insert stability and accuracy.
- Position the Insert: Carefully place the 16ER AG60 insert into the holder pocket, aligning the central hole with the holder's clamping screw hole.
- Secure the Insert: Insert the clamping screw through the insert's central hole and tighten it with the appropriate torque wrench. Tighten firmly to prevent movement during machining, but avoid overtightening, which can damage the insert or holder.
- Verify Stability: Gently check that the insert is firmly seated and does not wobble. Any movement can lead to poor thread quality or tool breakage.
Operating Instructions
These inserts are designed for external threading operations on a lathe. Follow these general steps:
- Workpiece Preparation: Securely mount the workpiece in the lathe chuck or collet. Ensure the workpiece material is suitable for carbide tooling and that the setup is rigid.
- Tool Offset Setting: Set the tool offset on your lathe to accurately position the threading insert relative to the workpiece's centerline and starting point.
- Threading Parameters: Refer to machining handbooks or manufacturer recommendations for appropriate cutting speeds, feed rates, and depth of cut for your specific material, thread profile, and machine capabilities. The AG60 geometry is versatile for various thread forms.
- Coolant Application: Apply appropriate cutting fluid or coolant during the threading process. Coolant reduces heat, lubricates the cut, and helps flush chips, which extends tool life and improves surface finish.
- Thread Engagement: Engage the threading operation carefully, ensuring proper alignment and gradual depth of cut to achieve the desired thread dimensions and prevent excessive tool load.
- Monitoring: Continuously monitor the cutting process for chip formation, vibration, and surface finish. Adjust parameters as needed to optimize performance and prevent issues.
Maintenance
Proper maintenance ensures longevity and consistent performance of your threading inserts.
- Cleaning: After each use, clean the inserts and tool holder to remove chips, swarf, and coolant residue. Use a brush and appropriate cleaning solution.
- Inspection: Regularly inspect inserts for signs of wear, chipping, or damage on the cutting edges. Replace worn inserts promptly to maintain machining quality and prevent tool failure or workpiece damage.
- Storage: Store unused and used inserts in their original packaging or a protective container to prevent damage and corrosion. Keep them in a dry, clean environment away from moisture and abrasive materials.
Troubleshooting
Refer to the table below for common issues and their potential solutions:
| Problem | Possible Cause | Solution |
|---|---|---|
| Poor Thread Quality / Rough Finish | Worn or chipped insert | Replace the insert with a new one. |
| Poor Thread Quality / Rough Finish | Incorrect cutting parameters (speed, feed, depth of cut) | Adjust cutting parameters according to material and thread specifications. |
| Poor Thread Quality / Rough Finish | Insufficient or incorrect coolant | Increase coolant flow or use a more effective cutting fluid. |
| Excessive Tool Wear | High cutting speed or feed rate | Reduce cutting speed or feed rate to recommended values. |
| Excessive Tool Wear | Lack of coolant or improper application | Ensure adequate and properly directed coolant supply. |
| Insert Breakage | Overtightening clamping screw | Tighten screw to recommended torque; avoid overtightening. |
| Insert Breakage | Excessive depth of cut or vibration | Reduce depth of cut; check machine rigidity and setup for stability. |
Specifications
- Model: 16ER AG60
- Material: Tungsten Carbide
- Hardness: 92
- Coating: No coating
- Usage: Thread Turning Tool (External Threading)
- Compatibility: Designed for SER type threaded holders.
Warranty and Support
For warranty information or technical support regarding Generic brand products, please refer to the retailer or manufacturer's official channels. Specific warranty details are not provided within this manual. Please retain your proof of purchase for any warranty claims.