StaticTek EFM® 51
Electrostatic Field Meter EFM® 51 with Charge Plate Set
Model: EFM® 51 | Brand: StaticTek
Introduction
The StaticTek EFM® 51 Electrostatic Field Meter with Charge Plate Set is a comprehensive, hand-held instrument designed for evaluating ESD ionizer efficiency, conducting static surveys, and assessing charge accumulation in electronic manufacturing and industrial environments. This device provides precise measurements of electrostatic fields and decay times, making it an essential tool for maintaining electrostatic discharge control.
Product Overview
The EFM® 51 system includes the main electrostatic field meter, a charge plate, and a high voltage generator, all housed in a protective carrying case. Below are visual representations and descriptions of the components.

Figure 1: The EFM® 51 Electrostatic Field Meter and Charge Plate Set, neatly organized within its protective carrying case. The kit includes the yellow handheld meter, a silver charge plate, and a high voltage generator.
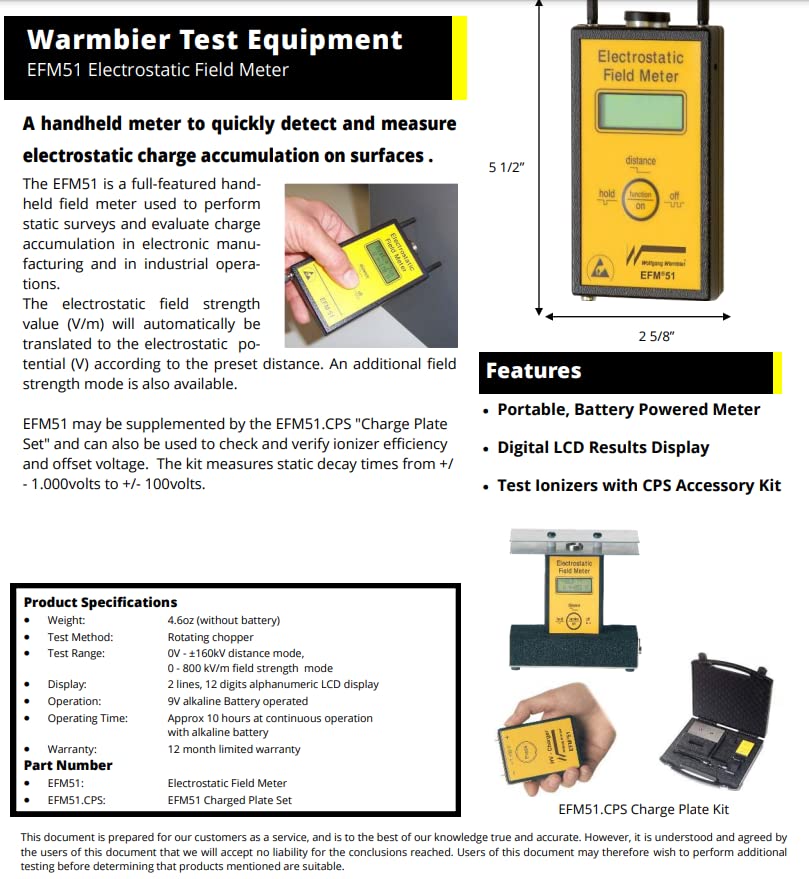
Figure 2: Detailed diagram illustrating the EFM® 51 meter's dimensions (approximately 5 1/2 inches tall, 2 5/8 inches wide), key features such as portability, battery power, and digital LCD display, and its capability to test ionizers with the CPS Accessory Kit. The image also provides a summary of product specifications including weight, test method, test range, display type, operation details, and warranty information.
Setup
- Unpacking: Carefully remove all components from the carrying case. Verify that the Electrostatic Field Meter (EFM® 51), Charge Plate, and High Voltage Generator are present.
- Battery Installation: The EFM® 51 operates on a 9V alkaline battery. Open the battery compartment on the back of the meter and insert a fresh 9V battery, observing correct polarity. Close the compartment securely.
- Charge Plate Connection: For decay time measurements and ionizer testing, connect the Charge Plate to the EFM® 51 meter. Ensure a secure connection.
- High Voltage Generator Preparation: The handheld high voltage generator is used to manually charge the plate. Ensure it is ready for use as per its specific instructions (if any separate manual is provided for it).
Operating Instructions
Basic Field Measurement (without Charge Plate)
- Power On: Slide the "on/off" switch to the "on" position. The LCD display will illuminate.
- Positioning: Hold the EFM® 51 at the desired distance from the object or surface to be measured. The meter will automatically translate the electrostatic field strength value (V/m) to electrostatic potential (V) according to the preset distance.
- Reading: Read the electrostatic potential directly from the digital LCD display.
- Hold Function: Press the "hold" button to freeze the current reading on the display. Press again to release.
Decay Time Measurement (with Charge Plate)
This function is crucial for evaluating ESD ionizer efficiency.
- Attach Charge Plate: Ensure the Charge Plate is securely connected to the EFM® 51.
- Charge the Plate: Use the handheld high voltage generator to manually charge the plate to either +1.000V or -1.000V.
- Initiate Decay Test: Position the charged plate within the ionizer's field. The EFM® 51's integrated start-stop timer will automatically begin measuring the decay time as the charge dissipates from +1.000V to +100V or from -1.000V to -100V.
- Record Result: The decay time will be displayed on the LCD once the measurement is complete.
Maintenance
- Cleaning: Use a soft, dry, lint-free cloth to clean the exterior of the EFM® 51 meter and the Charge Plate. Do not use abrasive cleaners or solvents.
- Battery Replacement: Replace the 9V alkaline battery when the low battery indicator appears on the display or when the meter's performance degrades. Always dispose of used batteries responsibly.
- Storage: When not in use, store the EFM® 51 and its accessories in the provided protective carrying case in a cool, dry environment, away from direct sunlight and extreme temperatures.
- Calibration: Regular calibration is recommended to ensure the accuracy of the EFM® 51. Refer to the manufacturer's guidelines or contact StaticTek support for calibration services.
Troubleshooting
| Problem | Possible Cause | Solution |
|---|---|---|
| Meter does not power on. | Dead or improperly installed battery. | Replace the 9V battery, ensuring correct polarity. |
| Inaccurate readings. | Contaminated sensor, low battery, or need for calibration. | Clean the sensor area. Replace battery. Consider professional calibration. |
| Decay time measurement fails to start. | Charge plate not sufficiently charged or improperly connected. | Ensure the charge plate is charged to the required voltage (+/- 1000V) and securely connected. |
| Display shows "OL" or "OVER". | Measurement range exceeded. | Move the meter further from the charged object or surface. |
Specifications
- Model: EFM® 51 Electrostatic Field Meter
- Part Number (Meter): EFM51
- Part Number (Charged Plate Set): EFM51.CPS
- Weight: 4.6 oz (without battery)
- Test Method: Rotating chopper
- Test Range: 0V - ±160KV (distance mode), 0 - 800 kV/m (field strength mode)
- Display: 2 lines, 12 digits alphanumeric LCD display
- Operation: 9V alkaline battery operated
- Operating Time: Approximately 10 hours at continuous operation with alkaline battery
- Manufacturer: Transforming Technologies
- ASIN: B09Z77JS38
- Date First Available: April 29, 2022
Warranty and Support
The StaticTek EFM® 51 Electrostatic Field Meter comes with a 12-month limited warranty from the date of purchase, covering defects in materials and workmanship under normal use. This warranty does not cover damage caused by misuse, accident, unauthorized modification, or improper operation.
For technical support, warranty claims, or service inquiries, please contact StaticTek customer service. Please have your product model number and purchase date available when contacting support.
StaticTek Customer Service:
- Website: Visit the StaticTek Store on Amazon
- Email: Refer to StaticTek's official website for contact email.
- Phone: Refer to StaticTek's official website for contact phone number.
Note: This document is prepared for our customers as a service, and is to the best of our knowledge true and accurate. However, it is understood and agreed by the users of this document that we will accept no liability for the conclusions reached. Users of this document may therefore wish to perform additional testing before determining that products mentioned are suitable.
Ask a question about this manual
Ask about setup, troubleshooting, compatibility, parts, safety, or missing instructions. Manuals+ will review the question and use this page’s manual context to help answer it.