1. Introduction
Thank you for choosing the EBERTH Professional Dehumidifier BT3-B50L. This device is designed for efficient moisture removal in various environments, including construction sites, basements, and other large spaces. Its robust construction, high performance, and user-friendly interface ensure reliable operation. Please read this manual thoroughly before operating the dehumidifier to ensure safe and optimal use.

Figure 1: EBERTH Professional Dehumidifier BT3-B50L, front-side view. This image shows the grey dehumidifier with its top handle and wheels, ready for use.
2. Safety Instructions
Always follow basic safety precautions when using electrical appliances to reduce the risk of fire, electric shock, and personal injury.
- Ensure the power supply matches the voltage specified on the rating label (230V AC).
- Do not operate the dehumidifier with a damaged power cord or plug.
- Keep the appliance away from heat sources, flammable materials, and water.
- Do not insert objects into the air inlet or outlet.
- Always unplug the unit before cleaning, maintenance, or when not in use.
- This appliance is not intended for use by persons with reduced physical, sensory, or mental capabilities unless supervised.
- Ensure the unit is placed on a stable, level surface to prevent tipping.
3. Product Overview
Key Features:
- High Dehumidification Capacity: Up to 50 liters per day.
- Wide Coverage: Suitable for rooms up to 90 m² or 230 m³.
- Adjustable Humidity: Relative humidity (RH) can be set in 1% increments from 20% to 90%.
- Intuitive Control Panel: Digital display with touch buttons for easy operation.
- Large Water Tank: 5.5-liter capacity with automatic shut-off when full.
- Continuous Drainage Option: Allows for extended, unsupervised operation with a connected hose.
- Washable Air Filter: Easily accessible and removable for simple cleaning.
- Robust and Portable Design: Stable chassis, two solid rubber wheels, and an ergonomic handle for easy transport.
- Rotary Piston Compressor: Enables transport and storage in any position.
- Automatic Defrosting: Ensures efficient operation even at low temperatures.
- 24-Hour Timer: For scheduled operation.
Components and Controls:

Figure 2: Internal components and key features. This image shows the dehumidifier with its side panel open, revealing the internal 5.5L water collection tank and the washable air filter. Insets highlight the robust handle, solid wheels, and the digital humidity display.

Figure 3: Control Panel. A detailed view of the dehumidifier's control panel, featuring a digital display for humidity and temperature, along with touch buttons for 'In-Dry' (Dry Mode), 'Auto' (Auto Mode), 'Add' (Increase), 'Minus' (Decrease), 'Set' (Settings), and 'Power'.
- Power Button: Turns the unit on or off.
- Set Button: Accesses settings and confirms selections.
- Add/Minus Buttons: Adjusts desired humidity levels or timer settings.
- Auto Mode: Automatically adjusts operation based on ambient humidity.
- In-Dry Mode (Dry Mode): For continuous maximum dehumidification.
- Digital Display: Shows current humidity, temperature, and selected settings.
4. Setup
- Unpacking: Carefully remove the dehumidifier from its packaging. Inspect for any shipping damage.
- Placement: Place the dehumidifier on a firm, level surface. Ensure there is at least 20 cm (8 inches) of clear space around the air inlet and outlet for proper airflow. Avoid placing it near walls or furniture that could obstruct ventilation.
- Power Connection: Plug the power cord into a grounded 230V AC electrical outlet.
- Water Tank / Drainage:
- Manual Drainage: Ensure the 5.5L water tank is correctly inserted. The unit will automatically stop when the tank is full.
- Continuous Drainage: For continuous operation, connect a drainage hose (12mm inner diameter) to the drainage outlet. Ensure the hose leads to a suitable drain and is sloped downwards to allow gravity drainage.

Figure 4: Moving the Dehumidifier. An individual effortlessly transporting the dehumidifier across a floor, highlighting its portability thanks to the robust handle and wheels.
5. Operating Instructions
- Power On: Press the 'Power' button on the control panel to turn on the dehumidifier. The digital display will illuminate.
- Setting Desired Humidity:
- Press the 'Set' button. The humidity percentage on the display will flash.
- Use the 'Add' (up arrow) and 'Minus' (down arrow) buttons to adjust the desired relative humidity (RH) between 20% and 90% in 1% increments.
- Press 'Set' again to confirm, or wait a few seconds for the setting to be automatically saved. The unit will now operate to maintain the set humidity level.
- Auto Mode: Press the 'Auto' button to activate automatic operation. In this mode, the dehumidifier will intelligently manage humidity levels.
- In-Dry Mode (Continuous Dehumidification): Press the 'In-Dry' button for continuous dehumidification, regardless of the ambient humidity level. This is ideal for rapid drying or very damp conditions.
- Timer Function: The 24-hour timer allows you to schedule when the unit turns on or off. Refer to the detailed instructions in the full manual for specific timer programming steps.
- Automatic Shut-off: The dehumidifier will automatically turn off when the water tank is full or when the set humidity level is reached.

Figure 5: Operating the Control Panel. A user's hand interacting with the intuitive touch control panel, demonstrating ease of operation.
6. Maintenance
Regular maintenance ensures the longevity and efficient operation of your EBERTH dehumidifier.
6.1. Cleaning the Air Filter
The removable air filter protects the internal components from dust and impurities. It should be cleaned regularly, especially in dusty environments.
- Power Off: Always unplug the dehumidifier before cleaning.
- Remove Filter: Open the side access panel and carefully pull out the air filter.
- Clean Filter: Wipe the filter with a soft cloth or wash it gently with lukewarm water and mild detergent. Rinse thoroughly.
- Dry and Reinstall: Allow the filter to air dry completely before reinstalling it. Ensure it is properly seated.

Figure 6: Air Filter. A close-up of the easily accessible and removable air filter, designed for simple cleaning to maintain optimal performance.

Figure 7: Removing the Air Filter. A user demonstrating the simple process of removing the air filter for routine cleaning.
6.2. Emptying the Water Tank
When the water tank is full, the dehumidifier will automatically stop operating and an indicator light may illuminate. Empty the tank as follows:
- Power Off: Turn off the unit and unplug it.
- Remove Tank: Carefully pull out the water collection tank from the side of the unit.
- Empty Water: Dispose of the collected water.
- Reinstall Tank: Slide the empty tank back into its position until it clicks securely.

Figure 8: Water Tank Removed. The 5.5-liter water collection tank, detached from the dehumidifier, ready for emptying or connecting to a continuous drainage hose.

Figure 9: Connecting Drainage Hose. A close-up of a user attaching a hose to the water tank for continuous drainage, allowing for extended, unsupervised operation.
6.3. Storage
If the dehumidifier will not be used for an extended period:
- Empty the water tank completely and clean it.
- Clean the air filter.
- Store the unit upright in a cool, dry place, protected from direct sunlight and extreme temperatures.
7. Troubleshooting
Before contacting customer support, please check the following common issues and solutions:
| Problem | Possible Cause | Solution |
|---|---|---|
| Dehumidifier does not turn on. | No power supply; power cord not plugged in; power outage. | Check power connection; ensure outlet is functional; check circuit breaker. |
| No water collected / Low dehumidification. | Air filter clogged; ambient humidity too low; temperature too low; unit too far from moisture source; door/windows open. | Clean air filter; ensure desired RH is set lower than ambient; check room temperature; close doors/windows. |
| Unit stops operating. | Water tank full; desired humidity level reached; automatic defrost cycle. | Empty water tank; unit will resume when humidity rises; wait for defrost cycle to complete. |
| Unusual noise. | Unit not on a level surface; foreign object inside. | Place on a level surface; inspect for and remove any foreign objects (unplug first). |
8. Specifications
| Specification | Value |
|---|---|
| Brand | EBERTH |
| Model Number | BT3-B50L |
| Dehumidification Capacity | 50 L/day |
| Power | 650 Watts |
| Voltage | 230 Volts (AC) |
| Water Tank Volume | 5.5 Liters |
| Product Dimensions (L x W x H) | 55 x 40 x 86 cm |
| Recommended Coverage Area | Up to 90 m² (230 m³) |
| Humidity Adjustment Range | 20% to 90% RH (in 1% increments) |
| Compressor Type | Rotary Piston |
| Included Components | User Manual |
| Color | Grey |
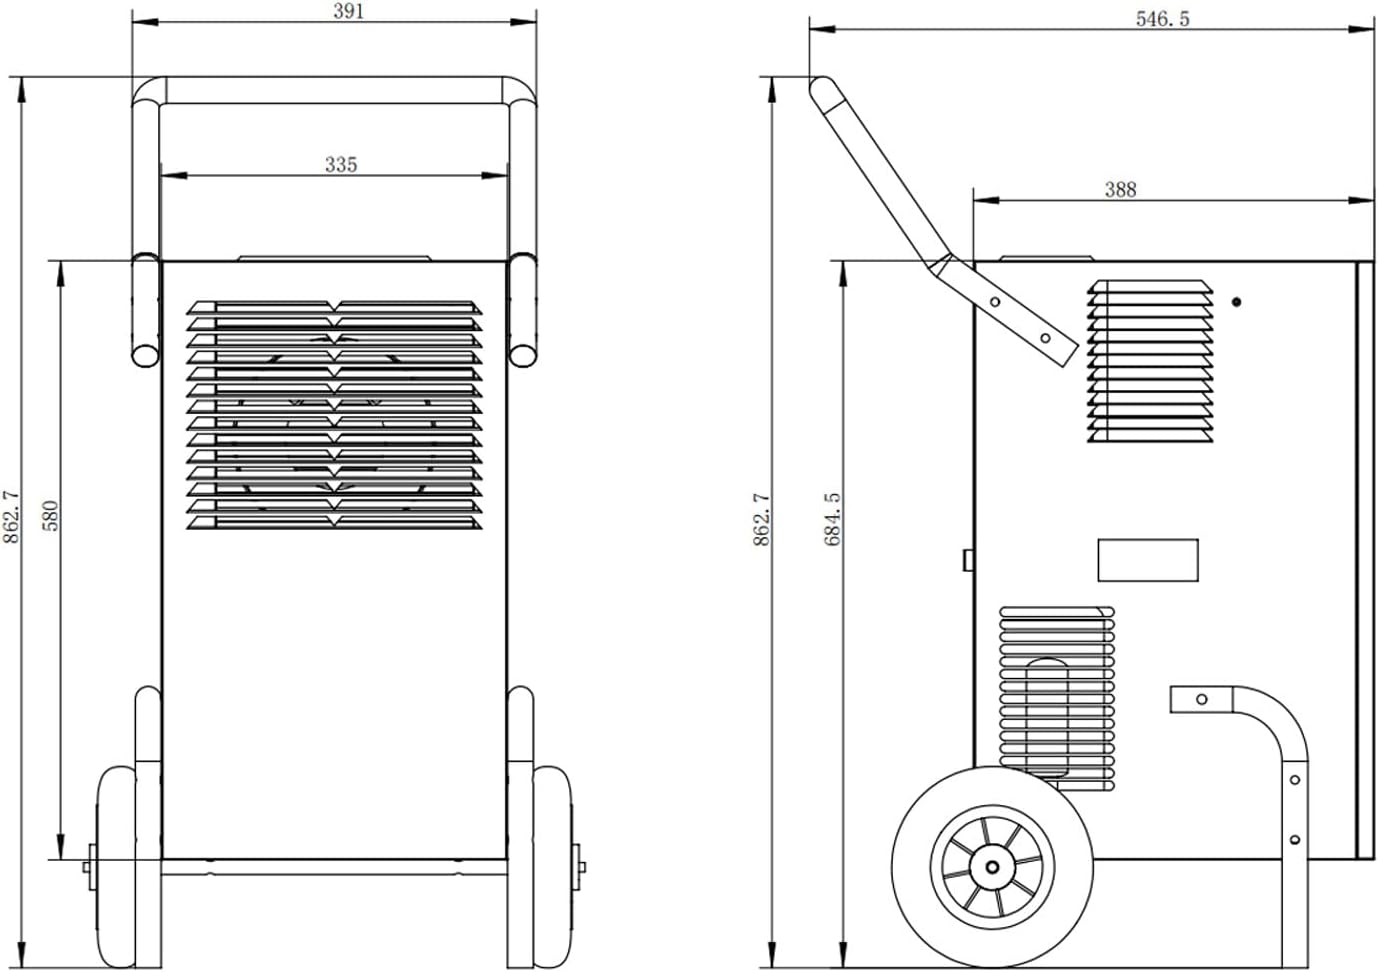
Figure 10: Product Dimensions. A technical diagram illustrating the precise measurements of the dehumidifier, useful for planning placement.
9. Warranty and Support
EBERTH products are designed for quality and reliability. For warranty information, technical support, or spare parts inquiries, please refer to the contact details provided with your purchase documentation or visit the official EBERTH website. Please retain your proof of purchase for warranty claims.