1. Introduction
The CenryKay CH340G USB to TTL Serial Adapter provides a reliable interface for converting USB signals to TTL serial signals. This adapter facilitates communication between a computer and various microcontrollers, GPS devices, routers, set-top boxes, and other serial-based hardware. It is commonly used for debugging, flashing firmware, and general serial data transfer applications.
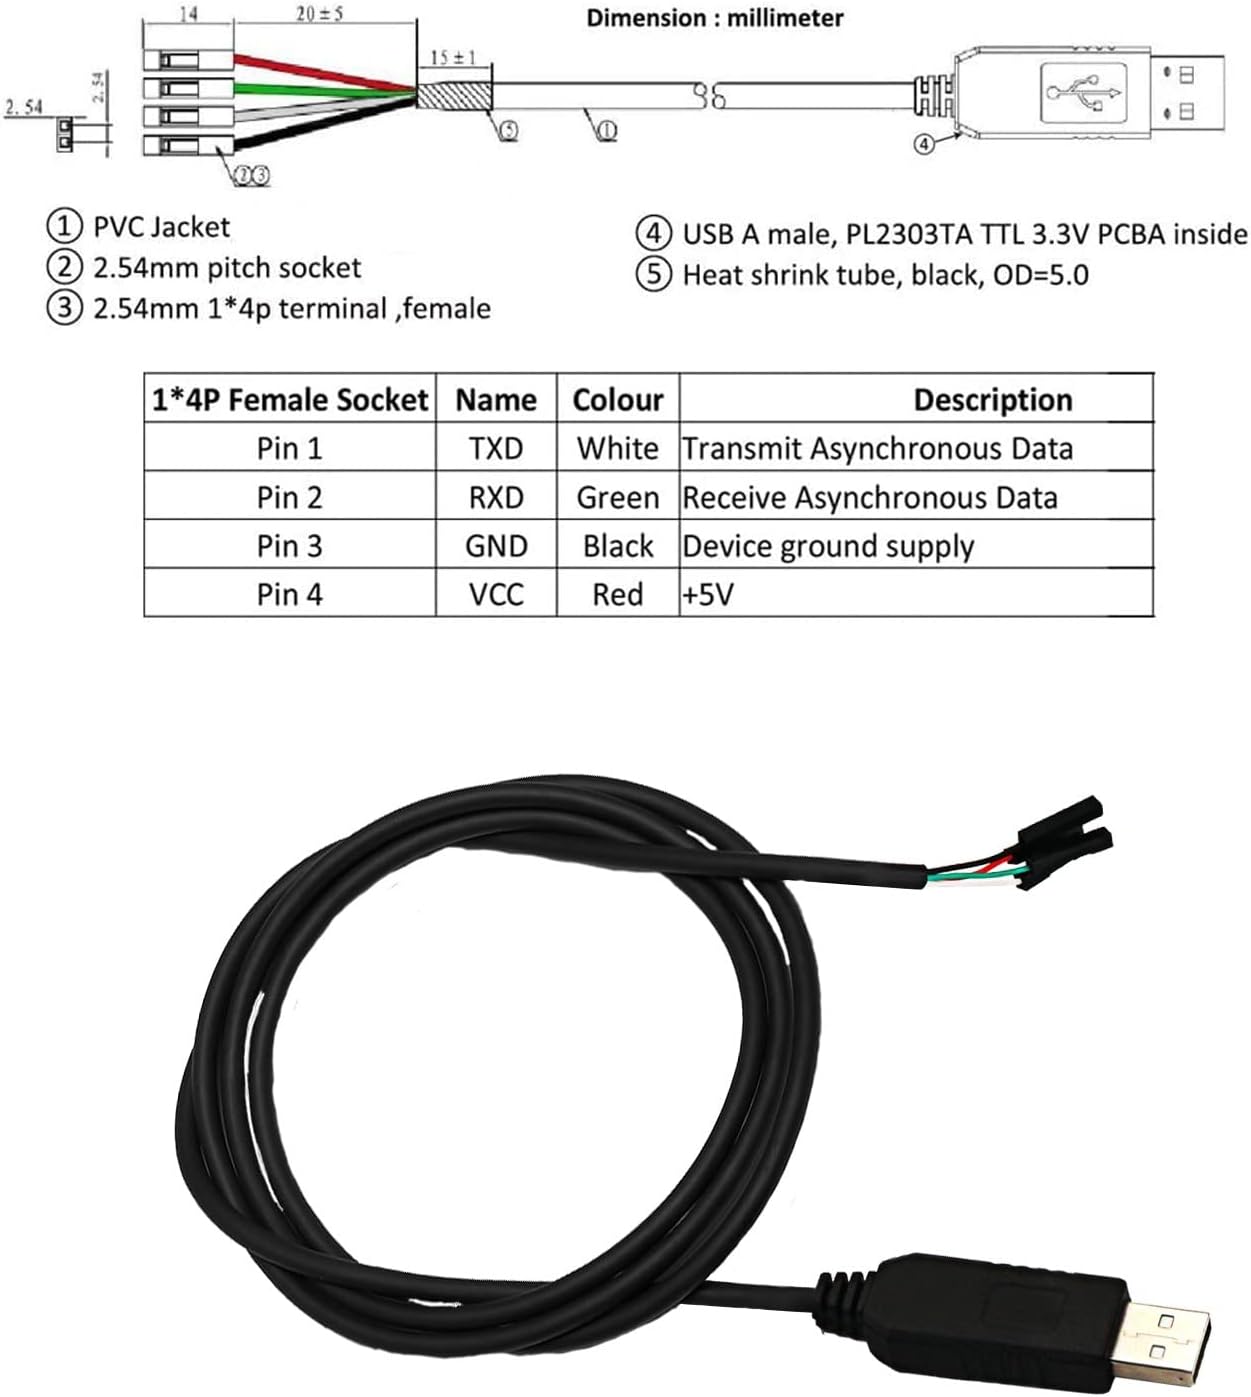
Image 1.1: Overview of the CenryKay USB to TTL Serial Adapter.
2. Safety Information
Please read and understand the following safety guidelines before using the adapter:
- Pin Definition: Always identify the correct pin definitions (TXD, RXD, GND, VCC) before making any connections. Incorrect wiring can cause damage to the adapter or the connected device.
- Voltage: Ensure that the GND pin is never connected to a pin with voltage. Connecting GND to a voltage source, or RX/TX to VCC, can lead to irreversible damage to the adapter chip. Some VCC pin voltages have been measured as high as 14V, which can burn the adapter chip if incorrectly connected.
- Power Supply: The VCC pin typically provides +5V. Verify the voltage requirements of your target device before connecting.
- Static Discharge: Handle the adapter with care to avoid electrostatic discharge, which can damage sensitive electronic components.

Image 2.1: Detailed pinout diagram and critical connection warnings. Note the mention of FTDI Chip FT232RL and TTL 3V3, indicating potential chip variations.
3. Package Contents
Your package should contain the following items:
- 4x USB to Serial TTL Level Converter Cable
4. Specifications
| Feature | Description |
|---|---|
| Model Number | CH340G |
| Connector Type | Serial Adapter (USB to TTL) |
| Compatible Devices | GPS, Routers, Microcontrollers, Set-top boxes, Transmitters |
| Output Voltage | VCC (+5V) |
| Cable Length | Approximately 6 feet (1.8 meters) |
| Pinout | GND (Black), VCC (+5V, Red), TXD (Transmit, White), RXD (Receive, Green) |
| Dimensions (USB connector) | Approximately 10.1 cm total length, 18mm width, 12mm height (USB-A plug) |
| Item Weight | 5.9 ounces (for the 4-pack) |

Image 4.1: Approximate dimensions of the USB to TTL Serial Adapter.
5. Setup
5.1 Driver Installation
This adapter requires a driver to function correctly on your computer. The specific driver needed depends on the chip used in your adapter. While the product is listed as CH340G, some units may contain PL2303TA or FT232RL chips. If you encounter issues, you may need to identify the chip on your board and install the corresponding driver.
- Download Driver: For PL2303TA chips, drivers can often be found at prolificusa.com. For CH340G chips, drivers are widely available from various online sources by searching for "CH340G driver". For FT232RL chips, search for "FTDI FT232RL driver".
- Install Driver: Follow the instructions provided with the downloaded driver package to install it on your operating system (Windows XP/Vista/7/8/10/11, macOS, Linux).
- Restart Computer: After installation, it is recommended to restart your computer.
- Connect Adapter: Insert the USB end of the adapter into an available USB port on your computer. The system should automatically recognize the device and complete the driver setup.

Image 5.1: Information regarding driver support, specifically referencing the Prolific PL2303TA chip.
5.2 Physical Connection
The adapter features four flying leads for connection to your target device. Refer to the pin definitions below and the provided diagrams for correct wiring:
- Red Wire: VCC (+5V output)
- Black Wire: GND (Device ground supply)
- Green Wire: TXD (Transmit Asynchronous Data output from adapter)
- White Wire: RXD (Receive Asynchronous Data input to adapter)
Important: When connecting to a target device, ensure that the adapter's TXD connects to the device's RXD, and the adapter's RXD connects to the device's TXD. The GND pins must also be connected. Do not connect the VCC pin unless your device requires 5V power from the adapter and can safely accept it.

Image 5.2: Simplified wiring definition for the adapter's flying leads.
6. Operating Instructions
Once the drivers are installed and the adapter is physically connected to your target device, you can begin serial communication:
- Identify COM Port: Open your computer's Device Manager (Windows) or check `/dev/ttyUSBx` (Linux) to identify the assigned COM port number for the USB-to-Serial adapter.
- Open Serial Terminal Software: Use a serial terminal program (e.g., PuTTY, Tera Term, Arduino IDE Serial Monitor, minicom) on your computer.
- Configure Settings: Configure the serial terminal software with the correct communication parameters for your target device. This typically includes:
- Baud Rate: Common rates include 9600, 19200, 38400, 57600, 115200.
- Data Bits: Usually 8.
- Parity: None.
- Stop Bits: Usually 1.
- Flow Control: None.
- Establish Communication: Once configured, open the serial connection in your terminal software. You should now be able to send and receive data to/from your connected device.
7. Troubleshooting
- Adapter Not Recognized: If the adapter is not recognized by your computer, ensure the correct driver for the specific chip (CH340G, PL2303TA, or FT232RL) is installed. Try reinstalling the driver and restarting your computer.
- No Data Transmission/Reception:
- Verify that TXD and RXD lines are correctly cross-connected (adapter TXD to device RXD, adapter RXD to device TXD).
- Ensure the GND lines are connected.
- Check that the baud rate, data bits, parity, and stop bits are correctly set in your serial terminal software to match the target device.
- Confirm the target device is powered on and functioning correctly.
- Garbled Data: This often indicates an incorrect baud rate setting. Double-check the baud rate configuration on both the adapter side (via software) and the target device.
- Device Manager Errors: If you see an exclamation mark next to the adapter in Device Manager, it typically indicates a driver issue. Reinstall the driver or try a different version.
8. Warranty and Support
For warranty information and technical support, please refer to the retailer or manufacturer's official website. Keep your purchase receipt as proof of purchase.